How to Perform CRUD Operations with Entity Framework and ASP.NET Core
| Quick Start Guide | |
|---|---|
| What You Will Need |
Visual Studio 2022 ASP.NET Core ComponentOne ASP.NET MVC Edition |
| Controls Referenced | |
| Tutorial Concept | This tutorial demonstrates how to do basic database operations like create, read, update and delete data in an ASP.NET Core application. It uses FlexGrid for ASP.NET Core, SQL Server database and Entity Framework Core. |
Fetching and updating data are fundamental activities in the field of web development. Whether we are building a small or complex application, we will need to create, read, update, and delete (CRUD) data. ASP.NET Core, when combined with Entity Framework Core, provides a robust platform for completing these tasks quickly.
In this blog, we go through the process of implementing the CRUD operations by integrating ComponentOne FlexGrid for ASP.NET Core with an SQL Server database using Entity Framework Core's DbContext. We'll review the following segments of this process:
- Setting Up the Environment
- Creating the DbContext
- Setting up the FlexGrid
- CRUD Methods Definition in Controller
- Add the FlexGrid with CRUD Actions
Ready to Get Started? Download ComponentOne Today!
Setting Up the Environment
Firstly, we need to create the ASP.Net Core Web Application. Follow the steps mentioned below to create a fresh application.
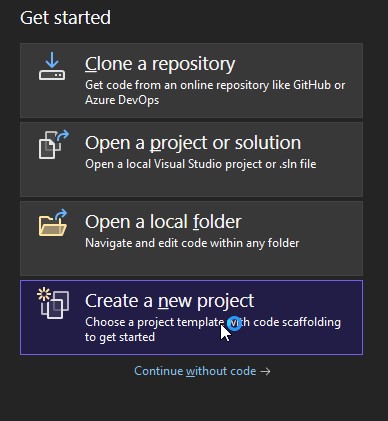
1. Open Visual Studio 2022
2. Click on the “Create a new project” option
3. Select the template “ASP.NET Core Web App (Model-View-Controller)” as shown in the screenshot. Then, click on "Next."

4. Provide the project name and location folder and click "Next."
5. In this step, we need to select the Framework version. For this application, set it as .NET 8.0.
Along with the Framework version, select the following settings as shown in the screenshot below:
a. Authentication type: The Authentication type can be selected based on individual requirements. We are not using Authentication for now, so this will be set to "None."
b. Configure for HTTPS: This setting is for executing the project locally with HTTPS protocol or not, which is selected by default.
c. Enable Docker: This allows us to add the required Docker file to the project if you would like to host the project using Docker.

6. Click on "Create," and the base project will be ready for development.
In the project, we will use the ComponentOne FlexGrid to perform the operations on DB and Entity Framework to Fetch/Update the DB on FlexGrid operations. Hence, we need to install the following NuGet Packages:
- Microsoft.EntityFrameworkCore
- Microsoft.EntityFrameworkCore.SqlServer
- Microsoft.EntityFrameworkCore.Tools
- C1.AspNetCore.Mvc
Creating the DbContext
Entity Framework provides the following two approaches:
- DB First Approach
- Code First Approach
DB First Approach
This approach can be employed with an existing database. Here, we harness the power of Entity Framework to generate models from the existing tables in the database. This process can also be accomplished using migrations with the aid of the Package Manager Console/.NET CLI.
Code First Approach
This approach can be used when creating a new application without an existing database. In this approach, we first create the model and DbContext. Then, we utilize Microsoft.EntityFrameworkCore.Tools to generate the database in SQL Server/SQL Lite using the Migrations commands with the assistance of the Package Manager Console/.NET CLI.
As we are creating a new application for viewing and updating the Tasks information, we will use the Code First Approach. If you have an existing DB and would like to use the DB First approach, please refer to Microsoft Documentation “Reverse Engineering-EF Core.”
Create the Model
Next, define the context class and entity classes that comprise the model. For this, right-click on the 'Models' folder, add a new class named Model.cs, and add the following code:
using Microsoft.EntityFrameworkCore;
using System;
using System.Collections.Generic;
using System.ComponentModel.DataAnnotations;
namespace TaskManager.Models
{
    public class TasksContext : DbContext
    {
        public DbSet<Task> Tasks { get; set; }
        public TasksContext(DbContextOptions<TasksContext> options) : base(options)
        {

        }
    }
    public class Task
    {
        [Required]
        public int TaskID { get; set; }
        public string TaskName { get; set; } = string.Empty;
        public DateTime StartDate { get; set; }
        public DateTime EndDate { get; set; }
        public double TaskProgress { get; set; }

    }

}
Define the Connection String
After defining the Model and Context classes, we need to define the connection string for the targeted Database in the appsettings.json.
The connection string should be defined as follows, where TasksDb is the Database name to be created in the SQL Server:
{
  "ConnectionStrings": {
    "DefaultConnection": "Server=(localdb)\\mssqllocaldb;Database=TasksDb;Trusted_Connection=true;TrustServerCertificate=true"
  },
  ...
}
Add Context for the Application
After creating the model and defining the connection string, we need to add the DbContext to the application so that it is available throughout the application. This is achieved by adding the following code to the Program.cs file:
builder.Services.AddDbContext<TasksContext>(options =>
{
    options.UseSqlServer(builder.Configuration.GetConnectionString("DefaultConnection"));
});
Now, we are ready to execute the migration using the Package Manager Console with the help of the Entity Framework Core to create the tables and database in the SQL server.
This only requires the following two commands:
- Add-Migration InitialCreate
- Update-Database
Execute both commands one by one and wait for the completion of this without any issues.
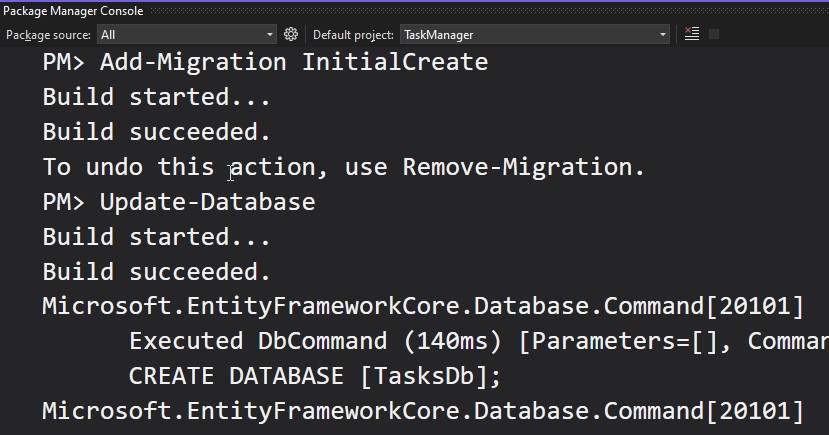
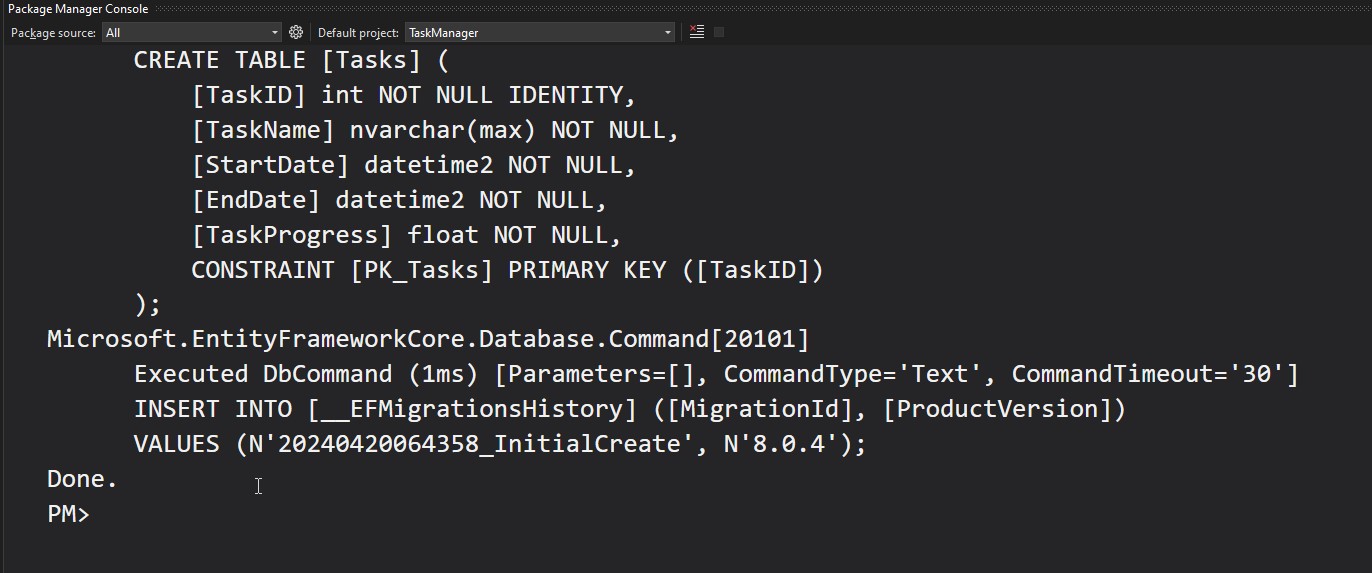
Once the migration is completed, the database will be created on the server. You can verify it by connecting to the server and exploring the databases.
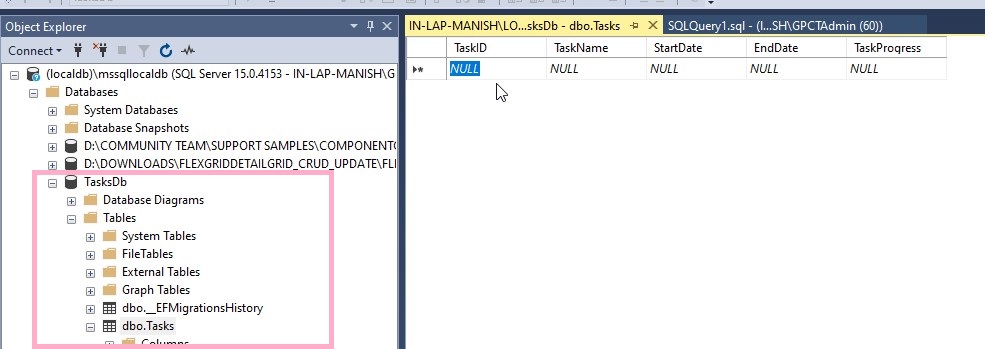
Initially, the tables will be empty. Add a single record by choosing "Edit Top 200 rows" after right-clicking on the table to view the data while fetching it.

Now, the DbContext is ready to use in the application. Next, we are going to configure the FlexGrid UI.
Setting up the FlexGrid
The NuGet package for ComponentOne FlexGrid for ASP.NET Core is already installed in the application, so next, we will set it up using the following steps:
Add the Tag Helper
To work with FlexGrid, add the required tag helper in the _ViewImports.cshtml file:
@addTagHelper *, C1.AspNetCore.Mvc Register Resources
Next, register the required scripts and styles to be added to the head section of the _Layout.cshtml file. This can be done using the following code snippet:
  <c1-styles />
 <c1-scripts>
     <c1-basic-scripts />
 </c1-scripts>
 <c1-deferred-scripts />
Read more about deferred scripts in the documentation.
Add Map Routing
For ASP.NET Core applications (version 3.0 and above), the following code should be added to the Configure method of Startup.cs or in the Program.cs file:
app.MapControllers();Now, we are ready to integrate the FlexGrid into the application. Proceed by writing the methods necessary to perform CRUD operations.
CRUD Methods Definition in Controller
When performing actions on the client-side, the FlexGrid sends an AJAX request to the server, and the data can be updated using these methods with the help of the DbContext. To perform CRUD operations in the database, the context should be defined within the Controller. This can be achieved with the following code:
private readonly ILogger<HomeController> _logger;

private readonly TasksContext _db;
public HomeController(ILogger<HomeController> logger, TasksContext context)
{
    _logger = logger;
    _db = context;
}
We also define the method to retrieve the actual exception message if it occurs due to the SQL Server.
 /// <summary>
 /// In order to get the real exception message.
 /// </summary>
 private static SqlException GetSqlException(Exception e)
 {
     while (e != null && !(e is SqlException))
     {
         e = e.InnerException;
     }
     return e as SqlException;
 }

 // Get the real exception message
 internal static string GetExceptionMessage(Exception e)
 {
     var msg = e.Message;
     var sqlException = GetSqlException(e);
     if (sqlException != null)
     {
         msg = sqlException.Message;
     }
     return msg;
 }
Read Data
After defining the context in the Controller, we are ready to use it. First, we need to write the method to fetch the data from the database to view in the FlexGrid. To achieve that, copy and paste the following code:
 public ActionResult ReadGridData([C1JsonRequest] CollectionViewRequest<Task> requestData)
 {
     return this.C1Json(CollectionViewHelper.Read(requestData, _db.Tasks.ToList()));
 }
Create or Add Data
After the 'reading data' method, write a method to update the record in the database, which will then be reflected in the FlexGrid on the client-side.
public ActionResult GridCreateTask([C1JsonRequest] CollectionViewEditRequest<Task> requestData)
{
    return this.C1Json(CollectionViewHelper.Edit<Task>(requestData, item =>
    {
        string error = string.Empty;
        bool success = true;
        try
        {
            _db.Entry(item as object).State = EntityState.Added;
            _db.SaveChanges();
        }
        catch (Exception e)
        {
            error = GetExceptionMessage(e);
            success = false;
        }
        return new CollectionViewItemResult<Task>
        {
            Error = error,
            Success = success,
            Data = item
        };
    }, () => _db.Tasks.ToList()));
}
Update Data
Now, write the method that would update the existing records in the database as soon as the row edit ends in the FlexGrid.
public ActionResult GridUpdateTask([C1JsonRequest] CollectionViewEditRequest<Task> requestData)
{
    return this.C1Json(CollectionViewHelper.Edit<Task>(requestData, item =>
    {
        string error = string.Empty;
        bool success = true;
        try
        {
            _db.Entry(item as object).State = EntityState.Modified;
            _db.SaveChanges();
        }
        catch (Exception e)
        {
            error = GetExceptionMessage(e);
            success = false;
        }
        return new CollectionViewItemResult<Task>
        {
            Error = error,
            Success = success,
            Data = item
        };
    }, () => _db.Tasks.ToList()));
}
Delete Data
Now, we will write the method to delete the targeted record from the database when the Delete key is pressed after selecting the row by clicking the RowHeader.
public ActionResult GridDeleteTask([C1JsonRequest] CollectionViewEditRequest<Task> requestData)
{
    return this.C1Json(CollectionViewHelper.Edit(requestData, item =>
    {
        string error = string.Empty;
        bool success = true;
        try
        {
            {
                _db.Entry(item as object).State = EntityState.Deleted;
                _db.SaveChanges();
            }
        }
        catch (Exception e)
        {
            error = GetExceptionMessage(e);
            success = false;
        }
        return new CollectionViewItemResult<Task>
        {
            Error = error,
            Success = success,
            Data = item
        };
    }, () => _db.Tasks.ToList()));
}
Add the FlexGrid with CRUD Actions
Our methods for performing CRUD operations are ready, and they can be utilized by the FlexGrid. Now, integrate the FlexGrid with an item source that would invoke the previously written methods.
After adding the following code in the Index.cshtml file, our application is ready to execute and perform CRUD operations with FlexGrid.
<c1-flex-grid allow-add-new="true" allow-delete="true" height="800" width="100%">
    <c1-items-source read-action-url="@Url.Action("ReadGridData")"
                     create-action-url="@Url.Action("GridCreateTask")"
                     update-action-url="@Url.Action("GridUpdateTask")"
                     delete-action-url="@Url.Action("GridDeleteTask")">
     </c1-items-source>
</c1-flex-grid>
Conclusion
Throughout this blog, we have explored the integration of ComponentOne FlexGrid for ASP.NET Core with an SQL Server database using Entity Framework Core's DbContext. From setting up the environment and configuring the DbContext to defining the model and establishing database connections, we have covered the foundational steps required for CRUD operations.
The Code First approach enabled us to create our application's domain model in code, facilitating a streamlined development process. By leveraging Entity Framework Core's migration feature, we effortlessly generated the corresponding database schema.
Additionally, we delved into setting up the FlexGrid control, a powerful tool for displaying and manipulating data within our ASP.NET Core application. Through detailed explanations and code snippets, we learned how to implement CRUD methods within our Controller, enabling seamless data manipulation from the client-side.
Ready to try it out? Download ComponentOne Today!
Related Blogs
Try Our .NET UI Components & Datagrid
Getting Started With ComponentOne

Manish Gupta