In This Topic
You can set the display to allow rows or columns to be grouped as an outline according to the headers. This creates a separate area beyond the headers that contains outlines for expanding or collapsing levels of rows or columns. Use the Group method to create the range group.
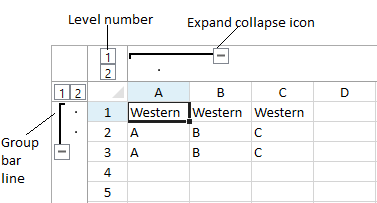
The column group area is above the column headers and the row group area is to the left of the row headers.
The level button and number show the number of levels. The level button or the icon can be used to expand or collapse the group.
You can customize the appearance with the RangeGroupBackground, RangeGroupBorderBrush, and RangeGroupLineStroke properties.
The grouped columns or rows can be hidden or resized.
Using Code
The following example creates a range group.
| CS |
Copy Code
|
|
gcSpreadSheet1.Sheets[0].ColumnCount = 7;
gcSpreadSheet1.Sheets[0].RowCount = 34;
gcSpreadSheet1.Sheets[0].Cells[0, 0].Text = "Western";
gcSpreadSheet1.Sheets[0].Cells[0, 1].Text = "Western";
gcSpreadSheet1.Sheets[0].Cells[0, 2].Text = "Western";
gcSpreadSheet1.Sheets[0].Cells[1, 0].Text = "A";
gcSpreadSheet1.Sheets[0].Cells[1, 1].Text = "B";
gcSpreadSheet1.Sheets[0].Cells[1, 2].Text = "C";
gcSpreadSheet1.Sheets[0].Cells[2, 0].Text = "A";
gcSpreadSheet1.Sheets[0].Cells[2, 1].Text = "B";
gcSpreadSheet1.Sheets[0].Cells[2, 2].Text = "C";
gcSpreadSheet1.Sheets[0].RowRangeGroup.Group(0, 2);
//The following code removes the row range group
//gcSpreadSheet1.Sheets[0].RowRangeGroup.Ungroup(0, 2);
gcSpreadSheet1.Sheets[0].ColumnRangeGroup.Group(0, 1);
//The following code removes the column range group
//gcSpreadSheet1.Sheets[0].ColumnRangeGroup.Ungroup(0, 1);
gcSpreadSheet1.Invalidate();
private void button1_Click(object sender, RoutedEventArgs e)
{
gcSpreadSheet1.Sheets[0].RowRangeGroup.Expand(0, false);
gcSpreadSheet1.Sheets[0].ColumnRangeGroup.Expand(0, false);
gcSpreadSheet1.Invalidate();
}
|
| VB.NET |
Copy Code
|
|
GcSpreadSheet1.Sheets(0).ColumnCount = 7
GcSpreadSheet1.Sheets(0).RowCount = 34
GcSpreadSheet1.Sheets(0).Cells(0, 0).Text = "Western"
GcSpreadSheet1.Sheets(0).Cells(0, 1).Text = "Western"
GcSpreadSheet1.Sheets(0).Cells(0, 2).Text = "Western"
GcSpreadSheet1.Sheets(0).Cells(1, 0).Text = "A"
GcSpreadSheet1.Sheets(0).Cells(1, 1).Text = "B"
GcSpreadSheet1.Sheets(0).Cells(1, 2).Text = "C"
GcSpreadSheet1.Sheets(0).Cells(2, 0).Text = "A"
GcSpreadSheet1.Sheets(0).Cells(2, 1).Text = "B"
GcSpreadSheet1.Sheets(0).Cells(2, 2).Text = "C"
GcSpreadSheet1.Sheets(0).RowRangeGroup.Group(0, 2)
'The following code removes the row range group
'GcSpreadSheet1.Sheets(0).RowRangeGroup.Ungroup(0, 2)
GcSpreadSheet1.Sheets(0).ColumnRangeGroup.Group(0, 1)
'The following code removes the column range group
'GcSpreadSheet1.Sheets(0).ColumnRangeGroup.Ungroup(0, 1)
GcSpreadSheet1.Invalidate()
Private Sub Button1_Click(sender As System.Object, e As System.Windows.RoutedEventArgs) Handles Button1.Click
GcSpreadSheet1.Sheets(0).RowRangeGroup.Expand(0, False)
GcSpreadSheet1.Sheets(0).ColumnRangeGroup.Expand(0, False)
GcSpreadSheet1.Invalidate()
End Sub
|
See Also