Quick Start
In This Topic
Quickly begin using ActiveReports by following the steps of some of the most commonly used features. See Install ActiveReports topic to see how to add references to GrapeCity.ActiveReports from nuget.org.
Add ActiveReports Controls to Toolbox
You can add an ActiveReport to a project without using the Visual Studio toolbox, but in order to use the Viewer control, any of the exports, the Designer and related controls, or the WebViewer control, you need to have them in your toolbox.
On installing NuGet packages, the controls are automatically added to the toolbox in Visual Studio 2017 and Visual Studio 2019, in an ActiveReports 14 tab.
Visual Studio 2013 and Visual Studio 2015
If you are using Visual Studio 2013 or Visual Studio 2015, the NuGet packages do not add the controls on the toolbox by default. You need to add the controls manually as follows.
- Install the NuGet packages (in WinForms or WebForms application).
- Right-click anywhere on the toolbox and select Add Tab.
- Right-click the newly added tab and select Choose Items.
- In the Choose Toolbox Items dialog with .NET Framework Components tab selected, click Browse.
- Select the assembly present inside the package you installed in the application. The path to the assembly is similar to the following:
[App name]\packages\{Package name}\lib\net462\{Assembly}
The added control(s) should now display in the tab.
Limitation: Items for ActiveReports 14 cannot be added if the toolbox already contains items for ActiveReports 13. This is because assembly names in both ActiveReports versions are the same. To resolve this issue, remove the toolbox items for ActiveReports 13, and then add the items for ActiveReports 14.
Add an ActiveReport to a project
- From the Visual Studio Project menu (or Website menu in Web projects), select Add New Item.
- Select the type of report that you want to add (for information on the differences, see Report Types):
- Section Report (code-based)
- Section Report (xml-based)
- Page Report
- RDL Report
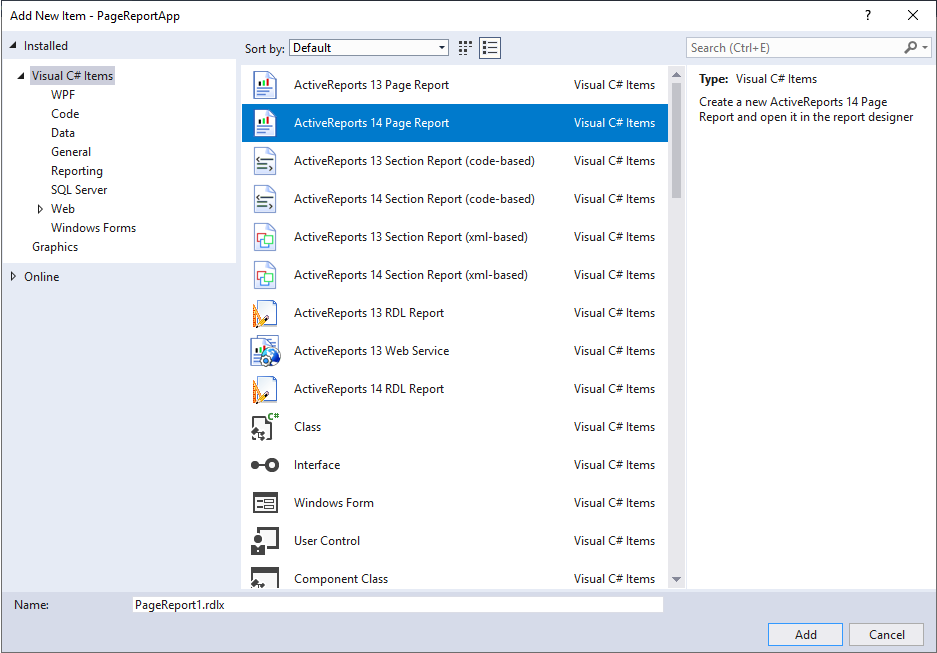
- In the Name box, type a name for the report, and click Add. The selected report type is added to your project and opens in the report designer.
Add an ActiveReport to a project at run time
- In Visual Studio, create a new Windows Forms Application or open an existing one.
- From the Visual Studio toolbox, drag the Viewer control onto your Windows Form.
- Set the Viewer's Dock property to Fill to show the complete Viewer control on the form.
- On the Form.cs or Form.vb that opens, double-click the title bar to create the Form_Load event.
- Add the following code inside the Form_Load event.
Page Report
| Visual Basic.NET code. Paste INSIDE the Form Load event. |
Copy Code
|
|---|---|
' Create a new Page report instance Dim pageReport As New GrapeCity.ActiveReports.PageReport() Dim Page As New GrapeCity.ActiveReports.PageReportModel.Page() Dim fixedPage As New GrapeCity.ActiveReports.PageReportModel.FixedPage() ' Add a textbox to your Page report Dim textbox1 As New GrapeCity.ActiveReports.PageReportModel.TextBox() textbox1.Name = "TextBox1" textbox1.Height = "1cm" textbox1.Width = "10cm" textbox1.Left = "2cm" textbox1.Top = "0.5cm" textbox1.Value = "Sample Page Report" Page.ReportItems.Add(textbox1) fixedPage.Pages.Add(Page) pageReport.Report.Body.ReportItems.Add(fixedPage) ' Create a Page document and load it in Viewer Dim pageDocument As New GrapeCity.ActiveReports.Document.PageDocument(pageReport) viewer1.LoadDocument(pageDocument) |
|
| C# code. Paste INSIDE the Form Load event. |
Copy Code
|
|---|---|
// Create a new Page report instance GrapeCity.ActiveReports.PageReport pageReport = new GrapeCity.ActiveReports.PageReport(); GrapeCity.ActiveReports.PageReportModel.Page Page = new GrapeCity.ActiveReports.PageReportModel.Page(); GrapeCity.ActiveReports.PageReportModel.FixedPage fixedPage = new GrapeCity.ActiveReports.PageReportModel.FixedPage(); // Add a textbox to your Page report GrapeCity.ActiveReports.PageReportModel.TextBox textbox1 = new GrapeCity.ActiveReports.PageReportModel.TextBox(); textbox1.Name = "TextBox1"; textbox1.Height = "1cm"; textbox1.Width = "10cm"; textbox1.Left = "2cm"; textbox1.Top = "0.5cm"; textbox1.Value = "Sample Page Report"; Page.ReportItems.Add(textbox1); fixedPage.Pages.Add(Page); pageReport.Report.Body.ReportItems.Add(fixedPage); // Create a Page document and load it in Viewer GrapeCity.ActiveReports.Document.PageDocument pageDocument = new GrapeCity.ActiveReports.Document.PageDocument(pageReport); viewer1.LoadDocument(pageDocument); |
|
RDL Report
| Visual Basic.NET code. Paste INSIDE the Form Load event. |
Copy Code
|
|---|---|
' Create a new RDL report instance Dim rdlReport As New GrapeCity.ActiveReports.PageReport() ' Add a textbox to your RDL report Dim textbox1 As New GrapeCity.ActiveReports.PageReportModel.TextBox() textbox1.Name = "TextBox1" textbox1.Height = "1cm" textbox1.Width = "10cm" textbox1.Left = "2cm" textbox1.Top = "0.5cm" textbox1.Value = "Sample RDL Report" rdlReport.Report.Body.ReportItems.Add(textbox1) ' Create a Page document and load it in Viewer Dim rdlDocument As New GrapeCity.ActiveReports.Document.PageDocument(rdlReport) viewer1.LoadDocument(rdlDocument) |
|
| C# code. Paste INSIDE the Form Load event. |
Copy Code
|
|---|---|
// Create a new RDL report instance GrapeCity.ActiveReports.PageReport rdlReport = new GrapeCity.ActiveReports.PageReport(); // Add a textbox to your RDL report GrapeCity.ActiveReports.PageReportModel.TextBox textbox1 = new GrapeCity.ActiveReports.PageReportModel.TextBox(); textbox1.Name = "TextBox1"; textbox1.Height = "1cm"; textbox1.Width = "10cm"; textbox1.Left = "2cm"; textbox1.Top = "0.5cm"; textbox1.Value = "Sample RDL Report"; rdlReport.Report.Body.ReportItems.Add(textbox1); // Create a Page document and load it in Viewer GrapeCity.ActiveReports.Document.PageDocument rdlDocument = new GrapeCity.ActiveReports.Document.PageDocument(rdlReport); viewer1.LoadDocument(rdlDocument); |
|
Section Report
| Visual Basic.NET code. Paste INSIDE the Form Load event. |
Copy Code
|
|---|---|
' Create a new Section report instance Dim sectionReport As New GrapeCity.ActiveReports.SectionReport() ' Create a Detail section sectionReport.Sections.Add(GrapeCity.ActiveReports.Document.Section.SectionType.Detail, "Body") ' Add a textbox to your Section report Dim textbox1 As New GrapeCity.ActiveReports.SectionReportModel.TextBox() textbox1.Name = "TextBox1" textbox1.Height = 1.5F textbox1.Width = 10.0F textbox1.Left = 0.5F textbox1.Top = 0.5F textbox1.Value = "Sample Section Report" sectionReport.Sections(0).Controls.Add(textbox1) ' Load the Section report in the Viewer sectionReport.Run() viewer1.LoadDocument(sectionReport) |
|
| C# code. Paste INSIDE the Form Load event. |
Copy Code
|
|---|---|
// Create a new Section report instance GrapeCity.ActiveReports.SectionReport sectionReport = new GrapeCity.ActiveReports.SectionReport(); // Create a Detail section sectionReport.Sections.Add(GrapeCity.ActiveReports.Document.Section.SectionType.Detail, "Body"); // Add a textbox to your Section report GrapeCity.ActiveReports.SectionReportModel.TextBox textbox1 = new GrapeCity.ActiveReports.SectionReportModel.TextBox(); textbox1.Name = "TextBox1"; textbox1.Height = 1.5F; textbox1.Width = 10F; textbox1.Left = 0.5F; textbox1.Top = 0.5F; textbox1.Value = "Sample Section Report"; sectionReport.Sections[0].Controls.Add(textbox1); // Load the Section report in the Viewer sectionReport.Run(); viewer1.LoadDocument(sectionReport); |
|
Add a Data Source to a Report
The first thing you probably want to do when you create a report is to add data. You can accomplish this in a variety of ways, depending on the type of report you are using.
Page Report/RDL Report Data
With page reports or RDL reports, you basically connect to a data source, and then add a dataset. You can also create a shared data source if you use the same one for many reports. For information on how to perform these tasks, see Work with Data in the How To section. For more information on each item in the associated dialogs, see Data Sources and Datasets in the Concepts section.
For more advanced ways to connect data, see the Walkthroughs section for step by step instructions on using Reports with Stored Procedures, or creating a Custom Data Provider.
Section Report Data
With section reports, you bind a report to any of a variety of data sources and select the data using a SQL query or XPath expression in the Data Source Dialog. You can also use code to create an unbound data source or to change the data source at run time. For more information on all of these methods of binding reports to data, see Work with Data in the Section Report How To section.
Add an ActiveReports application to a Project
ActiveReports provides an in-built sample application that includes a report template along with the Viewer control. You learnt about creating a report and viewing it in the preceding sections. With this Windows Forms application you only need to create a report layout and run the application to view the report, effectively skipping the manual process of adding a Viewer and template separately and creating an instance of the report.
- From the Visual Studio File menu, select New, then Project.
- In the New Project dialog that appears, under your desired language (VB.NET or C#), click the Reporting node.
- Select the type of report application that you want to add (for information on the differences, see Report Types):
- ActiveReports 14 Page Report Application
- ActiveReports 14 RDL Report Application
- ActiveReports 14 Section Report Application (xml-based)
- ActiveReports 14 Section Report Application (code-based)
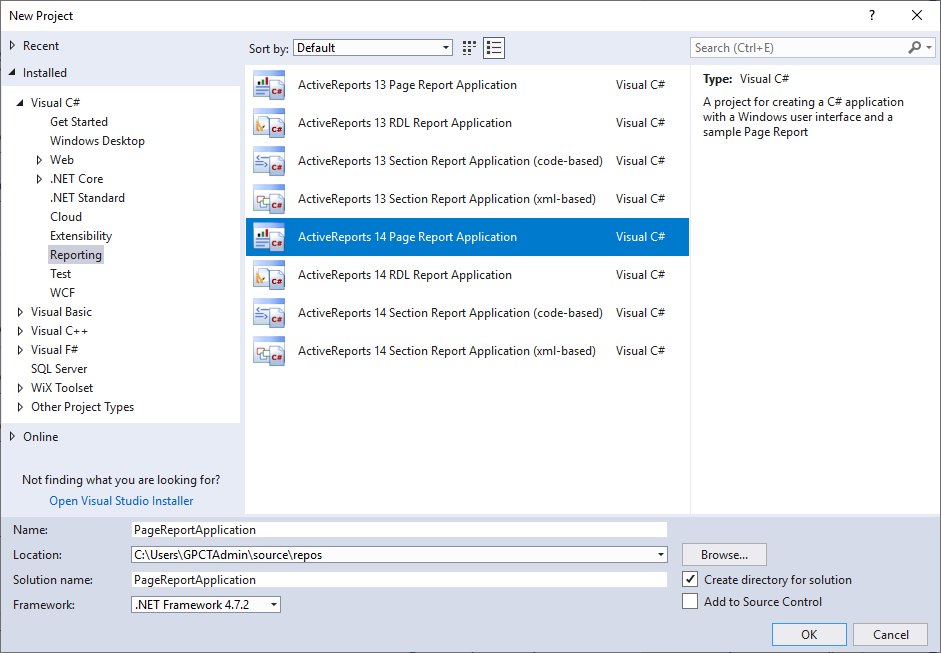
- In the Name field, enter a name for the report application, and click OK. The selected report type is added to your project.
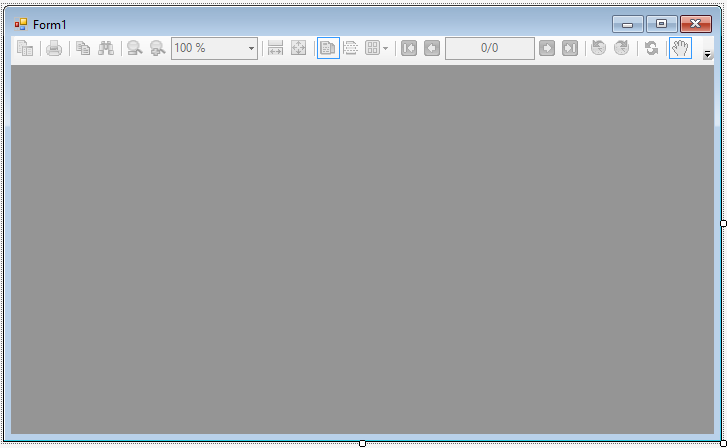
- Go to the Visual Studio Solution Explorer and double-click Form1.cs or Form1.vb. Notice that the Viewer control already appears on the form.
Add Fields in Reports
Fields provide data to display on a report page. ActiveReports has two types of fields; a bound or database field and a calculated field.
- Bound or Database field: A field where the value is returned by a query. See the Query dropdown in the Dataset Dialog for further information on queries in page reports and RDL reports.
- Calculated field: A field where the value is an expression created with functions, formulas and operators. Use the following instructions to add calculated fields in a report.
To create a calculated field in a Section Report
In a section report, once you connect to a data source, bound fields automatically appear under the Fields > Bound node in the Report Explorer. However, you have to add calculated fields manually under the Fields > Calculated node. The following steps guide you through the process.
- In the Report Explorer, expand the Fields node.
- Right-click the Calculated node and select Add. This action creates an unbound field with a default name like field1.
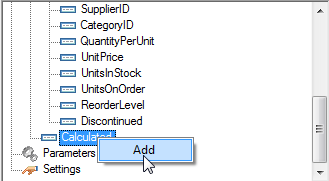
- In the Report Explorer, with field1 selected, go to the Properties Window and set a value for the field in the Formula property. For e.g., for a calculated field Inventory, in the Formula field, enter the expression =UnitsInStock - ReorderLevel.

You can change the name of the field in the Name property. - Drag the field from the Calculated node onto the detail section of the report. This action creates a TextBox object, and sets its DataField property to the name of the calculated field.
Note: You can also add C# expressions in a Bound Field's DataField property to modify it. See Add Field Expressions for more information.
To create a calculated field in a Page Report/RDL Report
In a page report or a RDL report, all fields irrespective of their type appear under the corresponding DataSet node in the Report Explorer. To create a calculated field, you can add the new field in the DataSet dialog.
The following steps guide you through the process.
Note: These steps assume that you have added a DataSet in your report. See Add a Dataset for further information.
- In the Report Explorer, right-click the data set node and select Edit.
- In the DataSet dialog that appears, go to the Fields page and click the Add (+) button to add an empty field to the list.
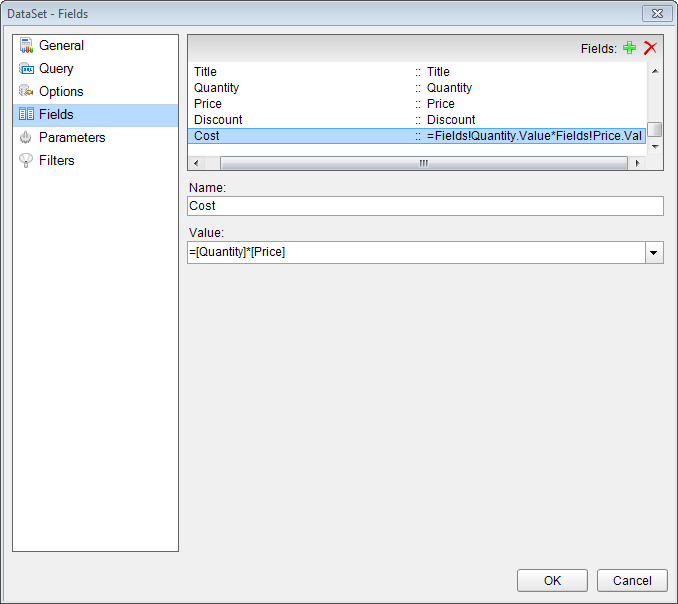
- Under Name, enter the name of the field. By default it appears as Field1.
- Under Value, click the dropdown arrow and select <Expression...>, to open the Expression Editor dialog.
- In the Expression Editor dialog, create an expression you want to use as the value for the calculated field. For e.g., for a calculated field Cost, in the Formula field, enter the expression =[Quantity]*[Price]. See Expressions for further information.
- Click OK to close the Expression Editor and then the DataSet dialogs.
- From the Report Explorer, drag the calculated field from that now appears as a field under the DataSet node onto the design surface. This action creates a TextBox object, and sets its Value property to the name of the calculated field expression.
See Also