
- GettingStarted
- DeveloperGuide
-
ReportAuthorGuide
- Overview
- Quick Start
- Interface Elements
- Report Controls
- Data Binding
- Expressions
- Parameters
- Drill Down
- Drill Through
- Hyperlinks
- Sort
- Tutorial 1: Create Tabular Report
- Tutorial 2: Create Parameterized Report
- Tutorial 3: Create Master-Detail Report
- Tutorial 4: Create Pivot Report
- Tutorial 5: Create Report with Chart
- Report Templates
- Tutorial-6-Apply-Styles-and-Themes
- Compatibility-with-AR-NET
Image
Image report control displays an image that you embed in the report from an external source, a database or an embedded image.
Some properties of the Image control are described below. Note that you need to enable Advanced Properties Mode to view all properties.
Appearance
Image: Select an available image from the image source - Shared, Embedded, or Database.
Source: Select whether the image comes from a source that is:
| Source | Description |
|---|---|
| External | Image available via URL. Using external images does not increase the file size of your report, however if the web based image is moved, it will no longer show in your report. |
| Embedded | Image embedded in your report. Using embedded image increases the file size of your report, but it is advantageous as the image is always available when you move report. |
| Database | Image available in the database. |
Value: Depending on the source of image, select the image. If the source of the image is Database, you can also use data visualizers as images. A Data Visualizer is used to display data in small graphs that are easy to comprehend.
MIME Type: Select the MIME type of the selected image as:
- image/png for PNG images
- image/jpeg for JPEG images
- image/svg+xml for SVG images
Image Sizing: Specify the Image Sizing property from the following available options:
| Image Sizing | Description |
|---|---|
| AutoSize | The border of the Image control adjusts according to the size of the image. |
| Fit | The image resizes to fit within the dimensions of Image control. |
| FitProportional | The image resizes to fit proportionally within the dimensions of Image control, thereby preserving the aspect ratio. |
| Clip | The image clips if it is larger than the dimensions of Image control. |
Border
Width: Enter a value in points to set the width of the border.
Style: Select a style for the border.
Color: Select a color to use for the border from Color Picker, Standard Colors, or Web Colors.
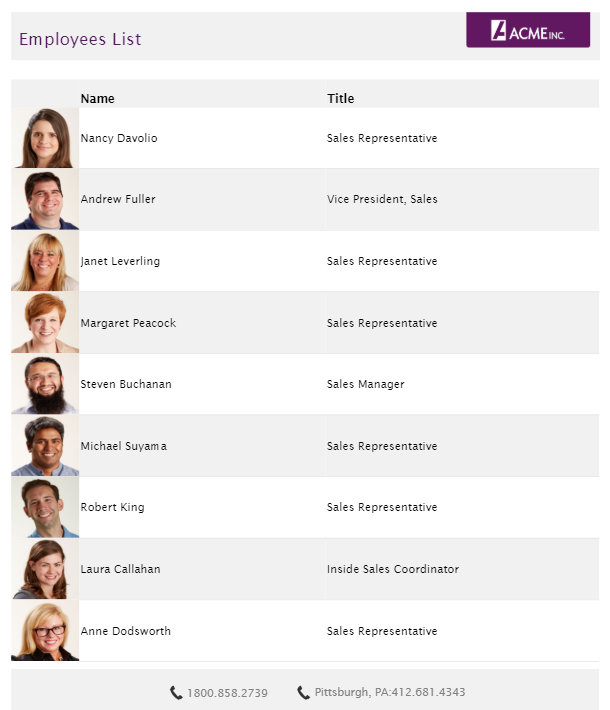
Use Case
Let's say that we want to create a report that shows a list of employees along with their photos and job titles.
The final report will be as shown.
Drag-drop the Container control on the page header area of the report.
Drag-drop a TextBox control and an image control into the container and place them opposite to each other, such that the textbox is in the extreme left and the image is in the extreme right of the container. This will be the report's title.
Select the TextBox control in the container and set its Value property to 'Employees List'.
Similarly, select the Image control in the container and set the following properties to some suitable values as follows:
Image Source - Embedded
Value - header-AcmeLogo
Image Sizing - Fit
Drag-drop the Table data region to the body area of the report and bind the table to the report's data set by selecting it in the Data Set Name property.
Set the Table's labels in its Header row to 'Name' and 'Title'.
Select the text boxes in the Table's Details row and bind them to the following values.
For TextBox1, enter expression
=Fields!firstName.Value & " " & Fields!lastName.ValueFor TextBox2, enter expression
=Fields!Title.Value
Drag-drop the Image control to the extreme left corner of the Table's Details row and set its properties to the following values.
Image Source: Embedded
Value:
=Fields!firstName.Value & " " & Fields!lastName.ValueImage Sizing: Fit
Drag-drop the Container control on the page footer area of the report.
Drag-drop two TextBox and Image controls into the Container and place them next to each other. These will be the report footer.
Select both the text boxes in the container and set their Value properties as follows:
For TextBox1, enter text '1800.858.2739'
For TextBox2, enter text 'Pittsburgh, PA:412.681.4343'
Select both the Image controls and set their properties to the following values.
Image Source: Embedded
Value: footer-phone
Image Sizing: Fit
Improve the appearance of the report by resizing the controls and applying the font style and alignment properties.
Preview the report.