
- GettingStarted
- DeveloperGuide
-
ReportAuthorGuide
- Overview
- Quick Start
- Interface Elements
- Report Controls
- Data Binding
- Expressions
- Parameters
- Drill Down
- Drill Through
- Hyperlinks
- Sort
- Tutorial 1: Create Tabular Report
- Tutorial 2: Create Parameterized Report
- Tutorial 3: Create Master-Detail Report
- Tutorial 4: Create Pivot Report
- Tutorial 5: Create Report with Chart
- Report Templates
- Tutorial-6-Apply-Styles-and-Themes
- Compatibility-with-AR-NET
Table Of Contents
Table Of Contents report control displays document map in the body of the report. Document map is an organized hierarchy of the report heading levels and labels along with their page number, which allows you to quickly understand and navigate the data inside a report.
You can use the Table Of Contents control to embed the Table Of Contents structure in the report body for printing and rendering purposes.
Some properties of the Table Of Contents control are described below. Note that you need to enable Advanced Properties Mode to view all properties.
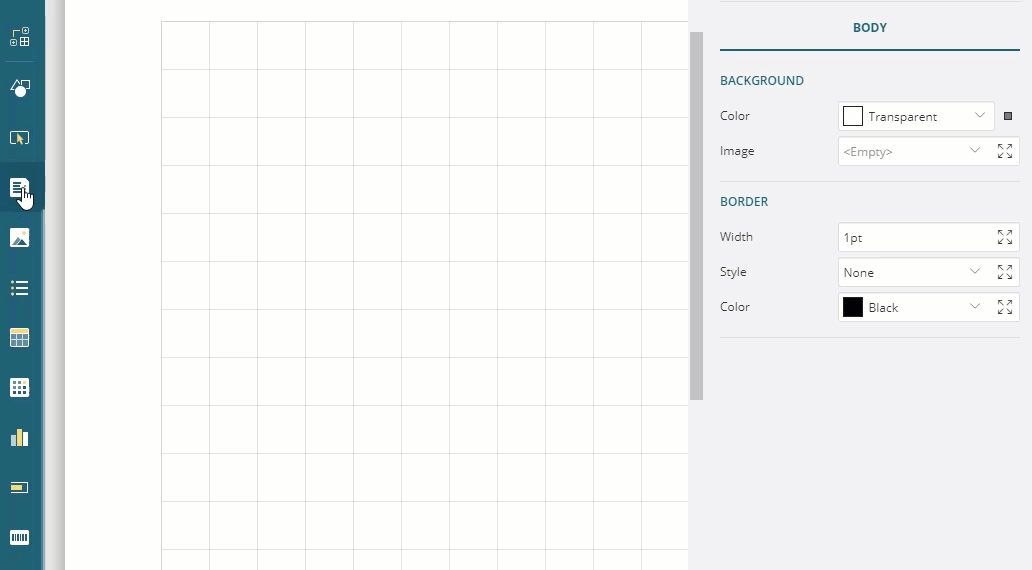
Background
Color: Select a color to use for the background.
Border
Width: Enter a value in points to set the width of the border.
Style: Select a style for the border.
Color: Select a color to use for the border from Color Picker, Standard Colors, or Web Colors.
Layout
Style: Choose from the list of available styles and set to apply a style to the control.
Page Break: Specify if the page breaks occurs:
Start - Inserts page break at start of the control.
End - Inserts page break at end of the control.
StartAndEnd - Inserts page break at both start and end of the control.
Levels
The Add item option allows you adding a new level to the Table Of Contents control. The Level item also has important properties that you can use. Some of them are described below.
Background
Color: Select a color to use for the background.
Text
Color: Select a color to use for the border from Color Picker, Standard Colors, or Web Colors.
Font Style: Apply a font style on the text. Note that if you chose a theme for Layout > Style, the text appears according to the selected theme. You can select the following styles:
Normal - Makes text appear in normal style.
Italic - Makes text appear italicized.
Text Decoration: Lets you decorate the text by use of lines. You can choose from:
Underline - Draws a line below the text.
Overline - Draws a line above the text.
LineThrough - Draws a line through the middle of the text.
General
Fill Character: Use the expression to specify a fill character for a leading character.
Display Fill Character: Specifies whether to display a leading character. The Default value is True.
Display Page Number: Specifies whether to display a page number. The Default value is True.
Use Case
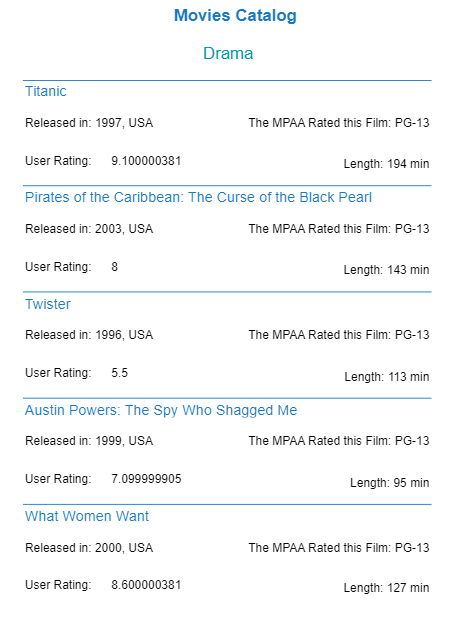
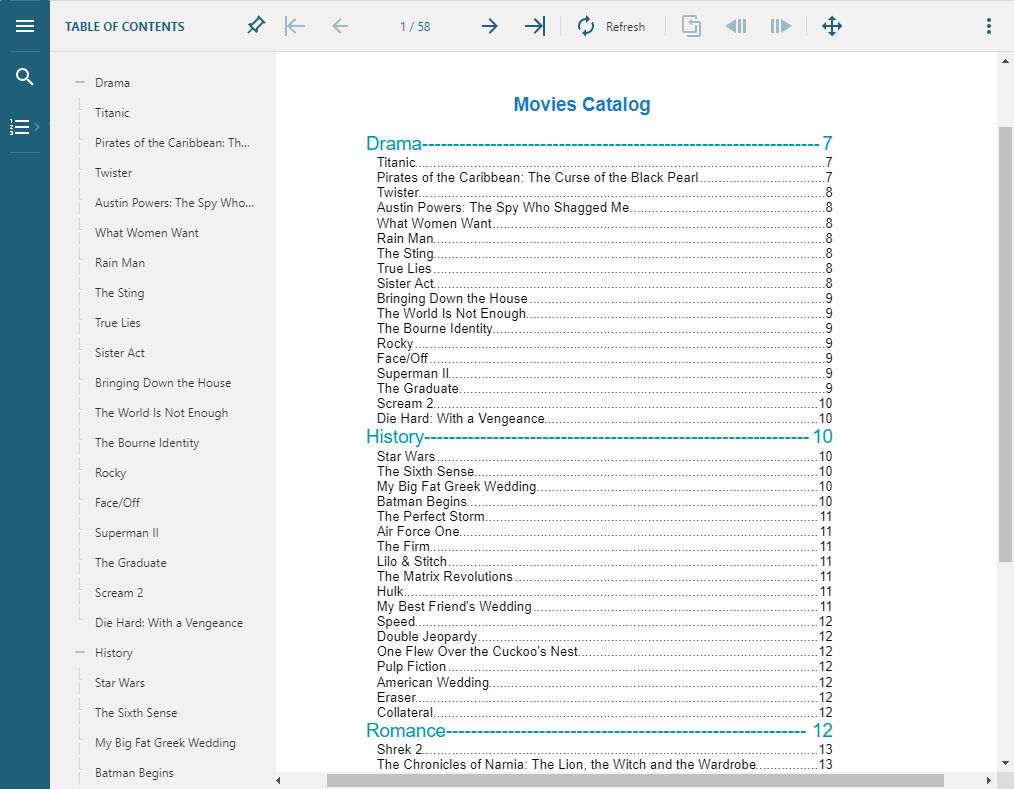
Let’s say that we want to show the movies catalog that lists movies along with the movie information - release year, user rating and movie length, with the Table of Contents at the beginning of the report to be able to navigate to the specific genre or movie of choice.
Let us first create a report for which we will add Table of Contents later. The report uses two List data regions with few TextBox controls to show [YearReleased], [MPAA], [UserRating] and [Length] of the movie. The report uses the Group Expressions on List data regions to group movies by genre and title. The report layout will be as shown:
| Design-time | Preview |
|---|---|
 |
 |
- Create an RDL Report and drag-drop the List data region (List1) on the report’s designer.
- Set the Group Expression property to
=Fields!GenreName.Value. - Drag-drop the TextBox control onto the List data region and bind it to
[GenreName]. This will be the header of the catalog section. - Drag-drop another List data region (List2) onto the first List.
- Set the Group Expression property to
=Fields!Title.Value. - Drag-drop the TextBox control onto the List data region and bind it to
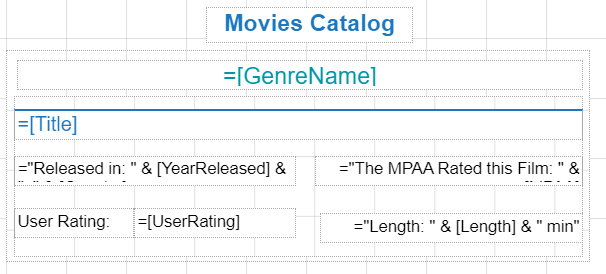
[Title]. This will be the header of each catalog entry for a movie. - Next, drag-drop few TextBox controls below the
[Title]on List2, and set their Value property as follows:- TextBox3: ="Released in: " & Fields!YearReleased.Value & ", " & Fields!Country.Value
- TextBox4: ="The MPAA Rated this Film: " & Fields!MPAA.Value
- TextBox5: User Rating:
- TextBox6: =Fields!UserRating.Value
- TextBox7: ="Length: " & Fields!Length.Value & " min"
- To add the report title, drag-drop the TextBox control on top of the report and set its Value to "Movies Catalog".
- Improve the appearance of report by adjusting the properties of the report controls used.
- Preview.
Now lets add Table of Contents control to show the report or document map.
To add items to Table of Contents using Heading Level Property
You can define a hierarchical structure for your report using the Heading Level property of the TextBox control. If a TextBox is set to Heading Level 1 and another TextBox displaying a group header to Heading Level 2, the entries in Heading Level 2 are clubbed under the Heading Level 1 entry in the Table of Contents. The headings are auto-numbered.
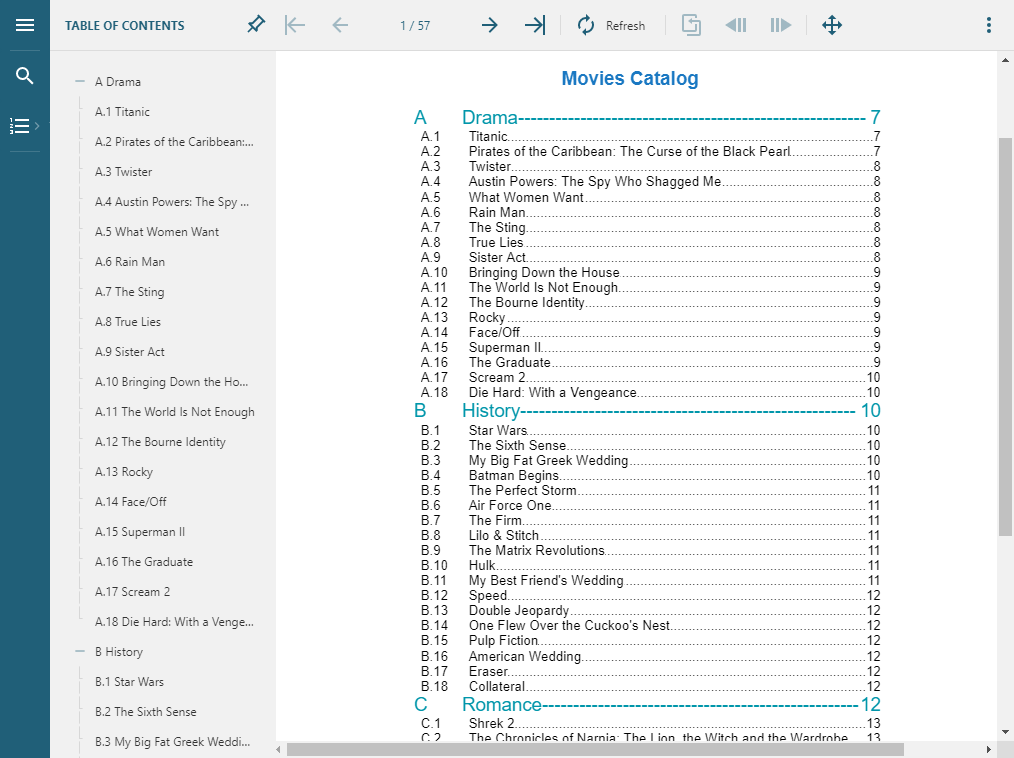
Drag-drop the Table of Contents control on top of the report, below report title. Grab its corner and adjust its size.
Select the Level1 (to display GenreName) in the Table of Contents and set the following properties:
- Text > Color: #0096aa
- Font Size: 14pt
- Fill Character: "-" (a dash)
- Display Fill Character: True
Click +Add item to add the Level2 (to display Title) to the Table of Contents and set the following properties:
- Font Size: 10pt
- Padding: 5 pt (on left)
- Fill Character: "." (a dot)
- Display Fill Character: True

From the Report Explorer, select Report and set its Document Map properties as follows.
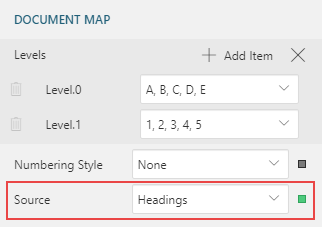
- Levels : Set the styles from the drop-down.
- Level.0: A,B,C,D,E
- Level.1: 1,2,3,4,5
- Source: Headings
- Levels : Set the styles from the drop-down.
Select Textbox with value
[GenreName]and set Heading Level property to 1.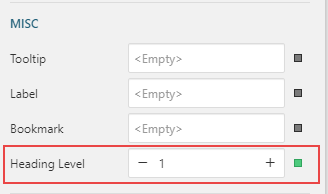
Preview.
To add items to Table of Contents using Label Property
By setting the Label property of the controls in your report, you can show a hierarchical structure based on the parent - child relationship between the controls in the Document Map. For example, if the Label property of the List data region is set and a TextBox control is place inside the List data region, the TextBox label appears nested inside the List data region label, thereby displaying a hierarchical structure.
Drag-drop the Table of Contents control on top of the report. Grab its corner and adjust its size.
Follow steps 2 and 3 of "To add items to Table of Contents using Heading Level Property" section for setting properties of levels in Table of Contents.
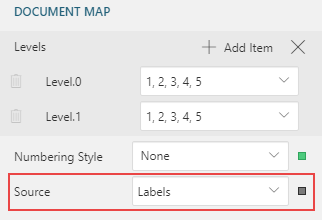
From the Report Explorer, select Report, and set Document Map > Source property to 'Labels'.
Select the List1 data region and set its Label property to
=Fields!GenreName.Valueto have it displayed in the Level1 of the Table of Contents.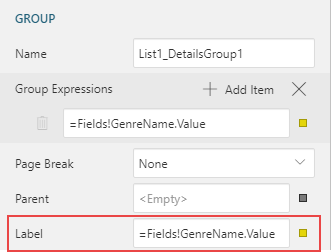
Note: The Table of Contents mapped using labels are not numbered. In this case, if you want to add numbering in Table of Contents, you need to use DocumentMap.Path expression in the Label property of the List data region. For example, to add numbering on the first level (GenreName), select List1 data region and set Label property to:
=DocumentMap.Path & ". " & Fields!GenreName.Value.Similarly, select the List2 data region and set its Label property to
=Fields!Title.Valueto have it displayed in the Level2 of the Table of Contents.Preview.