In This Topic
You can download the installer from here and then follow these steps to install ActiveReports.
- Double-click the installer.
- In the Welcome screen that appears, click the Accept End User License Agreement checkbox and click Next.
- In the screen that appears, select the release version to install from the drop-down list. If you want to change the default installation path, click Change in the Installation Directory area. Also, select the corresponding checkboxes for Visual Studio Templates installation and Customer Experience Program. After you select all necessary options, click Next.
- Once the installation finishes, a screen notifying of the successful installation appears. Select Close to close the window and complete the installation process, or select Activate to continue with activating the license. See License ActiveReports for information on licensing.
Note: The installer version is not identical to the ActiveReports version.
ActiveReports Utilities and Entries
When you run the installer, you get necessary utilities such as standalone designer and viewer applications, import tool, license manager, VSIX files, localization resources, etc.
- Shortcuts:
- MESCIUS License Manager
- ActiveReports 18 Designer
- ActiveReports 18 Import
- ActiveReports 18 Theme Editor
- ActiveReports 18 User Guide(CHM)
- ActiveReports 18 User Guide(PDF)
- ActiveReports 18 User Guide(Web)
- ActiveReports 18 Viewer
- MESCIUS License Manager (C:\ProgramData\Microsoft\Windows\Start Menu\Programs\MESCIUS)
- Program files (C:\Program Files\MESCIUS\ActiveReports 18 OR C:\Program Files (x86)\MESCIUS\ActiveReports 18)
- Deployment
- Icons
- Localization
- Tools
- VisualStudio
- ActiveReports.config
- Registry keys (Computer\HKEY_CURRENT_USER\SOFTWARE\MESCIUS\ActiveReports)
- Visual Studio integrations
About Visual Studio Integrations
The ActiveReports installation provides you with following Visual Studio Integrations that help you configure projects and design reports. Start a supported version of the Visual Studio IDE and select from the built-in project templates listed in the next section.
Project Templates
Create a report layout using built-in sample application templates:
- ActiveReports 18 Windows Forms Application (VB and C#)
- ActiveReports 18 ASP.NET Core MVC Application (VB and C#)
- ActiveReports 18 Blazor Server Application (C#)
- ActiveReports 18 Blazor WebAssembly Application (C#)
Item Templates
Add following item templates to your project:
- ActiveReports 18 Report
- ActiveReports 18 Code-Based Report
Toolbox with Report Controls
A new ActiveReports 18 tab is automatically added in the toolbox with the controls in sync with the references.
Integrated Designer
ActiveReports offers an integrated designer that lets you create report layouts in Visual Studio and edit them at design time, visually, and through code and scripts. Along with the designer, you can use:
- Report Explorer to view the report elements in tree view,
- Group Editor to manage grouping in Tablix data region,
- Layers List to view layers in a report,
- Reports Library to view list of reports and controls added in the reports.
Conversion Tool
Use the conversion or upgrade tool - Convert to ActiveReports 18 - to easily upgrade to the latest version. This tool is available under the Tools menu option of Visual Studio.
The following ActiveReports resources are available on the web:
To Remove Visual Studio Integration
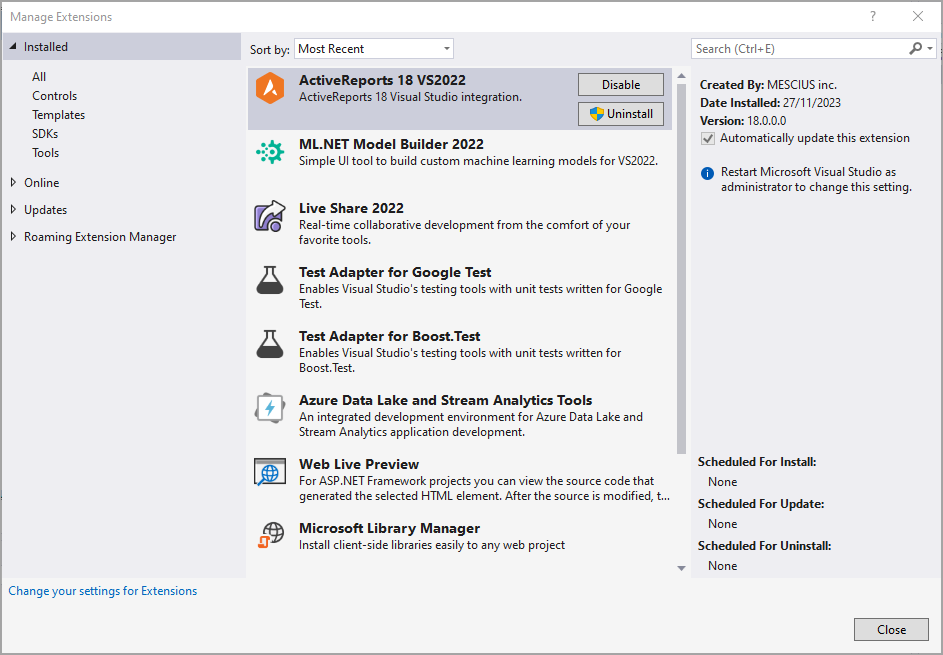
In case you want to disable or uninstall ActiveReports 18 Visual Studio integration, do the following.
- In Visual Studio 2019 and Visual Studio 2022, go to Extensions > Manage Extensions.
OR
In earlier supported versions of Visual Studio, go to the Tools menu and click Extensions and Updates.
- Navigate to ActiveReports 18 VS2022 and click Disable or Uninstall.
In case you want to install the integration again, follow these steps.
- Go to the installation folder - C:\Program Files\MESCIUS\ActiveReports 18\VisualStudio (C:\Program Files (x86)\MESCIUS\ActiveReports 18\VisualStudio on a 64-bit Windows operating system).
- Run the VSIX as per your Visual Studio Version.
Note:
- It is not possible to install ActiveReports 18 and ActiveReports 13 side-by-side.
- It is not possible to use different versions of ActiveReports for .NET within a single Visual Studio project.
- If you are creating an ActiveReports 18 application in Visual Studio 2017 or Visual Studio 2019 or Visual Studio 2022, and you also have ActiveReports 13 installed in the supported Visual Studio version, then you may get a few errors in the property grid such as 'Object does not match target type' or 'Object reference not set to an instance of Object'. This issue is related to Visual Studio; you just need to restart Visual Studio to resolve the issue. Before restart, save the project, if necessary.
- When using our Integrated Designer in Visual Studio 2022, you may observe invisible controls in our smart panels or tool windows (such as Report Explorer or Layers List). To solve this issue, navigate to Tools > Options > Environment > General and clear the 'Optimize rendering for screens with different pixel densities' checkbox.
Customer Experience Program
When you optionally join the Product Usage Program, your computer automatically transmits information to MESCIUS inc. about the usage of MESCIUS inc. products. This information is used to address issues within MESCIUS inc. products and improve quality/usability.
The Product Usage Program is strictly optional and you can opt-in or opt-out of the program at any time by executing the Web installer and making the appropriate selection within the installation program. The Product Usage Program does not transmit any personally identifiable information such as your name, address, or phone number. The Product Usage Program only collects information related to MESCIUS inc. controls and libraries. This information includes the usage of MESCIUS inc. controls at design time within Visual Studio. No information is collected from applications/demos you create.