In This Topic
This article explains connecting a or an report to a MS SQL Server/ Microsoft SQL Client data source. You can connect to this data source while creating a new report (via report wizard) or using report explorer (via report data source dialog).
Connect to MS SQL Server Data Source using Report Wizard
The steps to connect to the MS SQL Server data source are:
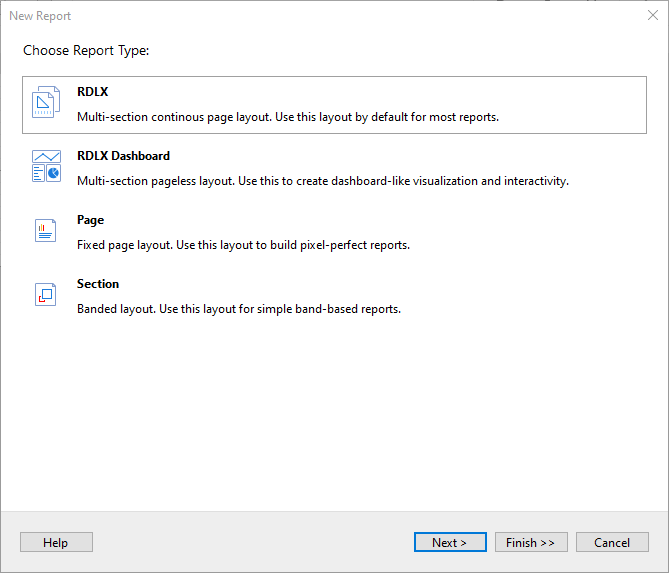
- Create a New Report.
- In the New Report dialog, choose the Report Type as RDLX, RDLX Dashboard, or Page and click Next.
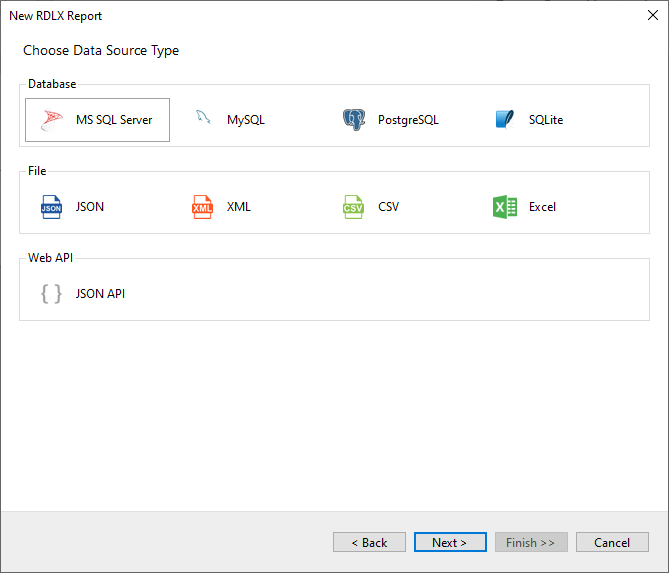
- Select the Data Source Type as MS SQL Server and click Next.
- Enter the Server name and Database you want to connect.

- To specify the runtime connection values, let us add two parameters: for the Server name and for the Database, as follows:
- Click on the Parameter link to open the Parameters dialog, and then click the Add button to add a new parameter.
- Specify the below details:
- Name: Specify the name of the parameter.
- Type: Select the value type (string by default) from the drop-down list.
- Testing Value: Specify the runtime value for the connection properties.
- Input Source: Select Interactive for non-hidden parameters and Programmatic for hidden parameters from the drop-down list.
- Click OK to finish adding the parameter.
- To specify the authentication method for the data source connection, choose the authentication Type as SQL Server or Windows.
If you choose the SQL Server authentication option, enter the User name and Password in the respective fields.
Note: The User name and Password fields are disabled in case of Windows authentication.
- You can select Advanced properties for additional configuration, for example, setting UI timeout option to allow entering key-value pairs.
- Click Test Connection to test the connection.
- Click Next and configure the dataset to retrieve the fields.
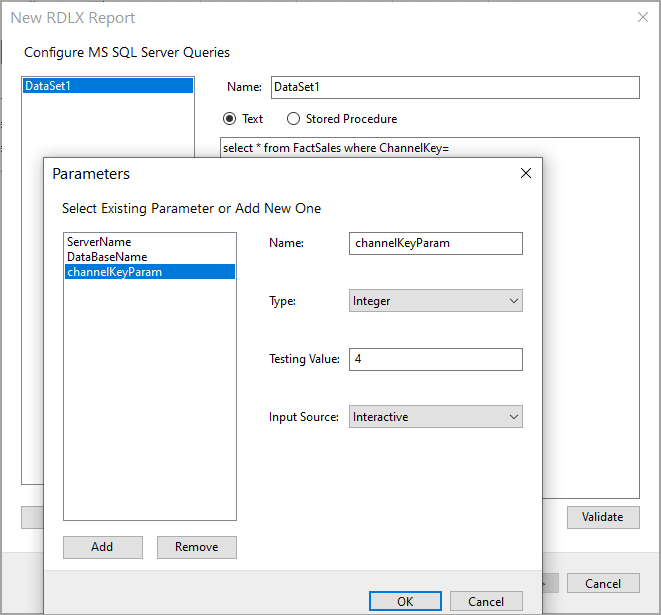
- Click Insert parameter to specify the interactive parameter 'channelKeyParam', to set the value of 'ChannelKey' field of type 'Integer', to '4'.
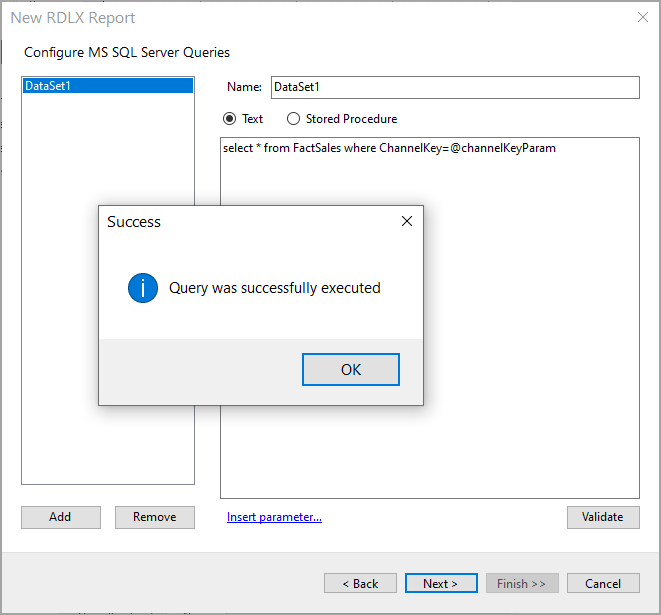
- You should add a valid query that utilizes the parameter added. Validate the query and click Next.
- On the final screen of the Report Wizard, review the summary of the report and click Finish to successfully create the report with the MS SQL Server data source.

Connect to a Microsoft SQL Client Data Source using Report Data Source dialog
- In the Report Explorer, right-click the Data Sources node and select the Add Data Source option or click the Add button and select the Data Source option.
- In the Report Data Source dialog that appears, select the General page and enter the data source name in the Name field. By default, the data source name is set to DataSource1. This name appears as a child node to the Data Sources node in the Report Explorer.
- Under the Type field, select Microsoft Sql Client Provider.
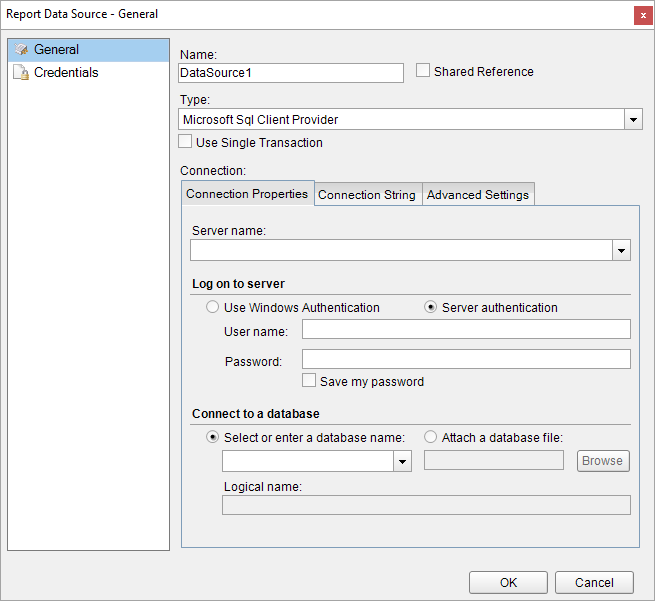
- In the Connection Properties tab, enter the server name that you want to connect.
- To specify the authentication method for the data source connection, select the Use Windows Authentication or Server authentication option.
If you choose the Server authentication option, enter the user name and password in the respective fields.
Note: The User name and Password fields are disabled in case of Windows authentication.
- To connect to a Database, choose the Select or enter a database name or Attach a database file option. If you choose the Select or enter a database name option, enter a database name or select it from the drop-down list. In case the Attach a database file option is selected, click on Browse and navigate to the desired database file on your system. You can also give a Logical Name to the selected database.
Note: The Logical Name field is disabled in case of Select or enter a database name option.
The Connection String tab displays the generated connection string as shown below.
data source=20.186.17.78;initial catalog=northwind;user id=qatester;password=*********;
For more information, see the Configuration Settings for Microsoft SQL Client Data Source section.
- Verify the generated connection string by clicking the Validate DataSource icon
 .
.
- Click the OK button to save the changes.
Configuration Settings
The Microsoft SQL Client Data Provider provides the following configuration settings under the Connection section in the Report Data Source dialog. Based on the defined configuration settings, the connection string is generated in the Connection String tab.
The Connection Properties tab describes the configuration settings for the Microsoft SQL Client data provider. It includes details related to server name, type of authentication method, and database name.
| Setting |
Description |
| Server name |
Enter a server name |
| Log on to server |
Select whether to use Windows authentication or server authentication which requires a user name and password. Below this field you can also check the Save my password option for future reference. |
| Connect to a database |
Select whether to enter a database name or attach a database file. |
The Advanced Settings tab gives access to the following properties.
| Setting |
Description |
| Application Name |
Indicates the client application name. |
| Current Language |
Indicates the SQL Server language name. It also identifies the language used for system message selection and formatting. The language must be installed on the SQL Server, otherwise opening the connection will fail. |
| Network Address |
Indicates the network address of the SQL Server, specified by the Location property. |
| Network Library |
Indicates the name of the network library (DLL) used to communicate with the SQL Server. The name should not contain the path or the .dll file name extension. The default name is provided by the SQL Server client configuration. |
| Packet Size |
Indicates a network packet size in bytes. The Packet Size property value must be between 512 and 32767. By default, the SQLOLEDB network packet size is 4096. |
| Trusted Connection |
Indicates the user authentication mode. You can set this property to Yes or No. By default, the property value is set to No. If Yes, the SQLOLEDB uses the Microsoft Windows NT Authentication Mode to authorize user access to the SQL Server database, specified by the Location and Datasource property values. If this property is set to No, then the SQLOLEDB uses the Mixed mode to authorize user access to the SQL Server database. The SQL Server login and password are specified in the User Id and Password properties. |
| Workstation ID |
Denotes a string that identifies the workstation. |