Create Custom Data Filters for WinForms
A data filter is a control that gives viewers a way to focus on the subsets of data. There are many components that offer rudimentary filtering options (like column filtering in grids). But when users need to filter all the information on the screen, a single control that helps them with quick filtering is needed. This is what C1DataFilter does by providing all of the options available in one place.
What is C1DataFilter?
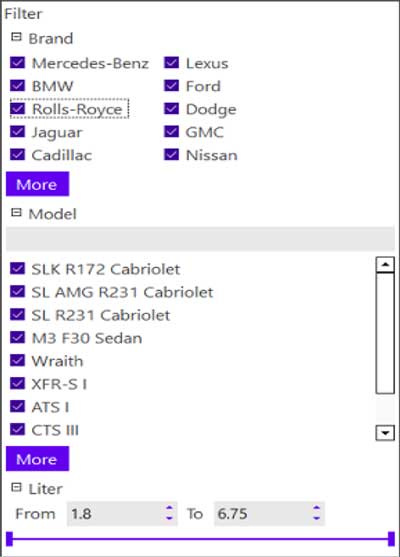
ComponentOne DataFilter for WinForms (C1DataFilter) is a UI control that seamlessly integrates with other UI components and allows filtering through interaction. It reads properties of the DataSource and automatically creates corresponding filter type amongst: BoolFilter, DataRangeFilter, CheckListFilter and RangeFilter.
To use these built-in filters just let AutoGenerateFilters property remain true.
Why Create Custom Data Filters?
The built-in filters are designed to handle common filter conditions like filtering based on checked values, selected data range, etc. For filtering using complex data visualization controls (like maps or charts) we’ll need to create our own custom data filters.
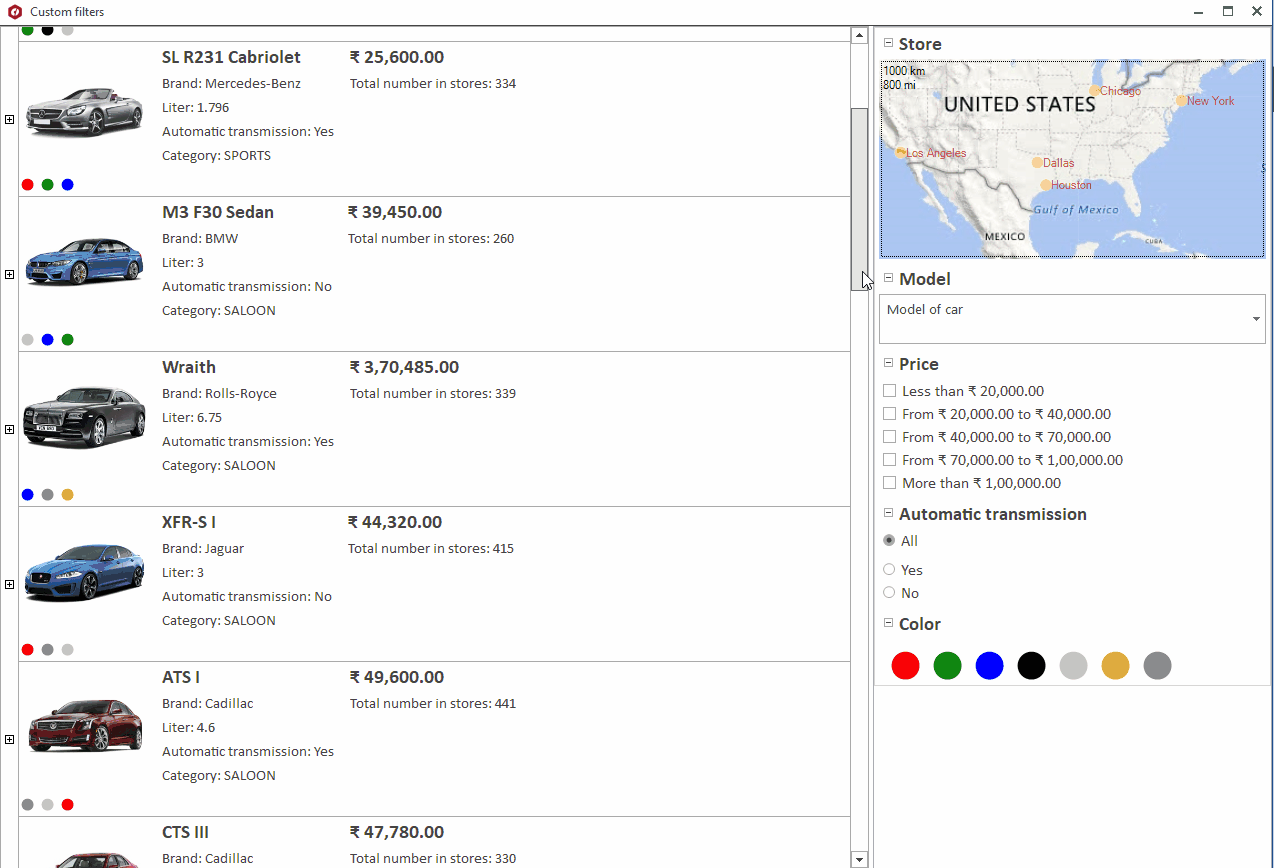
Data Filters Use Case: Taking Map as Filter Component
Let’s take an example where an automobile company needs to track the car models available at its stores. The stores are spread across different locations of the country. The user should be able to select the location of the store on the Map and filter the car models available at that location.
In this scenario, using a UI control like TreeView to present available car models, along with Map as custom data filter component for selecting store location would be ideal.
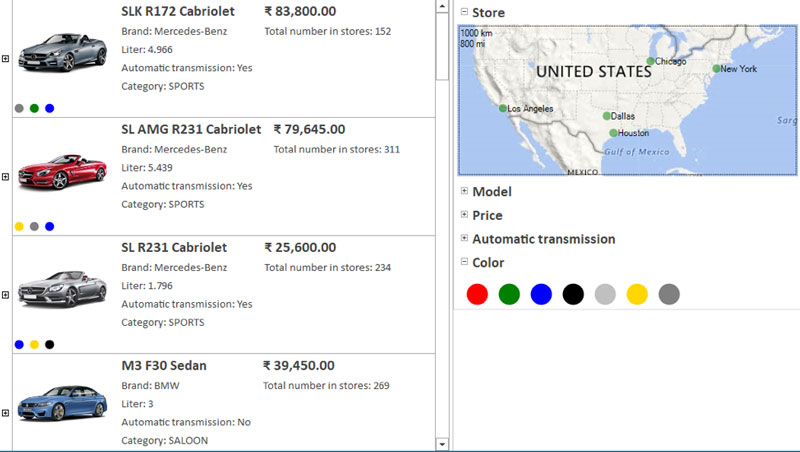
Here, each point in the map represents a store location and can be selected or unselected. Initially, the available car models in all the stores would be shown. However, based on the user’s selection of stores on the map, the data in the TreeView on the left would get filtered.
Let’s see how this scenario can be implemented using a custom data filter.
Customizing the Data Filter
We’ll be dividing the complete implementation in the following parts:
- Creating map view
- Creating custom filter
- Using custom filter
1. Creating Map View:
To create custom data filters here, we first need a control that helps us visualize store locations and allow selecting/unselecting them. For this, GrapeCity offers C1Map in WinForms Edition.
To place store elements on the Map, we need to first add a VectorLayer followed by VectorPlacemark.
private C1Map _map;
private C1.Win.Map.VectorLayer _layer;
private List<Store> _stores;

public MapView()
{
    _layer = new C1.Win.Map.VectorLayer { LabelVisibility = LabelVisibil-ity.AutoHide };
    _map.Layers.Add(_layer);
}

public void SetStores(IEnumerable<Store> stores)
{
    _stores = stores.ToList();
    foreach (var store in stores)
    {
        var mark = new C1.Win.Map.VectorPlacemark
        {
            Geometry = new GeoPoint(store.Location.X, store.Location.Y),
            Lod = new LOD(0, 0, 0, 20),
            Tag = store.City,
            Marker =
                {
                    Size = new SizeF(12,12),
                    Shape = MarkerShape.Circle,
                    Caption = store.City,
                    LabelPosition = LabelPosition.Right
                }
        };
        _layer.Items.Add(mark);
    }
}
After displaying the store markers in Map, we need the functionality to select/unselect them.
Using Map’s MouseClick event we get to know when viewers click over a point in Map. However, the clicked point in Map could/could not be relating to a store location. Therefore, we’ll create a method that returns the selected store if the clicked point represents a store, otherwise returns null.
private C1.Win.Map.VectorItem FindStore(C1.Win.Interop.Point point, C1.Win.Map.VectorLayer layer)
{
        foreach (C1.Win.Map.VectorPlacemark mark in layer.Items)
        {
            var p = mark.Geometry.Center;
            if (Math.Abs(p.X - point.X) < 1 && Math.Abs(p.Y - point.Y) < 1)
            {
                return mark;
            }
        }
        return null;
}
Once we know whether a clicked location is a store or not, we should distinguish the selected stores from all stores; therefore, we need two VectorLayers. If the clicked location is a store and was not selected, it would be added to the selected layer and removed from the normal layers (and vice-versa).
private C1.Win.Map.VectorLayer _selectedLayer;
public event EventHandler SelectedChanged;

private void Map_MouseClick(object sender, MouseEventArgs e)
{
        var point = _map.ScreenToGeographic(e.Location);

        var selectedStore = FindStore(point, _selectedLayer);
        if (selectedStore != null)
        {
            _selectedLayer.Items.Remove(selectedStore);
            _layer.Items.Add(selectedStore);
            SelectedChanged?.Invoke(this, e);
        }
        else
        {
            var store = FindStore(point, _layer);
            if (store != null)
            {
                _layer.Items.Remove(store);
                _selectedLayer.Items.Add(store);
                SelectedChanged?.Invoke(this, e);
            }
        }
}
With this, we can visualize the stores on the map and we can select/unselect them. To use this map as filter component, we’ll create custom data filter. Let’s see how.
2. Creation of custom filter:
Creation of custom filter requires implementing the C1.Win.DataFilter.CustomFilter class, which exposes Control property.
This property can be used to assign a map as data filter component. Also, the class exposes an event ValueChanged that informs it that selection values have changed.
private MapFilterView _mapFilterView;

public MapFilter()
{
        _mapFilterView = new MapFilterView
        {
            Height = 250
        };
        _mapFilterView.SelectedChanged += MapFilterView_SelectedChanged;
        Control = _mapFilterView;
}

private void MapFilterView_SelectedChanged(object sender, EventArgs e) =>                       OnValueChanged();
CustomFilter class also consists of two important abstract methods:
GetExpression and SetExpression. GetExpression method returns value of type C1.DataFilter.Expression. You should override this method to return your custom filter expression. In the custom expression, you should specify how you want the filter to operate. This can be done by setting PropertyName, Value and FilterOperation properties.
Here, the automobile company wants to present all the cars available in either of the selected locations so, we’d set the filter combination to OR.
protected override Expression GetExpression()
{
      var stores = _mapFilterView.GetSelectedStores();
      var expr = new CombinationExpression() { FilterCombination = FilterCombination.Or };
      foreach (var store in stores)
      {
           expr.Expressions.Add(new OperationExpression() { Value = store.ID, FilterOperation = FilterOperation.Equal, PropertyName = PropertyName });
      }
      return expr;
}
Custom filter is now built and ready to filter the available car models in C1TreeView.
3. Using custom filter:
Let’s open form designer. Drag-drop the C1DataFilter from ToolBox and set its DataSource. By default, DataFilter would use built-in filters to show filter options. To inform DataFilter to use the custom filter, we need to create its instance and set its PropertyName to the DataSource’s field for which custom filter component will be shown.
c1DataFilter1.DataSource = data;
var mapFilter = new MapFilter()
{
    HeaderText = "Store",
    PropertyName = "Store.ID"
};
The final step is to make the custom filter available in datafilter. This is done by adding the custom filter to DataFilter’s Filters collection.
c1DataFilter1.Filters.Add(mapFilter);
As soon as the custom filter is added, C1DataFilter starts using it for rendering Store.ID property field.
Download the demo
We invite you to share your ideas or use-cases that need custom data filters. We’d love to showcase them in the future blogs.
Also, please let us know how useful you found this article!

Ruchir Agarwal