Using the ComponentOne DataEngine API for ASP.NET Core
The ComponentOne DataEngine "C1DataEngine" WebAPI Service for ASP.NET Core is a RESTful API that provides high-performance analytics for large datasets. It allows importing the data from the SQL Server or from an enumerable collection. Once the data is imported successfully, queries can be created to perform grouping, join, filtering, and aggregation operation on this dataset.
Once a query is executed, resultset can be accessed as an in-memory list or a persistent memory-mapped file, and then we can call the provided APIs to get these results. After that the results can be bound to visualization controls such as Grid or Chart.
Before 2019v3, the DataEngine API was not available for a pure ASP.NET Core API application. In the latest version of 2019v3, we have added beta support for ASP.NET Core.
The C1 WebAPI DataEngine supports both the MVC with .NetFramework and ASP.Net Core from the 2019v3 release. However, cross-platform and cloud-based development & deployment support for ASP.Net Core makes it a better choice than traditional ASP.NET MVC.
In this article, we are going to learn to work with C1 DataEngine API and its usages with the following three sections:
- Configuring the DataEngine WebAPI on Server
- Using the WebAPI in the Client
- Communicating the OLAP
Before consuming the DataEngine API, we would need to configure the WebAPI on Sever.
Configure the DataEngine WebAPI on Server:
The DataEngine can be configured using the following two steps:
- Installing the DataEngine package
- Registering the DataEngine/DataSource
Step 1: Installing the DataEngine package
The DataEngine package can be installed from the NuGet manager in the existing API project or can be created using a new API project using C1Templates, which installs the required packages automatically.
Configure from NuGet package in the existing project: To install the DataEngine package in the existing project, go through the following steps:
- Right-click on Dependencies in Solution Explorer
- Select Manage NuGet Packages- Option
- Check the Include prerelease checkbox next to Search box at the top left
- Click on the Browse tab and type: C1.AspNetCore.Api.DataEngine” in search tab as attached image

- Select the Version “Latest prerelease 3.0.20193.222-beta” and click on Install
Create a Project Using the C1Template:
If you do not have any WebApi project in your ASP.NET Core application project. You may add the C1DataEngine API to your project with the following steps using the C1Template.
- In Visual Studio 2019, create a new project
- Search C1 Web API Application, select: “C1 Web API Application for ASP.NET Core (.NET Framework)” and click next
- Click: Create after providing Project name and location
-
Select ASP.NET Core 2.2 or higher and the Data Engine Services from the ComponentOne ASP.NET Web API application wizard as attached image:
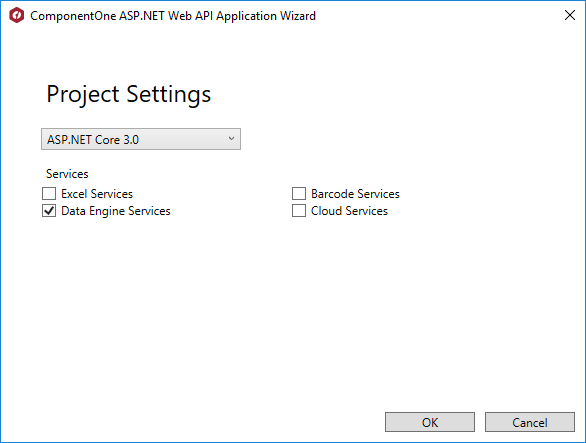
-
Click OK, and the project would be ready by installing the required packages

Using either of the above methods, we may install the required packages in the WebAPI project.
Step 2: Registering the DataEngine/DataSource
After installing the DataEngine package, we need to register DataEngine providers who would be required to access the API for various types of data.
For implementation refer to the following code snippet in Startup.cs file:
public void Configure(IApplicationBuilder app, IHostingEnvironment env)
        {
             ...
            app.UseDataEngineProviders()
                .AddDataEngine("complex10", () =>
                {
                    return ProductData.GetData(100000);
                })
                .AddDataSource("dataset10", () => ProductData.GetData(100000).ToList());
          }
In the above code, the AddDataEngine() and AddDataSource() method, accepts two parameters.
The first one is the data source key, which will be used later to access the Data Engine providers through API’s call.
The second parameter accepts the IEnumerable Data, which is used to process and provide the aggregate of the data or corresponding results as per the requested API.
Based on the above code snippet, a pertinent question must be asked as to why there is a need for AddDataEngine() & AddDataSource() ?
Here’s a basic difference between them:
| AddDataSource() | AddDataEngine() |
| Works with IEnumerable Data | Works with IEnumerable Data or DataBase |
| When number of records are upto 1M | Suitable for large records, records > 1M |
| Does not create cache files | Generates cache files at Server for faster Data access |
Add Cross-Domain Support (Optional):
By default, the API allows access from the same origin. To request API from all origins or some specified origin, we need to configure the CORS Setting by calling the AddCors() and UseCors() methods.
For implementation refer to the following code snippet in Startup.cs file:
// This method gets called by the runtime. Use this method to add services to the container.
        public void ConfigureServices(IServiceCollection services)
        {
            services.AddCors();            services.AddMvc().SetCompatibilityVersion(CompatibilityVersion.Version_2_2);        }

        // This method gets called by the runtime. Use this method to configure the HTTP request pipeline.
        public void Configure(IApplicationBuilder app, IHostingEnvironment env)
        {
            app.UseCors();
            app.UseMvc();
        }
Using the WebAPI in the Client:
Once the project is configured and executed, the DataEngine API can be accessed using the following URL:
http://{host}/api/dataengine/{key}/{command}
{host}: the root path of the API where it is hosted, in this case, we are using the hosted demo application @https://demos.componentone.com/ASPNET/5/C1WebAPI/3.0.20193.222/ as host name.
{key}: the string which is provided when the DataEngine Providers is added using the AddDataEngine() and AddDataSource() method is called in the startup.cs file. In this case, we would use the “complex10” as key.
{command}: the command is the action written for API to perform various queries. DataEngine has following features:
| Features | Description |
| fields | Get all the fields for the specified datasource |
| rawdata | Get the raw data of the data source for the specified datasource key |
| analysis | Create the aggregating query according to the specified data source and view Definition |
| status | Gets the status of the specified token. |
| cancel | Cancels the request specified by the token option. |
| resultdata | Gets the result data for the aggregating query specified by the token. |
| details | Gets the detail data for the specified cell. |
| uniquevalues | Gets the unique values of a field. Getting value list could take considerable time if number of rows in the source data is very large. |
Now, we'll discuss all the above features in detail.
Getting the Fields
In case of defining the columns for visualization control, it is required for the fields to be configured. Using this feature, we may get the field information for the specified table.
The fields can be fetched using the following API URL: http://{url}/api/dataengine/complex10/fields
The results for the above URL call would be as follows:
[
    {
        "header": "Active",
        "binding": "Active",
        "dataType": 3
    },
    {
        "header": "Country",
        "binding": "Country",
        "dataType": 1
    },
    {
        "header": "Date",
        "binding": "Date",
        "dataType": 4
    },…]
Getting the RawData
This feature of the DataEngine is quite useful since it allows us to fetch the raw data from the specified data source. This data can be shown in the Table or bind to the FlexGrid.
The following URL should be called to fetch the data from database:
http://{url}/api/dataengine/complex10?skip=10&top=10
The result for the above HTTP call would be as follows:
{
    "value": [
        {
            "ID": 10,
            "Product": "Xuni",
            "Country": "Portugal",
            "Date": "2015/05/21 00:00:00",
            "Sales": 2355,
            "Downloads": 1578,
            "Active": true,
            "Discount": 0.9948925734473824
        },
        {
            "ID": 11,
            "Product": "Wijmo",
            "Country": "India",
            "Date": "2015/05/11 00:00:00",
            "Sales": 6244,
            "Downloads": 114,
            "Active": false,
            "Discount": 0.007920812353454909
        },...
    ],
    "totalCount": 100000
}
Analysis: Creating the Query to Analyze the Response
Analysis features provide the API to create an analysis according to the specified data source and viewDefinition.
The view definition is a set of data containing the row, columns, and values fields to get the aggregated data. Here the row fields collection is used to specify the get the aggregated data based on specified row and value fields.
For example, if the row fields collection has “Country”,”Product” and value field is specified as "Sales”. In this case, sales would be calculated for each Country and Products.
It means each Country would have a product and corresponding sales information in the data. Here is the sample JSON object defining the viewDefinition to aggregate the data for specified data source:
var viewDefinition={
  fields:[
   {"binding":"Active","dataType":3},
   {"binding":"Country","dataType":1},
   {"binding":"Date","dataType":4},
   {"binding":"Discount","dataType":2},
   {"binding":"Downloads","dataType":2},
   {"binding":"ID","dataType":2},
   {"binding":"Product","dataType":1},
   {"binding":"Sales","dataType":2}
  ],
  rowFields:{items:["Product"]},
  columnFields:{items:["Country"]},
  valueFields:{items:["Sales"]}
}
The HTTP call to analyses the data is POST call with two parameter data source and viewDefinition. This HTTP call should be as follows:
$.ajax({
url: ". api/dataengine/complex10/analyses",
data: JSON.stringify({view: viewDefinition}),
success:function(data){}
})
This HTTP POST call provides the token and status of the Analyses process. The response would be as follows:
{
    "token": "f6e1d82b-e6ee-4e3c-8790-5c3bd50ded25",
    "status": {
        "executingStatus": "NotSet",
        "progress": 0
    }
}
Getting the Analysis Status
This API call provides the process status of the analysis process to get the aggregated data. It returns if the process is completed, Executing, Cleared, or Exception.
This is a HTTP GET API call which should be call as follows with the provided token:
http://{url}/api/dataengine/complex10/analyses/f6e1d82b-e6ee-4e3c-8790-5c3bd50ded25/status

Response:
{
    "executingStatus": "Completed",
    "progress": 100
}
Getting the Aggregated Data
Once the analysis process is completed, which can be checked using the status API, we are ready to fetch the aggregated data from the API for the specified Table and view definition.
The data can be fetched using the following HTTP GET call:
http://{url}/api/dataengine/complex10/analyses/f6e1d82b-e6ee-4e3c-8790-5c3bd50ded25/result

Response:
[
    {
        "Product": null,
        "Country": null,
        "Sales": 499559319
    },
    {
        "Product": null,
        "Country": "China",
        "Sales": 46061991
    },...
]
Cancel the Analysis Process
Sometimes the analysis process takes too much time to calculate the aggregate data because of a large number of records and complex view definitions. Occasionally user updates the view definition just after the analysis process is started. In all of the above cases, the previous call needs to be canceled to stop the analysis process.
The cancel API call is HTTP Delete call, and it requires the token for which the analysis process should be canceled.
$.ajax({
                     url: 'http://{url}/api/dataengine/complex10/analyses/f6e1d82b-e6ee-4e3c-8790-5c3bd50ded25/',
                     type: 'DELETE',
                     dataType: 'json',
                     success: function (data) {
                     },
                 });
As a result, it returns the status of the call which is as follows:

Getting the Detail Data for Specified Cell:
In some cases, we required to get the raw data for a specific cell in the output table. The following would be the HTTP Post call for fetching the data:
$.ajax({
                     url: 'http://{url}/api/dataengine/complex10/analyses/f6e1d82b-e6ee-4e3c-8790-5c3bd50ded25/',
                      type: 'POST',
                      dataType: {skip: 0,top: 10,view: viewDefinition,keys: [ “Aoba”,”China”]},
                      success: function (data) {

                     }
                 });
While fetching the raw data for a specific cell, the keys parameter is an array object. First, we need to add the values of the fields in rowFields in order into keys. Then add the values of the fields in columnFields in order. If some field value is null, just add null into array and DO NOT remove it.
We should keep the count of the keys array the same as the count of the fields in rowFields and columnFields.
The response would be as follows for the HTTP call:
{
    "value": [
        {
            "Active": false,
            "Country": "China",
            "Date": "2015/01/28 00:00:00",
            "Discount": 1,
            "Downloads": 473,
            "ID": 13813,
            "Product": "Aoba",
            "Sales": 3852
        },…],
    "totalCount": 2373
}
Getting Unique Values for Specific Field:
The unique values for specific fields required to show the unique data in the filter or getting a number of unique records for that field.
This is a HTTP Post call which requires the data source, field name, view definition as a parameter. The URL for this would be as follows:
$.ajax({
                      url: 'http://{url}/api/dataengine/complex10/fields/Product/uniquevalues ',
                       type: 'POST',
                       dataType: {view: viewDefinition},
                       success: function (data) {
                       }
                 });
The response for the above HTTP call would be as follows: ["Aoba","Olap","Wijmo","Xuni"]
Communicating with OLAP Controls
We have seen each of the features with how to use the API by passing the parameter. Now, we would see how to communicate the DataEngine API with C1 OLAP control.
OLAP is a powerful technology that is often used for complex analytical calculations and viewing reports based on specified fields.
Pivot is one of the most popular features for Excel, which caters to data analytics on tabular data. C1OLAP is very similar to Excel Pivot tables, which makes it easy to use for end-users. DataEngine takes OLAP control to the next level (since it can process aggregation over a huge amount of data in a fraction of a second).
How Data Engine Works
Let's say we have a database with millions of records, and we want to create dynamic reports to display aggregated data based on the user queries created from the Existing table column fields.
- OLAP control performs the complex task of creating dynamic queries
- After this operation, the query is sent to the server
- Server fetches the data from the Database.
- DataEngine helps to reduce the time to fetch data by creating the cache on server
The diagram below explains how DataEngine and OLAP interact to create data reports: 
Now, let's discuss how DataEngine API can be configured to be used in Wijmo, MVC Edition, and MVC Core edition OLAP controls.
The DataEngine service can be consumed in the following products:
- Wijmo OLAP
- MVC Edition OLAP
- MVC Core Edtion OLAP
Data Engine service can be consumed by PivotEngine control, to provide the data to display in the following UI controls.
- Pivot Grid
- Pivot Chart
Also, field configuration by user is allowed using the PivotPanel, which provides the UI to modify the query to fetch analytic data from the server.
While using the C1DataEngine with the C1PivotEngine, ensure that Bind(url) method should be used when the row count < 10K.
Implementation code for consuming C1 DataEngine API:
Wijmo OLAP
// initialize pivot engine
    var svcUrl = 'https://demos.componentone.com/ASPNET/c1webapi/4.0.20173.114/api/dataengine/';
    var ngCube = new wjOlap.PivotEngine({
        // connect to ComponentOne Data Service
        itemsSource: `${svcUrl}complex10`,
        // build default view
        valueFields: ['Sales', 'Downloads'],
        rowFields: ['Country', 'Product']
    });
    // show pivot panel
    var pivotPanel = new wjOlap.PivotPanel('#pivotPanel', {
        itemsSource: ngCube
MVC Edition OLAP
@(Html.C1().PivotEngine().Id("dataEngine")
        .BindService("~/api/dataengine/complex10")
        .RowFields(pfcb => pfcb.Items("Country"))
        .ColumnFields(cfcb => cfcb.Items("Product"))
        .ValueFields(vfcb => vfcb.Items("Sales")))
  @Html.C1().PivotPanel().ItemsSourceId("dataEngine")
@Html.C1().PivotGrid().Id("indexGrid").ItemsSourceId("dataEngine")
MVC Core Edition OLAP
@using C1.Web.Mvc.Grid
<c1-pivot-engine id="dataSourceEngine" service-url="~/api/dataengine/complex10">
    <c1-view-field-collection c1-property="RowFields" items="Country"></c1-view-field-collection>
    <c1-view-field-collection c1-property="ColumnFields" items="Product"></c1-view-field-collection>
    <c1-view-field-collection c1-property="ValueFields" items="Sales"></c1-view-field-collection>
</c1-pivot-engine>
<c1-pivot-panel items-source-id="dataSourceEngine"></c1-pivot-panel>
<c1-pivot-chart items-source-id="dataSourceEngine"></c1-pivot-chart>
<c1-pivot-grid items-source-id="dataSourceEngine"></c1-pivot-grid>
Demos Links:
MVC Core OLAP with DataEngine API | Wijmo with DataEngine API
Additional resources to learn more about C1DataEngine:

Manish Gupta