Digital image manipulation is necessary and helpful in many different instances, from media for magazines, to product photos in e-commerce, to invitations or flyers. When processing an image, the size, color, or effects of the image can be modified to enhance or clarify the end result. This process can include inserting shapes such as rectangles, ellipses, or custom figures.
An imaging API can help achieve image processing. This article describes how the Document Solutions for Imaging (DsImaging, previously GcImaging) .NET API allows you to create and edit graphics and text to create high-production quality images for .NET Core apps.
DsImaging is an image library that can be used for image processing without the need for an external image editor. It can create, load, modify, and save images programmatically in .NET Standard 2.0 and .NET Core 3 applications. It provides a rich set of features for image processing such as applying effects, adding text, shapes or other graphics, and many more. You can explore these features with the help of our demos and documentation.
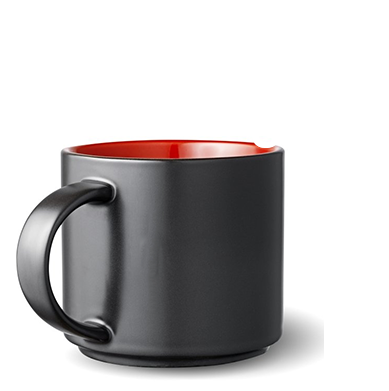
In this demo, we will add a discount tag to a promotional product in an online store. The discount offer will be displayed inside a semi-transparent shape form.
Download a Free Trial of Document Solutions for Imaging Today!
Step 1: Render the product image on target BitMap
We'll create an object of the GcBitMap class and get the corresponding graphics object using the CreateGraphics method. The graphics object is of type GcBitmapGraphics class which provides different methods to draw text/shapes/graphic elements. Use the DrawImage method of the GcBitmapGraphics class to render the image on the target bitmap:
using (var bmp = new GcBitmap(420, 400, true))
using (var g = bmp.CreateGraphics(Color.White))
{
  using (var img = Image.FromFile(@"Images\eCommerceProduct.png"))
  {
    g.DrawImage(img, new RectangleF(2, 10, 400, 400), null, ImageAlign.ScaleImage);
  }
}
Step 2: Add a semi-transparent shape for discount displaying
We'll use a custom shape to display the discount offer which can be created using a graphics path. A graphics path can be any shape created using a sequence of connected lines and curves.
The graphics path uses CreatePath method of the GcBitmapGraphics class. The code below defines a method to create a graphic path:
public IPath CreatePath(RectangleF rc, GcGraphics g)
{
    var c = new PointF(310, 123);
    float r1 = 100f;
    float r2 = 65f;
    var degreesToRadians = Math.PI / 180;

    var path = g.CreatePath();
    path.BeginFigure(new PointF(c.X + r1, c.Y));
    for (int i = 0; i < 15; i++)
    {
        var angle = (24 * i + 12) * degreesToRadians;
                path.AddLine(new PointF((float)(r2 * Math.Cos(angle)) + c.X, (float)(r2 * Math.Sin(angle)) + c.Y));
        angle = (24 * i + 24) * degreesToRadians;
        path.AddLine(new PointF((float)(r1 * Math.Cos(angle)) + c.X, (float)(r1 * Math.Sin(angle)) + c.Y));
       }
      path.EndFigure(FigureEnd.Open);
      return path;
    }
Draw the graphics path on the product image and fill with a semi-transparent color. The DrawPath and FillPath methods of the GcBitmapGraphics class will be used to draw and fill the path respectively.
var semiTransparentColor = Color.FromArgb(100, Color.Red);
var path = CreatePath(new RectangleF(200, 15, 210, 210), g);
g.FillPath(path, semiTransparentColor);
g.DrawPath(path, semiTransparentColor);
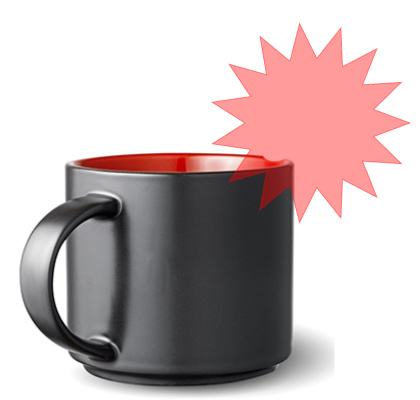
Step 3: Add discount offer text to the discount tag
We'll create a TextFormat object to define the format settings used to render the text, such as font, font size etc. and render the text using the DrawString method of the GcBitmapGraphics class.
var tf = new TextFormat()
         {
           Font = Font.FromFile(@"Fonts\times.ttf"),
           FontSize = 36
         };
g.DrawString("50% OFF", tf, new RectangleF(260, 80, 100, 100),
                    TextAlignment.Center, ParagraphAlignment.Center,
                    true);

Step 4: Save the new image as JPEG image
Save the product image with the discount offer to any of the supported image formats. We are using the SaveAsJpeg method of the GcBitMap class to save the image in jpeg format.
bmp.SaveAsJpeg(@"result.jpg");
And there you have it! The steps help you customize existing images to create a new image with additional information. You can either design a completely new image or transform an existing image by adding different graphics and text objects.
Download the DsImaging sample here and try it for yourself.
Be sure to leave any thoughts or questions in the comments section below. Happy coding!
Ready to Try Out the Imaging API? Download Document Solutions for Imaging Today!
Related Blogs
Try Our .NET Imaging API

Manpreet Kaur