Getting Started with Xuni and Xamarin.iOS
If you're evaluating or just getting started using Xuni in a Xamarin.iOS app then start right here. This blog post gives you the inside scoop to everything available to you to get up and running with Xuni and Xamarin.iOS. I've divided this into six parts. Parts 1-3 focus on setting up Xuni and getting to familiar with resources. Then parts 4-6 dive into development with Xuni and Xamarin.iOS. 
Part 1: Downloading and Setting Up Xuni
Xuni is distributed as NuGet packages for use with the Xamarin Platform. You must download and install Xuni from www.goxuni.com at least once to not only get the latest packages, but to install the GrapeCity NuGet feed. We provide an MSI for Windows and a PKG for Macs. Once you’ve installed Xuni, you can proceed to use the packages in one of two ways:
- Copy the installed packages (\Documents\Xuni\Xamarin\NugetPackages) to your local NuGet feed. Read more about hosting your own NuGet feeds. This option is ideal if you need strict control over the libraries being used in a project. If that isn’t important, then you’ll probably prefer the second option.
- Browse and add packages to your projects from the GrapeCity NuGet feed (http://nuget.grapecity.com/nuget/). When you install Xuni, we add this feed automatically to your NuGet sources inside Visual Studio and Xamarin Studio. Updating is very straightforward because you can continue to receive updates directly from NuGet rather than downloading them manually from goxuni.com. The NuGet manager inside Visual Studio lets you install specific versions even, so rolling back is also very easy.
In part 4, we’ll look at how to work with the GrapeCity NuGet feed.
Part 2: Getting Familiar with the Documentation
As you continue working with Xuni beyond this tutorial, you’ll undoubtedly need to check the documentation at some point. So it’s good to know exactly where to look since we provide three different versions of the documentation: Xamarin.Forms, Android and iOS. It’s pretty straightforward unless you’re working with Xamarin.Android or Xamarin.iOS. Which set of documentation should you use? You should use the Android or iOS docs. We provide C# code snippets alongside the Java, Swift or Objective-C code in the Android and iOS documentation.
- Documentation Home
- Xamarin.Forms Docs
- Android Docs (includes Xamarin.Android)
- iOS Docs (includes Xamarin.iOS)
So if you’re looking for Xamarin.iOS-compatible code, check the iOS docs.
Part 3: Running the Xuni Samples
If you’re evaluating Xuni for the first time, the simplest and quickest way to test Xuni on your iOS simulator is to run the samples. When you install Xuni, the Xamarin.iOS samples get installed at \Documents\Xuni\Xamarin\Samples\iOS. Or, if you prefer, you can download the latest samples individually from GoXuni on GitHub. You can also just view the code on GitHub without having to download anything. At either location, we have several sample projects: one for each major control. They work in Xamarin Studio and Visual Studio. So long as you didn’t remove the GrapeCity NuGet feed, you should be able to just open, build and run these projects. Your IDE will first automatically download the packages. Then you can dig into the code and play with the controls to see how they work. Xuni controls do require a runtime license key, which our samples have included. I’ll cover more on licensing in part 6. There’s also the Xuni Explorer demo app, which you can install from the app marketplace. This is helpful to quickly browse the capabilities, but it doesn’t show the code. So now you can easily run our samples, but eventually you’ll want to test the Xuni control in your app with your data. That’s next. I also cover parts 4, 5 and 6 in this video.
Part 4: Adding Xuni Packages to Your Xamarin.iOS Project
Let’s assume you’ve already created a Xamarin.iOS project. I will show the instructions for Xamarin Studio since I covered Visual Studio in my Xamarin.Android post.
- To begin adding the Xuni NuGet packages, right-click the project name in the Solution Explorer and select Add > NuGet Packages. Make sure the GrapeCity package source is selected (or your local feed that contains the Xuni packages).
- Then browse and locate the Xuni package for the controls you wish to use. For instance, I’ll use the gauge controls. Since this is a Xamarin.iOS app, make sure to select the package that starts with Xuni.iOS.
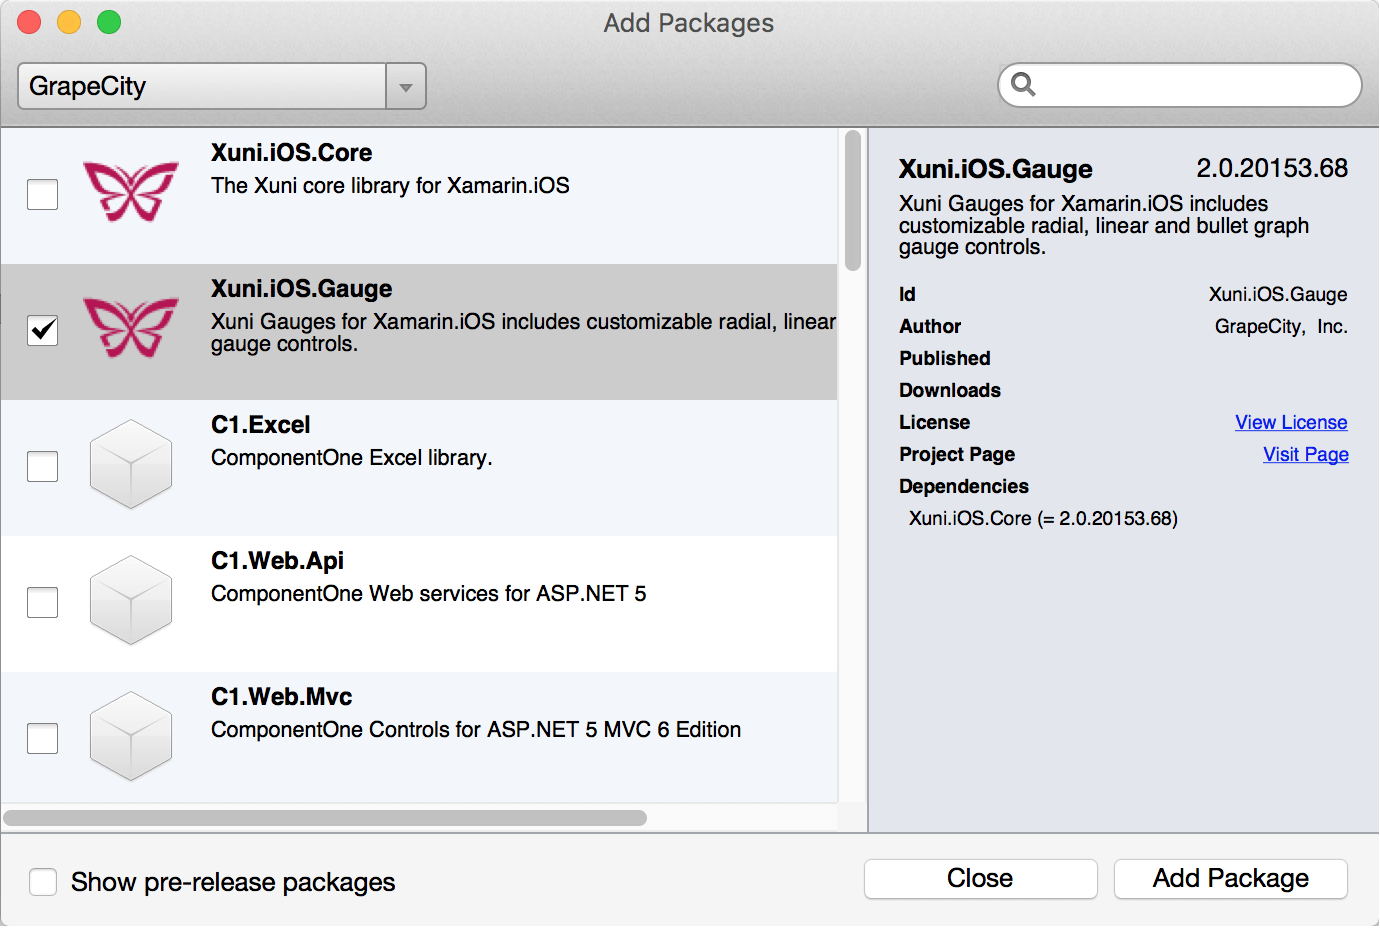
- Click Add Package.
- Dependencies are automatically handled by NuGet, so now you’ll see both the Xuni.iOS.Gauge package and the Xuni Core (a dependency).

You’re now ready to reference Xuni packages in code. Let’s add a control to an activity next.
Part 5: Adding a Xuni Control to a View Controller
You can add Xuni controls using the storyboard, but since Xuni is backward compatible to iOS 7 it's a limitation out of the box. So I will show how to create the control completely in code. At the top of the page add a using statement for the Xuni library.
using Xuni.iOS.Gauge;
Within the ViewDidLoad method instantiate a new XuniRadialGauge and set a few properties.
XuniRadialGauge radialGauge = new XuniRadialGauge();
radialGauge.Min = 0;
radialGauge.Max = 100;
radialGauge.Value = 75;
To define the layout bounds of the control you can set the Frame poprety, which is a Core Graphics Rectangle. This code draws the gauge with a 10 pixel margin on the left and right, and a 40 margin at the top. The height will be half the available height of the page.
radialGauge.Frame = new CoreGraphics.CGRect (10, 40, View.Bounds.Width - 20, View.Bounds.Height / 2);
The control is now defined so let's add it as a subview to the View.
View.AddSubview (radialGauge);
The control is now ready to go, but there’s one final step before we run the app—we need to add a Xuni runtime key for our app.
Part 6: Licensing Your App
Licensing is a required step to evaluate or use Xuni controls within your own app. The Xuni controls contain runtime license validation per app. As I mentioned above, the Xuni samples already have a license key unique to that sample so they run “out of the box.” To generate a runtime key for your app:
- Log in on www.goxuni.com. If you don’t have an account, you’ll need to create one. (It’s free.)
- Select License Your App from the support menu.
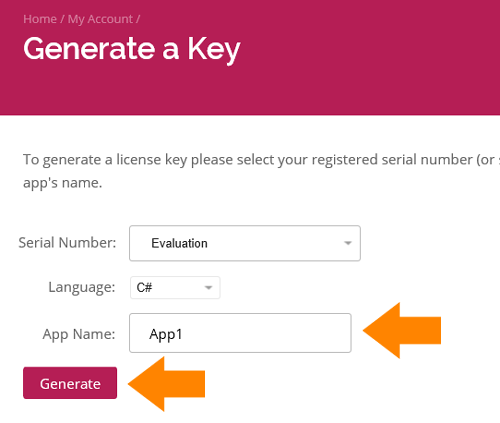
- Select Evaluation or Full, depending on the type of key you’re generating.
- On the Generate a Key page, select C# and enter the name of your app, which should also be the default namespace.
- Click generate.
- Take this key and copy it into your project. The simplest way to do this is to create a new class, named License.cs. The outputted text from the website includes the static class declaration so it’s very easy to just paste this into your editor.
- Finally, in your code, before you initialize the Xuni control, set the Xuni.iOS.Core.XuniLincenseManager.Key property to your key.

Xuni.iOS.Core.XuniLicenseManager.Key = License.Key;
Now you should be up and running with Xuni in your Xamarin.iOS app! When you purchase Xuni, you’ll get a serial number. Register that serial number at http://www.goxuni.com/my-account, and when you generate new app keys, you’ll be able to select your serial number rather than selecting Evaluation. For full steps on licensing, check out the documentation. — Thanks for reading and thanks for evaluating Xuni!

Greg Lutz