How to Compare Performance between .NET 5 and .NET Framework Controls
Microsoft released the latest version of its highly popular application development platform – .NET 5 – at the .Net Conf 2020 on November 10th, 2020. At this time, we at GrapeCity provided our .NET 5 UI controls for a wide variety of .NET development platforms and in particular, the WinForms platform. These controls will be the basis for all future versions of .NET 6 and beyond.
We want to present our results about performance comparison of .NET 5 and .NET 4.5.2 based on our flagship control for WinForms – FlexGrid, but the first thing we need to figure out is how to test and measure the performance of FlexGrid.
This blog demonstrates how to set up, build, run, and obtain output results of a simple benchmark app that compares FlexGrid for .NET 5 and .NET Framework 4.5.2.
Setup
Last year's BenchmarkDotNet became the standard tool for measuring the performance of the .NET code. It is widely used by different companies, for example, Microsoft, which uses it to measure the performance of .NET runtimes.
In this blog, we'll use this tool to create our benchmarks and compare the performance of .NET Framework 4.5.2 and .NET 5 FlexGrid.
Project definition
The base content of our .csproj file looks like below:
<Project Sdk="Microsoft.NET.Sdk">

  <PropertyGroup>
    <OutputType>Exe</OutputType>
    <TargetFrameworks>net461;net5.0-windows</TargetFrameworks>
    <EnableDefaultCompileItems>false</EnableDefaultCompileItems>
    <EnableDefaultEmbeddedResourceItems>false</EnableDefaultEmbeddedResourceItems>
    <EnableDefaultNoneItems>false</EnableDefaultNoneItems>
  </PropertyGroup>

  <PropertyGroup Condition="'$(TargetFramework)'=='net461'">
    <DefineConstants>CLR461</DefineConstants>
  </PropertyGroup>

  <PropertyGroup Condition="'$(TargetFramework)'=='net5.0-windows'">
    <DefineConstants>CLR5</DefineConstants>
    <UseWindowsForms>true</UseWindowsForms>
  </PropertyGroup>

  <ItemGroup>
    <PackageReference Include="BenchmarkDotNet" Version="0.13.0" />
  </ItemGroup>

  <ItemGroup Condition="'$(TargetFramework)'=='net461'">
    <Reference Include="System.Windows.Forms" />
    <PackageReference Include="C1.Win.C1FlexGrid" Version="4.5.20211.502" />
    <EmbeddedResource Include="Properties\licenses.licx" />
  </ItemGroup>

  <ItemGroup Condition="'$(TargetFramework)'=='net5.0-windows'">
    <PackageReference Include="C1.Win.FlexGrid" Version="5.0.20211.502" />
  </ItemGroup>

</Project>
This lets us execute the benchmarks for .NET Framework 4.6.1 and .NET 5. The .csproj file references C1FlexGrid NuGet packages for different runtimes. It also references the Benchmark.NET NuGet package (the latest release of version 0.13.0), which we use to create benchmarks. Although we have different namespaces for .NET Framework 4.5.2 and .NET 5 C1FlexGrid control in our packages, we use conditional compilation symbols to include proper namespaces inside benchmark files.
Runtime
BenchmarkDotNet targets netstandard2.0, so we cannot use .NET Framework 4.5.2 as target framework for our .Net 4.5.2 measurements.
However, as BenchmarkDotNet documentation says:
Full .NET Framework always runs every .NET executable using the latest .NET Framework available on a given machine. So if you try to run the benchmarks for a few .NET TFMs, they are all going to be executed using the latest .NET Framework from your machine. The only difference is that they will have different features enabled depending on the target version they were compiled for. You can read more about this here and here. This is .NET Framework behavior which can not be controlled by BenchmarkDotNet or any other tool.
So, we use the closest available target framework for measuring .NET 4.5.2 FlexGrid – .NET 4.6.1 to reduce the available features. It executes on the latest available .Net Framework runtime – 4.8.
How to run
To run the benchmarks, we execute such command from Visual Studio Developer Command Prompt:
dotnet run -c Release -f net461 --runtimes net461 net5.0-windows --filter **
However, sometimes dotnet.exe cannot build project which contains .licx files and raises the error:
error MSB4062: The "Microsoft.Build.Tasks.LC" task could not be loaded from the assembly Microsoft.Build.Tasks.Core, Version=15.1.0.0, Culture=neutral, PublicKeyToken=b03f5f7f11d50a3a. Confirm that the UsingTask declaration is correct, that the assembly and all its dependencies are available, and that the task contains a public class that implements Microsoft.Build.Framework.ITask.
There is also the posted issue, that dotnet.exe doesn’t support it.
In that case, you can build the project with Visual Studio (in Release configuration) and run the command:
dotnet run -c Release -f net461 --runtimes net461 net5.0-windows --filter ** --no-build
Both commands are available as .cmd files in the root folder of the benchmark application.
Hardware
All measurements provided in this blog post were done on a laptop with Intel Core i9-10980HK 2.40GHz CPU, NVIDIA GeForce RTX 2080 Super Max-Q graphics adapter, 32GB DDR4 RAM, M.2 NVMe PCIe 3.0 SSD, 15.6" 4K/UHD display with 250% scaling.
The exact brand and model of the laptop is ASUS ROG Zephyrus Duo 15 GX550LXS-HC066T.
Data generation
In our benchmarks, we bind FlexGrid to the DataSource, which is a common scenario of using data grid control and especially FlexGrid.
We have data generator utility class which provides the DataTable with columns of the following types:
private static readonly Type[] DataTypes = new Type[]
{
    typeof(int),
    typeof(string),
    typeof(double),
    typeof(DateTime),
    typeof(decimal),
    typeof(bool),
    typeof(int) // for DataMap
};
Such structure of columns with the types defined above repeats until the number of columns does not exceed. The last column is used for FlexGrid DataMap property, and it is the other common scenario used by our customers in their apps.
We use Random class for data generation, which generates different values (numbers, dates, strings with different characters, which might include spaces or not, etc.).
But for making the produced DataTable stable each iteration, we use Random class constructor with seed parameter:
Random _random = new Random(0);
This approach allows us to get the same data for the same row and column count and get heterogeneous data values.
Base class for benchmarks
As a base of our benchmarks, we use the following class:
[MemoryDiagnoser]
[RPlotExporter]
[MinIterationCount(30)]
[MaxIterationCount(10000)]
public abstract class BaseBenchmarks
{
    [Params(10000, 100000, 1000000)]
    public virtual int RowCount { get; set; }

    [Params(20, 50, 100, 200)]
    public virtual int ColumnCount { get; set; }
}
There are several BenchmarkDotNet attributes used:
- MemoryDiagnoser – allows measuring memory allocated for the benchmark.
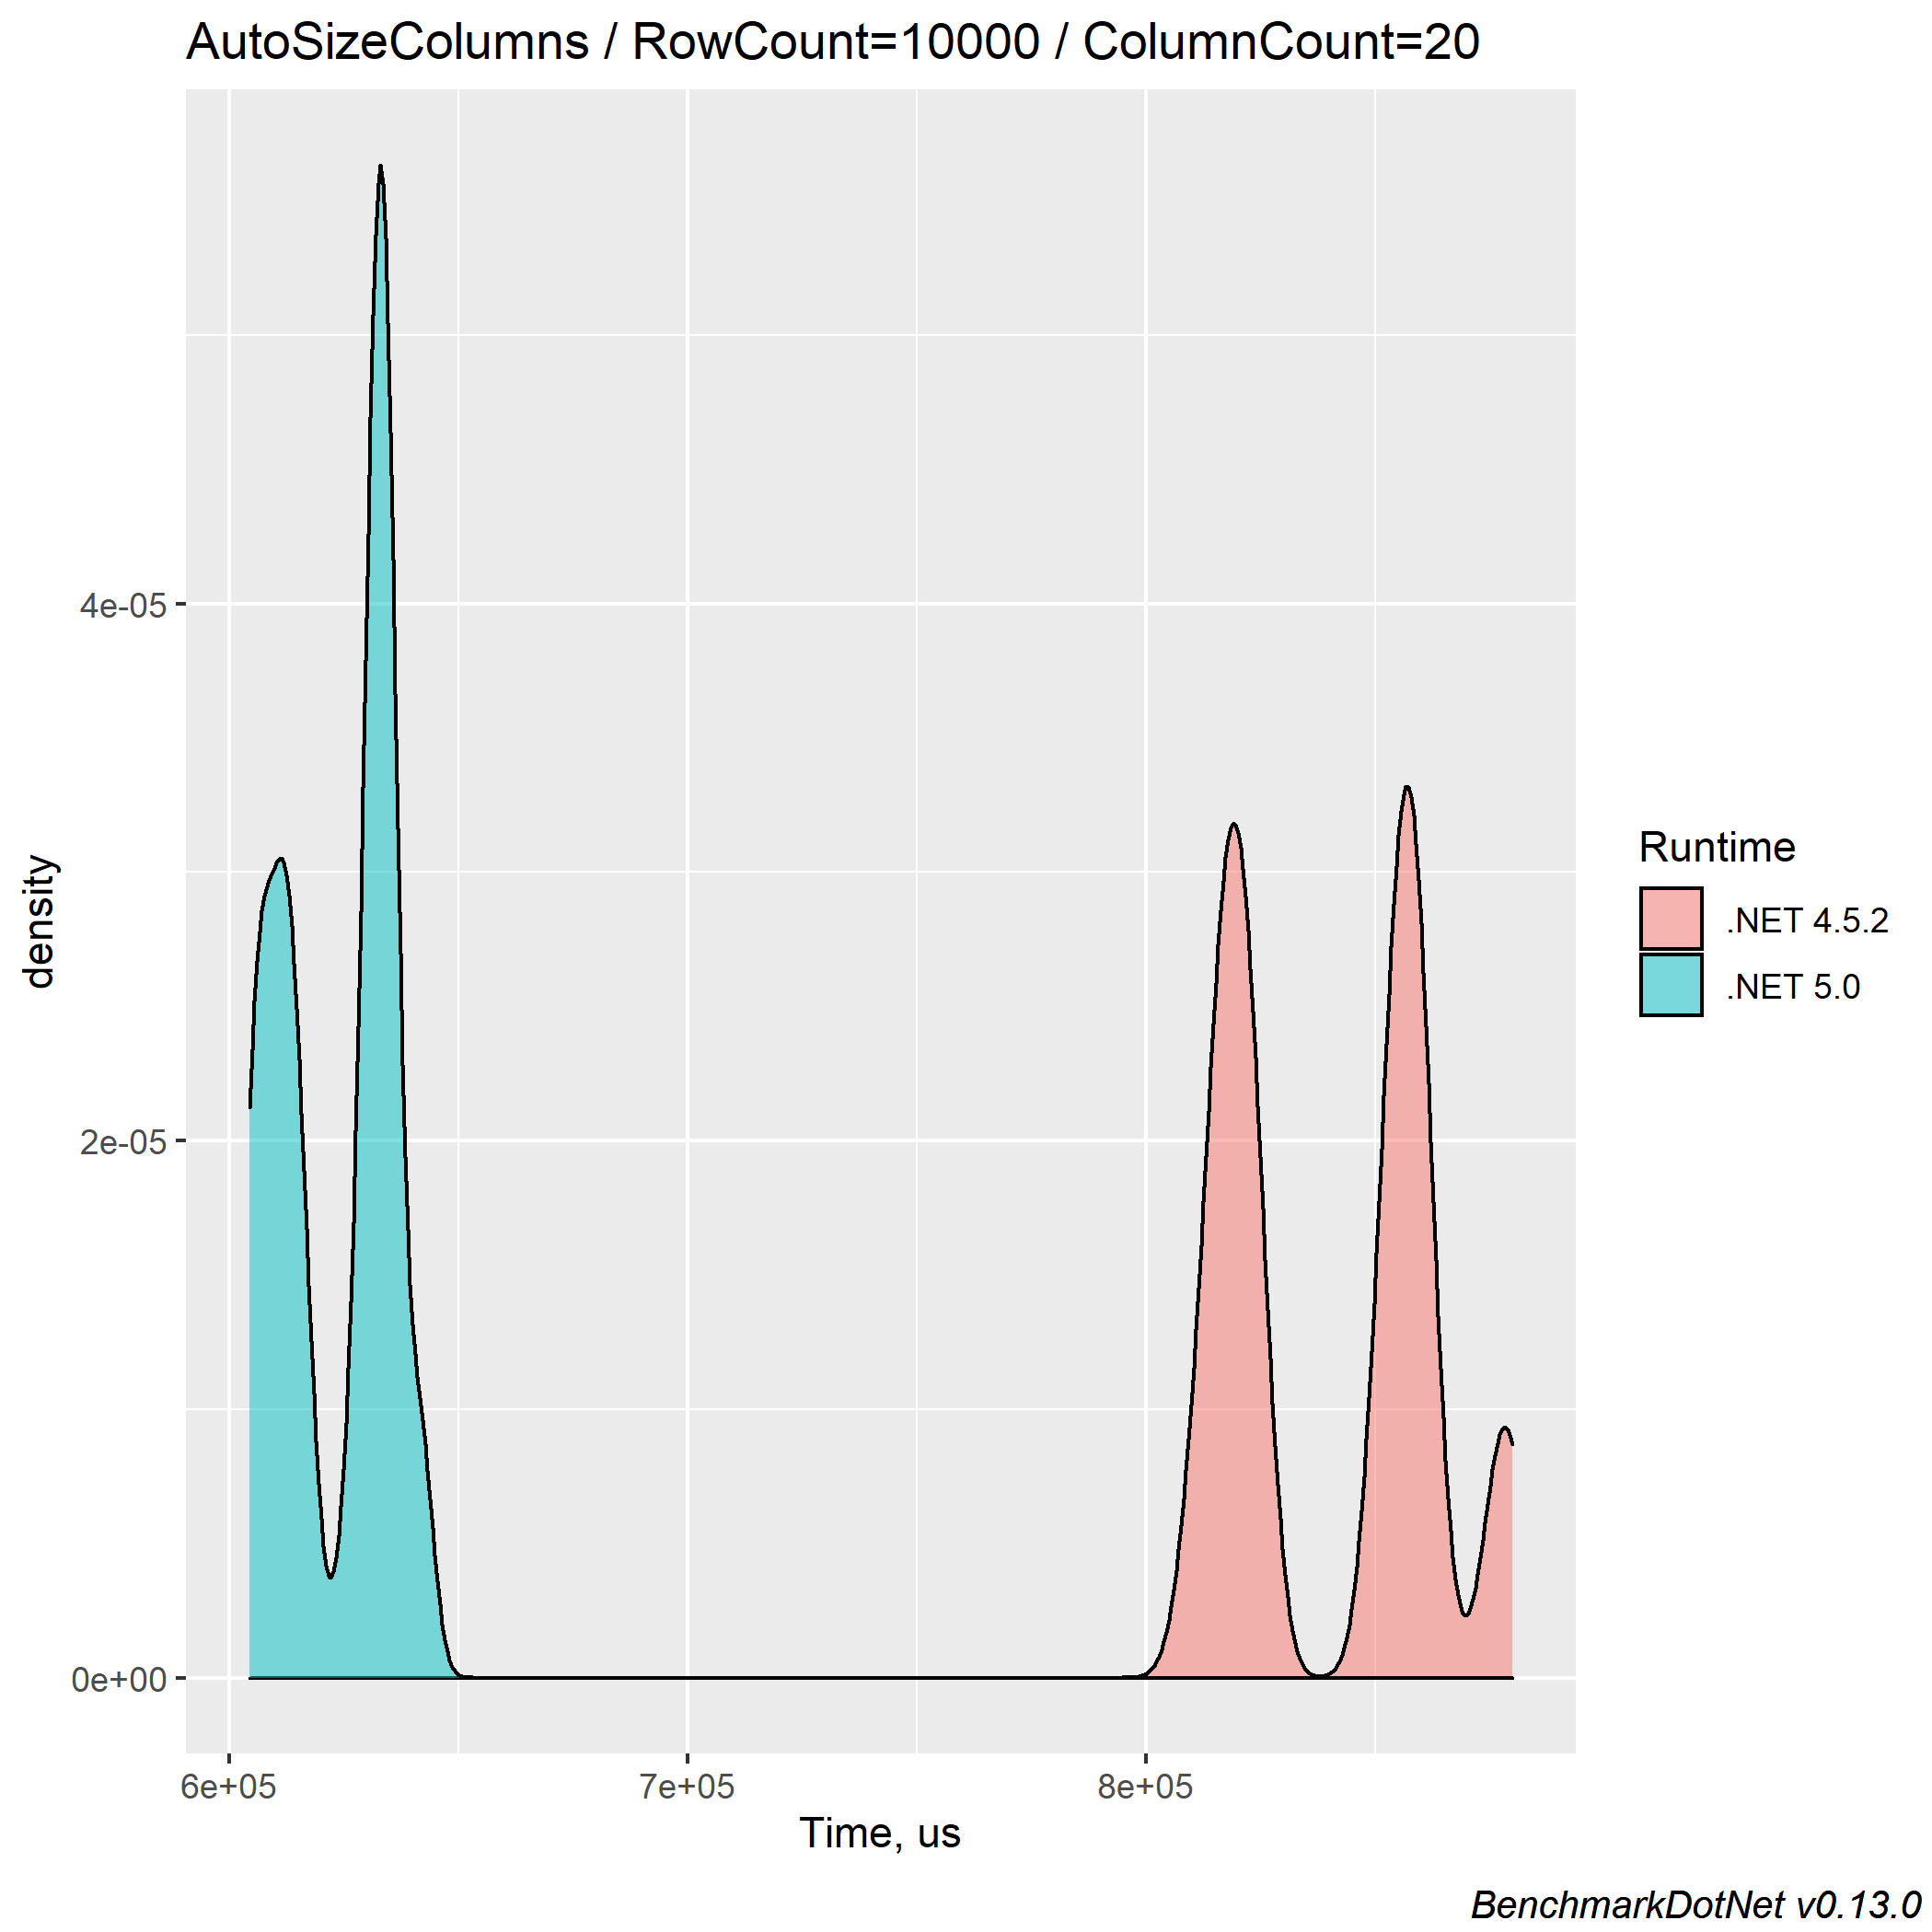
- RPlotExporter – generates the script (BuildPlots.R) for R, which produces a lot of different plots describing results. For this blog, we provide density plots that show how many times the measurement value of operation has occurred.
- MinIterationCount and MaxIterationCount – these values define the minimum and maximum iterations for each benchmark. The concrete value of iteration count BenchmarkDotNet chooses by an internal algorithm.
Also, there are two different properties – RowCount and ColumnCount with different values in its Params attribute. These attributes define the amount of data (row and column count of DataTable) that is generated for benchmarks. We defined these as virtual properties because, for some tests, we change them to other values.
Each benchmark class derived from described base class.
Benchmark setup and cleanup
BenchmarkDotNet allows executing some code before or after benchmark itself. We use such ability for preparing data, setup FlexGrid, and parent form.
In most cases we generate all data in GlobalSetup method:
[GlobalSetup]
public void GlobalSetup()
{
    _data = DataGenerator.Generate(RowCount, ColumnCount);
}
and dispose it in GlobalCleanup method:
[GlobalCleanup]
public void GlobalCleanup()
{
    _data?.Dispose();
    _data = null;
}
For each benchmark iteration, we create a form, place FlexGrid on it, show the form, and paint FlexGrid:
[IterationSetup]
public void IterationSetup()
{
    _form = new Form() { WindowState = FormWindowState.Maximized };
    _flexGrid = new C1FlexGrid() { Dock = DockStyle.Fill, UseCompatibleTextRendering = false };
    _form.Controls.Add(_flexGrid);
    _form.Show();
    _flexGrid.Refresh();
}
In the previous code snippet, the Refresh method was used to ensure that everything was drawn before benchmark execution, and we see the correct data.
Also, after each benchmark iteration, FlexGrid paints itself one more time, and we dispose of the form and FlexGrid:
[IterationCleanup]
public void IterationCleanup()
{
    _flexGrid.Refresh();
    _flexGrid?.Dispose();
    _flexGrid = null;
    _form?.Dispose();
    _form = null;
}
This setup allows us to generate data once for all iterations and have clean FlexGrid every iteration, not affected by previous ones.
Output
After measurements are done, BenchmarkDotNet generates a nice table with results. But for some reason, it sorts the table entries by parameters firstly.
We organize the output sorted by benchmark class and name, parameters, and then runtime by using this class as orderer:
public class SummaryOrderer : DefaultOrderer
{
    public override IEnumerable<BenchmarkCase> GetSummaryOrder(ImmutableArray<BenchmarkCase> benchmarksCase, Summary summary) =>
        from benchmark in benchmarksCase
        orderby benchmark.Descriptor.Type.ToString(),
            benchmark.Descriptor.WorkloadMethod.Name,
            benchmark.Parameters["RowCount"],
            benchmark.Parameters["ColumnCount"],
            benchmark.Job.Environment.Runtime.Name descending
        select benchmark;
}
As previously mentioned, using the RPlotExplorer attribute for benchmark class, we get density plots that show the measurement value of operation during all measurements.
Benchmark method
We provided a brief description of one common FlexGrid tested operation – automatic adjusting of column sizes, which can be run with AutoSizeCols method.
Since it is a brief explanation of the methodology of testing, we decrease the maximum amount of row count to make the test execution not so long:
[Params(10000)]
public override int RowCount { get; set; }
The benchmark method looks like this:
[Benchmark]
public void AutoSizeColumns()
{
    _flexGrid.AutoSizeCols();
}
The output summary table looks like this:
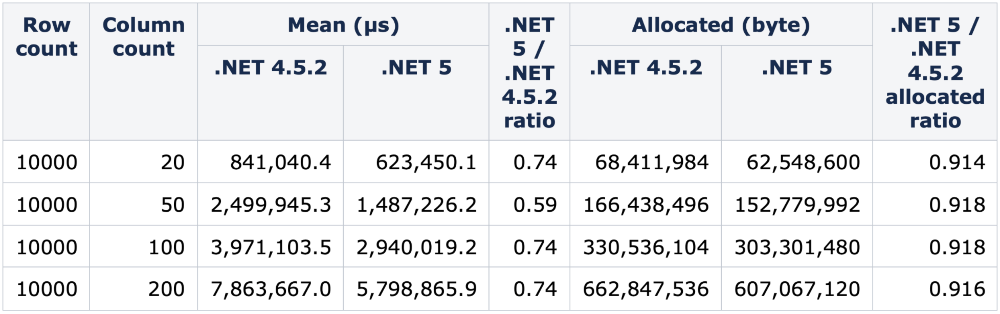
And the density plot:
In this blog, we provided information how to setup, build, run and obtain output results of simple benchmark app which compares FlexGrid for .NET 5 and for .NET Framework 4.5.2.
Next time, we'll measure the different common operations of FlexGrid and analyze the performance improvements of .NET 5 compared to .NET Framework 4.5.2.

MESCIUS inc.