How to Create Custom Reports using Excel (.xlsx) Templates in .NET
Every organization, irrespective of the domain, undergoes certain routine tasks, like planning and managing projects, placing orders, maintaining inventory, and generating invoices. To keep the business flow organized, these tasks require many hours of dedicated work. Organizations are looking for ways to cut this time and automate their processes. This is where bound structured documents (templates) can help.
A template is a pre-defined and formatted workbook that is used to help create the final report. Once you have the template, it just needs only minor tweaks to adjust according to the purpose and can thereafter be used time and again, saving you a lot of wasted effort.
Introducing DsExcel Templates
Document Solutions for Excel (DsExcel, formerly known as GcExcel) introduces new template support with comprehensive syntax and API to bind Excel documents to data and create Excel reports with advance layouts. With flexible template syntax, easy notations, support for various types of data sources, and need for minimal programming, DsExcel Templates are easy to use to define Excel templates and create Excel reports.
To understand how easy it is to use DsExcel Templates, let’s generate a quarterly products sales report.
Generate Quarterly Products Sales Report using Templates
A sales report gives an overview of the state of the sales activity within a company. It shows different trends happening in the sales volume and alerts management to any potential issues. Taking regular snapshots of the product-wise sales helps to assess whether they're generating expected revenue.
Let’s say there are several products sold by an organization. To analyze how the sales trend has changed over the years, they wish to generate a sales report. Instead of manually preparing the sales report, the company wants to automate the process of fetching products and their sales information from the database and generate a quarterly sales report as an Excel spreadsheet.
Using DsExcel Templates, the above requirement is straightforward to implement as the developer. Design the template in MS Excel, apply simple code to bind the template with the database, and DsExcel will generate separate Excel spreadsheet w.r.t product sales for each financial year.
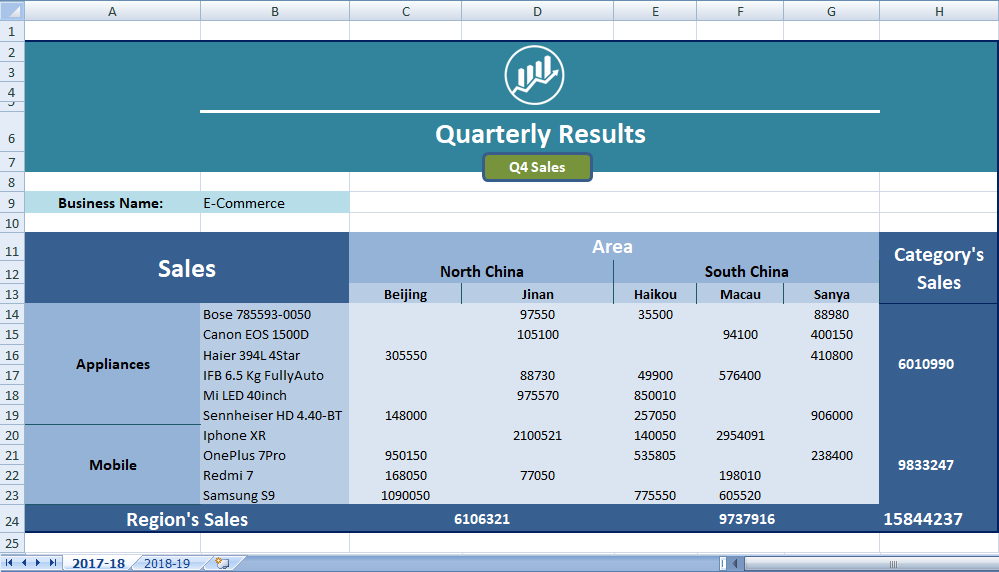
The following image shows how a sales report for a specific quarter looks:
To create this report, first you need to create a template in MS-Excel. How your final report will look depends on this template. Before getting started, let’s first familiarize ourselves with creating templates using DsExcel template syntax.
Generating XLSX Template in .NET Application
Template creation is undoubtedly the most important step in dynamic report generation. While creating a template, you’ll need to follow a certain DsExcel template syntax used to define database fields. Therefore, in the sales template wherever you want to replace the product and sales information, you must define the database fields following the syntax.
Template creation shall broadly be divided into the following steps:
- Define data
- Define data fields
- Set data field template properties
- Use formula functions
1. Define data - (C#)
As you see in the image above, the data fields: area, city and items' category, name, and sale are present in the final expected report; therefore, they will need to be added.
The following classes: region, item and sale, are created which will act as the blueprint for sales report generation:
Data Field Declaration - (C#)
public class Item
{
    public Int32 ProductID { get; set; }
    public string Name { get; set; }
    public string Category { get; set; }
    public double Revenue { get; set; }
}
public class Region
{
    public string Area { get; set; }
    public string City { get; set; }
}
public class Sale
{
    private Region _region;
    private List<Item> _items;
    public int Year { get; set; }
    public Region Region
    {
        get { return _region; }
        set { region = value; }
    }
    public List<Item> Items
    {
        get { return _item; }
        set { items = value; }
    }
    public Sale()
    {
        Items = new List<Item>();
        Region = new Region();
    }
}
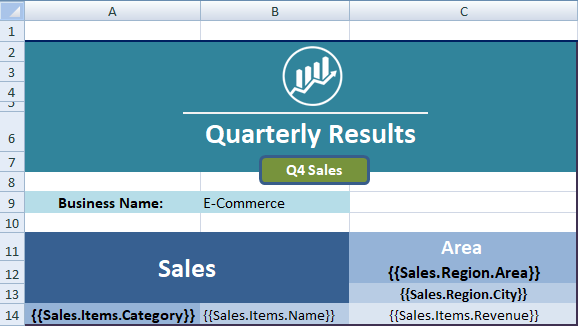
2. Creating Templates in MS-Excel
Once the data definitions are ready, you can start creating a template in Excel and map individual data field cells to their definition in the blueprint.
The following steps guide you through the template creation process.
2.1 Defining Data Fields
DsExcel Template syntax uses double curly braces ''{{ }}' to define database fields. So in the template cells where you want to show dynamically generated field values like category name, city name, etc., define the database field within curly braces.
To understand exactly how to define data fields in excel cells, we'll show an item's category name as displayed in the final report image above.
According to the data, the category's name is mapped to Category property of Item class and Sale class contains a collection of Item as its member, so you should define the cell A14 as a nested field {{Sales.Items.Category}}, where Sales is the name of the data source. Similarly, the item's name and revenue cells, B14 and C14 can be defined as {{Sales.Items.Name}} and {{Sales.Items.Revenue}}.
The same understanding shall be applied for showing Area and City. These fields are mapped to Region class's Area and City properties and the Sale class defines the Region class as its member, so cells C12 and C13 can be defined as {{Sales.Region.Area}} and {{Sales.Region.City}} respectively.
2.2 Set Data Fields Properties
Apart from replacing data fields dynamically, DsExcel also facilitates how they get replaced. This is done by properties like Expansion, Context, Range, Group, Sort and more. DsExcel uses brackets ‘(‘ and ‘)‘ to organize all template properties. A property is set in key-value format and multiple properties get separated through a comma. For developer’s convenience, property names and values are case-insensitive and support shorthand notations.
Now, let’s see how to use some of these properties in the generation of sales reports.
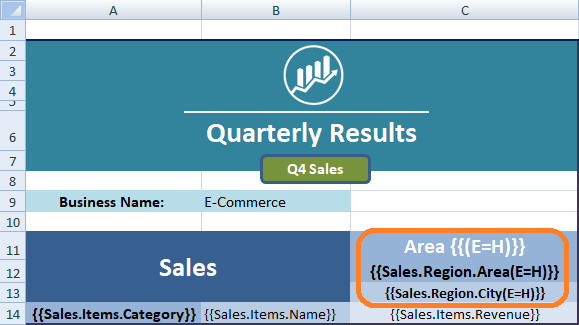
Expansion
Above, data field cells were defined in a way that they get replaced dynamically by the field value, but when there are multiple values of the same field in data, you'll want them to expand automatically, either vertically or horizontally. Like in the final sales report, Areas and Cities appear horizontally along with each other whereas Item's Categories and Names appear vertically.
The template syntax helps you define the direction for data expansion using the Expansion property. Expansion of a field can happen in any of the directions, horizontal or vertical, the default being vertical expansion.
So, to make the areas and cities expand horizontally, you should use E=H inside brackets. Doing this, the definition for cell C12 and C13 should look like {{Sales.Region.Area(E=H)}} and {{Sales.Region.City(E=H)}}. Similarly, for expanding Item's Category and Name vertically, cell A14 can be defined as {{Sales.Items.Category(E=V)}} and cell B14 as {{Sales.Items.Name(E=V)}} respectively but, since the default setting for expansion is vertical you can skip setting it and still get the same result.
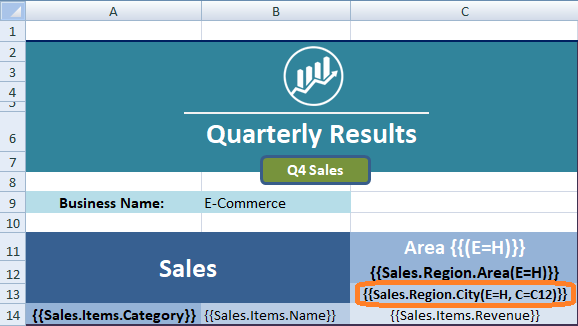
Context
When multiple cells are bound on the same sheet, there can be relationships between them. Sometimes, a data field can filter the values of another field, other times it might group the dependent field cells. In such cases, the former cell is called the context cell of the dependent cell. By defining DsExcel's Context property, you can direct how the dependent cells expand w.r.t the context cell.
In the final sales report image above, areas and cities expand horizontally, where only the cities belonging to that specific area appear below it, that is the Area field filters the Cities below it. To implement such a relationship, the city cell C13 should have its Context set to the Area cell-like, {{Sales.Region.City(E=H, C=C12)}}.
However, the context cell for vertical expansion (E=V) is the adjacent cell on the left and for horizontal expansion (E=H) adjacent cell on the top is the context cell, by default. Since the city cell is expanding horizontally (E=H), its' Context is C12 by default. Therefore, you may skip setting the Context explicitly for this cell.
2.3 Using formula functions
Once the data fields are defined, you'd want to analyze the values of these data fields. For this, DsExcel template syntax supports the most common Excel functions like Sum, Count, Average, Min, Max, and more.
In a quarterly sales report, to analyze how much revenue each area has generated, the Revenue field value for all cities in that area needs to be summed. The Sum function can be used on the Revenue data field with Area cell C12 as its Context like {{=Sum(C14)(C=C12)}}. Similarly, to calculate sales for each Category, again use the Sum function for Revenue cell but with Category cell A14 as its Context, like {{=Sum(C14)(C=A14)}}.
Also, to get the total sales you can use Sum function either on cell D14 or on cell C15, as both will return the same total revenue.

Additionally, to compare this year's quarterly data with previous years, multiple sheets can be generated. For this, just rename the template sheet in Excel to {{Sales.Duration}}, where Duration is a property in Sale class.
Following is an image of how the template with DsExcel template syntax should look:

After you know the syntax and have created a template for your sales report, just load this template, add data, process template, and that’s it, your report will be ready.
Steps to use DsExcel Templates
Templates can be incredibly useful in your business and DsExcel Templates helps in automating these processes. Now you’re ready to get started with implementing DsExcel Templates in your application.
Following are the steps guiding you right from loading the DsExcel assembly, to generating the Excel report.
1. Installation
1.1 In your .Net Core Console application, right-click ‘Dependencies’ and select ‘Manage NuGet Packages’.
1.2 Under the ‘Browse’ tab search for GrapeCity.Documents.Excel and click Install.
1.3 While installing, you’ll receive two confirmation dialogs: ‘Preview Changes’ and ‘License Acceptance’, click ‘Ok’ and ‘I Agree’ respectively to continue.
2. Setup your project
2.1 Add namespace
In the Program file, import following namespace:
using GrapeCity.Documents.Excel;
2.2 Create a new workbook
In the main function, add following code to create a new DsExcel workbook.
Workbook book = new Workbook();
2.3 Load Excel Template
Use Open method to load existing Excel Template file (shown in Fig.1) in the DsExcel workbook:
book.Open("Sales_Template.xlsx");
2.4 Initialize data
Prepare data that will fill in the data fields in loaded Excel Template:
var sales = new List<Sale>();
Sale sale1 = new Sale();
Item item1 = new Item()
{
     ProductID = 1140,
     Category = "Mobile",
     Name = "Iphone XR",
     Revenue = 2334091
};
sale1.Items.Add(item1);
sale1.Duration = "2018-19";
sale1.Region = new Region() { Area = "South China", City = "Macau" }; ;
sales.Add(sale1);
NOTE: DsExcel Templates can bind Excel templates directly with data from any of the following objects: DataSet/DataTable, Custom Object, Variable, and Array/List.
2.5 Add datasource
Use the AddDataSource method, to load the data in workbook.
book.AddDataSource("Sales", sales);
2.6 Process Template
Use ProcessTemplate to execute the template. Invoking this method, the data fields will bind automatically to the Excel template loaded in the workbook.
book.ProcessTemplate();
2.7 Save report to XLSX
Finally, export it all to an Excel file so you can see how database fields get bound to the template dynamically, giving you the final report.
book.Save("../../../SalesReport.xlsx");
Be sure that this line of code comes AFTER all your other code, so that all of it processes before it gets saved.
Download the Templates DsExcel.zip
Demos and documentation:
If you have a question about this tutorial, leave it for us in the comment thread below!
Related Blogs
Try Our .NET Spreadsheet Document API

Ruchir Agarwal