Installing ActiveReports Server
Continuing from the previous post on Preparing Your System for an ActiveReports Server Installation, here are the steps to install ActiveReports Server.
Installer
- Run the Installer
Run the ActiveReports Server installer. The file name is similar to "ActiveReports X Server vX.xx.xxxx.x.exe"
Note: Prior to installation, log in as a user with administrator privileges. When the following dialog appears, read the license agreement and click Agree. - Select the Installation Type
You can select whether you are installing the Server and creating a new site, or adding an Agent to an existing site.
For the server, we select Server (creates a new site) and click Next.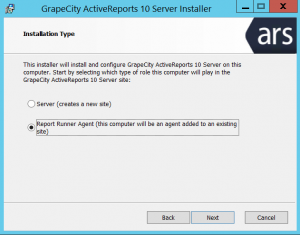
Note: In ActiveReports Server, you can have the server and agents on different PCs. You can also balance the load by having agents on up to five separate PCs. Visit the ActiveReports Server page for more information. When installing an Agent on another PC, you would select the Report Runner Agent option on this page. - Select the Agent Installation Method
Choose how to install the Agent. You can either install it on the same machine as the Server, or install it on another machine later. Here, to make it simple, we will install the Server and the Agent on the same machine.
Select Install Report Runner Agent on this server and click Next.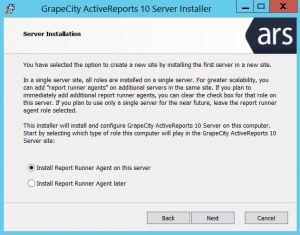
- Set the Installation Directory
Specify the folder in which to install ActiveReports Server.
The default folder is C:\ActiveReports Server. Specify a folder and click Next. - Create a Web Site
Specify whether to create a new IIS site for ActiveReports Server, or to create a virtual directory in an existing site.
In the installer, if you select New Site, it automatically creates an IIS virtual directory with the required settings.
Here, we select New Site and click Next. - Set the Site Name and Port Number
For the ActiveReports Server Administrator Dashboard, specify the name of the site and the port number. The port number is allocated automatically from available numbers. Here, we accept the default values and click Next.
Important: The port number specified here is required in your firewall settings, so make a note of it before proceeding.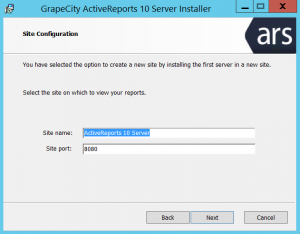
- Set the Application Pool User
Enter the credentials to use for the ActiveReports Server web site. You can use a pre-existing account, or you can create a new dedicated account. Enter your account information, and click Next. Be sure to keep a record of this password!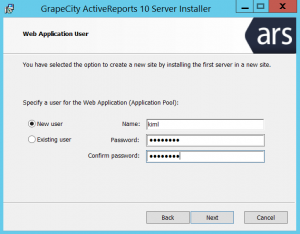
Note: ActiveReports Server will not work if the application pool user does not have sufficient permissions. If you are not sure of the permissions granted to an existing account, it is best to create a new one. If the installer fails at this point in a test installation on a client machine, check your Windows edition. If you're running the Home edition, you cannot install ActiveReports Server on it.
Caution: Your server policy settings might set password expiration on newly created accounts. Check the expiration policy of your newly created account, and set its expiration to never expire. Otherwise, you may be locked out of your account. - Set the ActiveReports Service User
ActiveReports Server uses its own Windows service internally, so it requires an account to register and run the service.
Again, you can use a pre-existing account, or create a new dedicated account. Enter your account information, and then click Install to start the installation.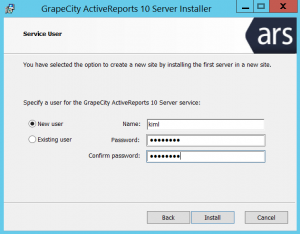
Note: ActiveReports Server will not work if the service user does not have sufficient permissions. If you are not sure of the permissions granted to an existing account, it is best to create a new one.
Caution: Your server policy settings might set password expiration on newly created accounts. Check the expiration policy of your newly created account, and set its expiration to never expire. Otherwise, you may be locked out of your account. - Installation Process
The installation progress screen appears, and installation begins. - Installation Complete
When the installation complete dialog appears, you are finished. Click Finish, and a wizard will guide you through configuring ActiveReports Server. Information on that process is in the Server Configuration Wizard section below.


Server Configuration Wizard
- Initial Screen
When installation is complete, the Administrator Dashboard automatically opens in your browser and starts up the configuration wizard. In the configuration wizard start-up screen, click Next.
Note: If it does not open automatically, open your browser and navigate to your Admin URL.
For example: http://arserver:8080/Admin (where arserver=PC name and 8080=port number specified in installer) - Configure the Administrator Account
First, we set up an account for the administrator (name=administrator, password=secret).
The email address is used to notify the administrator when a user forgets their password or a server error occurs. Always enter a valid notification address.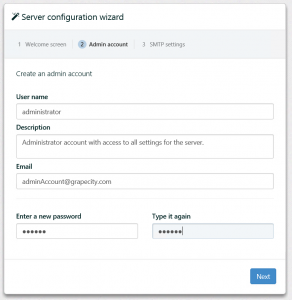
- Configure the SMTP Server
You can come back and set this up or change these settings later. If you do not use email functions in report scheduling, you can use ActiveReports Server without this and skip ahead to the next step.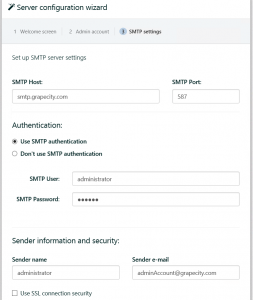
Caution: If the SMTP Server is not configured or if the configuration is incorrect, email-related features such as notifications and password reminders will not work.
Note: The email address that you specify in SMTP settings is used as the sender in email transmissions from ActiveReports Server. So this address is the reply-to address for all emails such as scheduled reports, feedback, error notifications, and diagnostics. - Configure Licensing
If you have an ActiveReports Server product key, you can register the license here. If you want to use the trial version or do not have a product key, click Next.
For more information on how to obtain an ActiveReports Server product key, see License Registration. - Wizard Complete
This completes the server configuration wizard steps.
Click Next, and the Administrator Dashboard login screen appears. - Log Into the Administrator Dashboard
When the following login screen appears, log in using the account information that you created in step 2 above, Configure the Administrator Account.
If the login is successful, the Administrator Dashboard appears.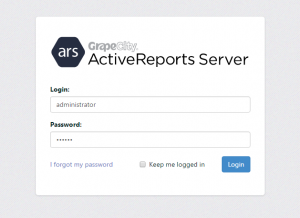


Back to ActiveReports Server Quick Start Previous: Preparing Your System | Next: Firewall Settings

MESCIUS inc.