How to Integrate Digital Ink with FlexGrid
Digital Ink provides a user the flexibility of writing freely, just like using pen and paper. The process includes collecting ink strokes with the help of WPF InkCanvas and then analyzing this handwritten text using the Microsoft.Ink API. This can be helpful in many industries. For example, in an industry when the customers are asked to fill-in a survey via a handheld device (like Microsoft Surface), and any industry that has field reps (such as sales). Using digital ink can collect information about the customers quickly and easily.
The digital inking capability of WPF platform supports collecting ink as a part of its core functionality. This feature is overlooked by many developers; yet, this is one of the most exciting things to me, as someone who works on several WPF applications.
In this article, we'll integrate digital inking functionality with the cells in FlexGrid. We’ll use ComponentOne's FlexGrid to edit cell values at runtime using InkCanvas.
Topics:
- Brief Introduction to InkCanvas
- Adding InkCanvas to FlexGrid
- Analyzing Ink
- Integrating CellFactory with Ink Color
An Intro to InkCanvas
A basic understanding about InkCanvas is a prerequisite for incorporating digital ink with the FlexGrid control. An InkCanvas is a FrameworkElement that provides the area to receive and display ink strokes. The input is commonly provided using a stylus, which interacts with a digitizer to produce ink strokes. In case a stylus is not available, you can use a mouse to provide the input.
To enable digital ink in your application, simply add an InkCanvas element to your tree:
<Grid>
  <InkCanvas/>
</Grid>
The created strokes are represented by stroke objects that can be manipulated programmatically by the application developer or via the UI by the end-user. The InkCanvas allows you to select, modify, or delete the existing strokes. For this, you can set the EditingMode to the required value.
Here is an example:
<Grid>
  <InkCanvas EditingMode="EraseByStroke"/>
</Grid>
Next...
Adding InkCanvas to FlexGrid
This is what we'll create:
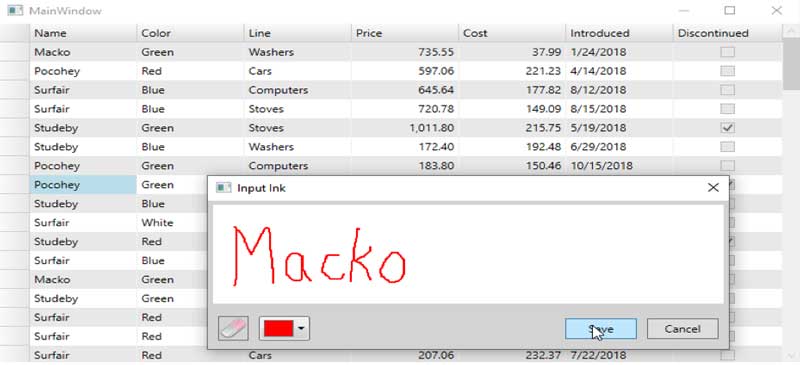
We'll host the InkCanvas within a custom dialog box that gets invoked each time a text-based cell in the grid gets into the editing mode.
The flow:
- The end-user double clicks a cell to edit.
- The InkCanvas dialog pops up and the user inks the text he wishes to input.
- Once the dialog is closed, the handwriting recognition engine is invoked to analyze the text and is set to the value of the edited cell.
Setting up the InkCanvas in this manner is an advantage. This will enable us to create a reusable component that can be integrated with other C1FlexGrid instances as well. The Ink canvas dialog can be depicted using the following XAML code.
 <Grid Background="LightGray">
        <Grid.Resources>
            <local:EditModeToImageConverter x:Key="imgConverter"/>
        </Grid.Resources>
        <Grid.RowDefinitions>
            <RowDefinition Height="*"/>
            <RowDefinition Height="50"/>
        </Grid.RowDefinitions>
  <InkCanvas x:Name="inkCanvas" Grid.Row="0" x:FieldModifier="public" Margin="5" MinWidth="500" MinHeight="120">
            <InkCanvas.DefaultDrawingAttributes>
                <DrawingAttributes x:Name="strokeColor"/>
            </InkCanvas.DefaultDrawingAttributes>
        </InkCanvas>
        <Grid Grid.Row="1" Margin="5">
            <Grid.ColumnDefinitions>
                <ColumnDefinition Width="*"/>
                <ColumnDefinition Width="Auto"/>
                <ColumnDefinition Width="Auto"/>
            </Grid.ColumnDefinitions>
            <StackPanel Orientation="Horizontal">
             <Button x:Name="mode" Content="{Binding EditingMode, ElementName=inkCanvas, Converter={StaticResource imgConverter}}" Click="Mode_Click" Background="Transparent" Width="30" Height="30" Margin="5">
                    <Button.ToolTip>
                        <ToolTip Content="Ink Mode"/>
                    </Button.ToolTip>
                </Button>
     <c1:C1ColorPicker Width="50" Height="30" Margin="5" SelectedColorChanged="C1ColorPicker_SelectedColorChanged"/>
            </StackPanel>
            <Button x:Name="saveInk" Width="70" Height="25" Margin="5" Grid.Column="1"
                    Content="Save" IsDefault="True" Click="SaveInk_Click"/>
            <Button x:Name="cancelInk" Width="70" Height="25" Margin="5" Grid.Column="2"
                    Content="Cancel" IsCancel="True"/>
        </Grid>
</Grid>
Once the dialog is set up, it needs to be connected with a FlexGrid instance. We’ll do so by creating an InputManager class as shown in the code snippet below:
public class InputManager: DependencyObject, INotifyPropertyChanged
{
public static readonly DependencyProperty FlexGridProperty =
            DependencyProperty.Register("FlexGrid", typeof(C1FlexGrid),
                typeof(InputManager),
                new PropertyMetadata(FlexGridChangeCallBack));
public C1FlexGrid FlexGrid
{
 get  { return (C1FlexGrid)this.GetValue(FlexGridProperty); }
set { this.SetValue(FlexGridProperty, value); }
}
}
Input the following code in MainWindow.xaml.cs:
var inputManager = new InputManager();
inputManager.FlexGrid = flexGrid;
Once the grid is attached, the InputManager binds it to an InkInputDialog object, which gets displayed whenever a cell enters the editing mode.
//Subscribe BeginningEdit event to show InkCanvas when cell is about to edit
this.FlexGrid.BeginningEdit += FlexGrid_ShowInkCanvas;
public void FlexGrid_ShowInkCanvas(object sender, CellEditEventArgs e)
{
this.FlexGrid.IsEnabled = false;
editingCell = e.CellRange;
InkInputDialog inkDialog = new InkInputDialog();
if (inkDialog.ShowDialog() == true)
 SaveInkStrokes(inkDialog.Strokes);
this.FlexGrid.IsEnabled = true;
e.Cancel = true;
}
Until now, we’ve covered how to invoke the InkCanvas element. In the next section, we’ll see how to analyze the handwritten text and update the content of the editing cell.
Analyzing Ink
In order to analyze the handwritten text, we’ll take the help of the Microsoft.Ink API. Read more detailed information regarding handwriting recognition in WPF.
The following code analyses the InkCanvas strokes and updates the editing cell’s content.
using(MemoryStream ms = new MemoryStream())
 {
    strokes.Save(ms);
    var ink = new Microsoft.Ink.Ink();
    ink.Load(ms.ToArray());
    if (ink.Strokes.Count > 0)
   {
      using (RecognizerContext recognizer = new RecognizerContext())
      {
         recognizer.Strokes = ink.Strokes;
         RecognitionStatus status;
         var result = recognizer.Recognize(out status);
         if (status == RecognitionStatus.NoError)
FlexGrid[editingCell.Row, editingCell.Column] = result.ToString();
      }
   }
}
Integrating CellFactory with Ink Color
The text we analyzed in the previous section used DefaultDrawingAttributes and hence was drawn with Black forecolor. But, let us say, we want to enter a colored text, such as a red colored text to write ‘SELL’ and a green colored text to write ‘BUY’. In that case, we can do so by getting the color of the ink strokes with DrawingAttributes and then use the same information in a custom cell factory as shown in the code below.
//Get Color from stroke in the InputManager
var color = result.Strokes[0].DrawingAttributes.Color;
this.CustomCellFactory.ColoredCells[editingCell] = new SolidColorBrush(color);
//Custom Cell Factory definition
public class ColoringCellFactory : CellFactory
{
public Dictionary<CellRange, SolidColorBrush> ColoredCells = new Dictionary<CellRange, SolidColorBrush>();
            public override void CreateCellContent(C1FlexGrid grid, Border bdr, CellRange rng)
            {
base.CreateCellContent(grid, bdr, rng);
 if (ColoredCells.Count > 0)
 FindAndStyleCell(bdr, rng);
}
private void FindAndStyleCell(Border bdr, CellRange rng)
{
var rangeExists = DoesRangeExist(rng);
if (rangeExists)
{
try
{
(bdr.Child as dynamic).Foreground = ColoredCells[rng];
                        }
                        catch { }
                    }
            }
            public bool DoesRangeExist(CellRange rng)
            {
return ColoredCells.Keys.Any(r => rng.IsSingleCell && rng.Row == r.Row && rng.Column == r.Column);
            }
}
Now, the resulting output will look like this:
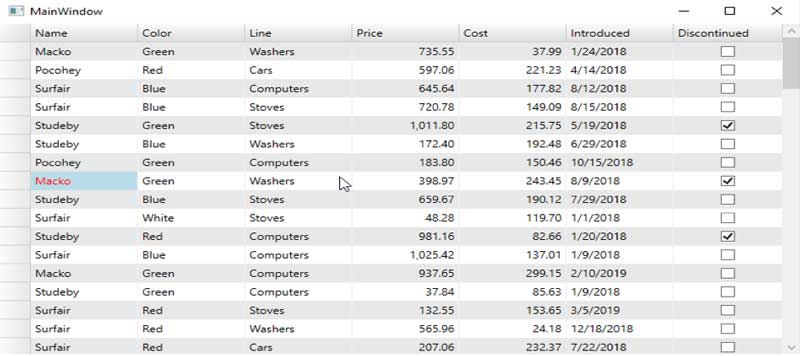
This completes the process of using digital ink for editing cells in FlexGrid. You can explore and try out the sample with the complete code details from the link below.
Download the sample
Now we can see how InkCanvas and Handwriting Recognition support in WPF leads us to incorporate Digital Ink in our WPF FlexGrid apps.
Thanks for following along. Please leave any questions in the comments below.
Happy Coding!

Basant Khatiyan