Integrating Salesforce with Entity Framework (Using the ComponentOne DataConnector)
In the 2020v1 release of ComponentOne, we added DataConnector service components, which can be used to connect to business solutions like Microsoft Dynamics 365 and OData. In the 2020v2 release, we also added the support for Salesforce and Kintone. This post demonstrates how to integrate Salesforce with Entity Framework using the ComponentOne DataConnector.
Salesforce is a cloud-based Customer Relationship Management platform that helps companies manage customer data and its related processes.
Salesforce provides its own set of tools that different companies use to improve upon their customer service relationships. Let's discuss an example of how ComponentOne DataConnector and FlexGrid can be useful for businesses to consume data from Salesforce and perform actions that are not available out of the box in Salesforce.
Let's take an example of an online service provider, which needs to keep track of its customers' monthly subscription status and generate custom reports based on the subscription records in Salesforce.
These are some of the views/reports they may need to evaluate the subscription status:
- Paid and unpaid subscriptions
- Subscriptions grouped by country
- Sorting subscription by data
Querying Data in Salesforce
Before we explain the usage of C1 DataConnector with Salesforce, let's discuss the default mechanism of Salesforce to query data objects.
Salesforce provides native SOQL (Salesforce Object Query Language) to query records; however, there are certain limitations with this approach:
- Generating these reports would require end-users to learn this syntax.
- Simple operations like grouping, sorting or filtering would require users to query data each time.
Using C1 Data Connector and FlexGrid with Salesforce Data
The C1 DataConnector is the workhorse that manages the connection to the Salesforce data and queries the underlying Subscription data. Once we have the this data, ComponentOne's Flexgrid will be used to display these records in a grid.
Using ComponentOne FlexGrid operations like grouping, sorting, filtering, search, and validations can be performed on subscription data (by end-users) without directly asking Salesforce.
Now that we understand how it fits in together, let's create our application!
Step 1: Setup and Enabling OAuth
Before we proceed to connect to Salesforce, we will need to create an application and use the credentials of this application for establishing connection.
Please go through this Salesforce resource that explains how to setup an application to enable OAuth to authenticate an application:
The following information is required in order to connect to Salesforce:
- Token Endpoint (https://help.salesforce.com/s/articleView?id=sf.remoteaccess_oauth_endpoints.htm&type=5&language=en_US)
- Api URL (https://help.salesforce.com/s/articleView?id=sf.remoteaccess_using_openid.htm&type=5)
- Client ID
- Client Secret
- Salesforce username and password
- Security token
Most of the above credentials will be available on the application page in Salesforce and security token would have been sent to the registered email used for creating the Salesforce account.
The image below displays the OAuth Client Id (Consumer Key) and OAuth Client Secret (Consumer Secret).

Now we have the required information for connection to Salesforce, we will create an application that will use DataConnector.
Step 2: Project Setup
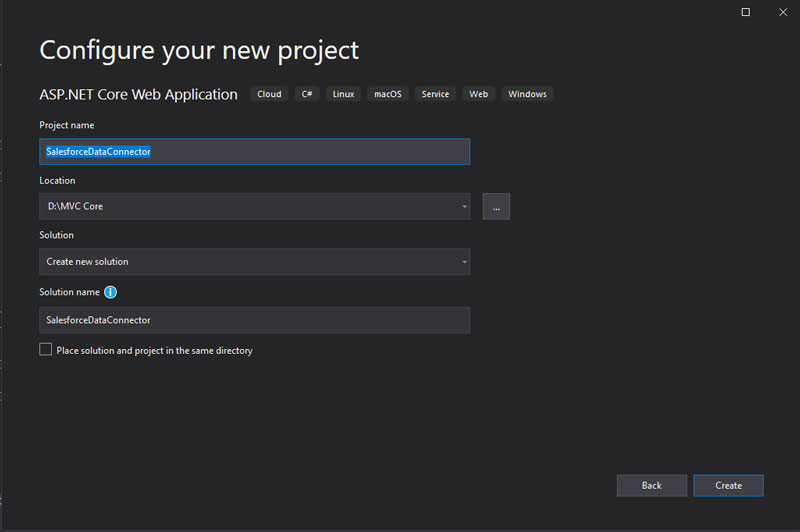
- Open Visual Studio and create a new project using the ASP.NET Core Web Application template.
- Once selected click on the Next button and provide the project name and location.
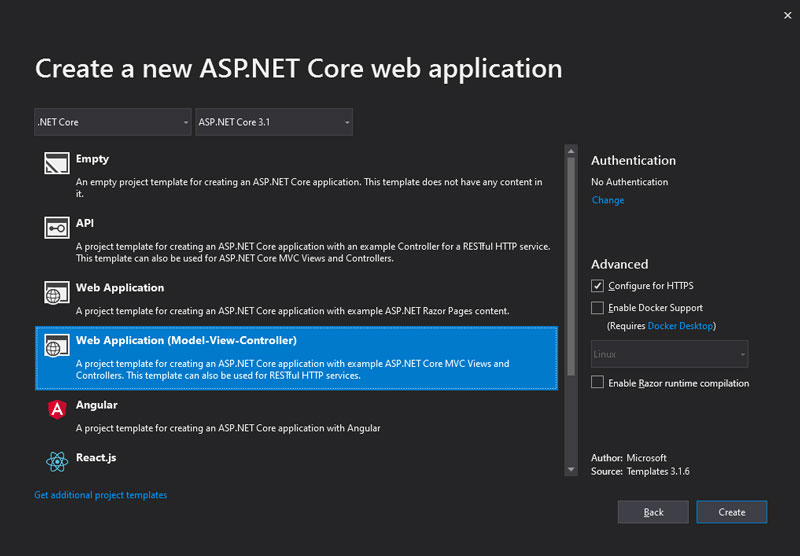
- Click on Create and select Web Application (Model-View-Controller) template to initialize the project with MVC template.
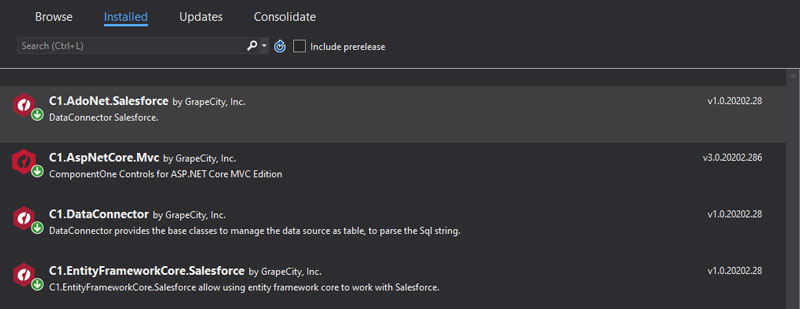
- After the project is loaded, add the following NuGet packages in the application.
- C1.DataConnector
- C1.AdoNet.Salesforce
- C1.EntityFrameworkCore.Salesforce
These are the core packages required for a basic connection to Salesforce.
** Also, add a C1.AspNetCore.Mvc package in order to use the ComponentOne FlexGrid in the application.
After the packages have been installed move to Step 3.
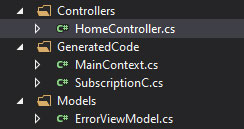
Step 3 : Creating the Model and Context Class
In Entity Framework, all of the data is processed through a context class which utilizes a model class that contains a definition of a single entity in the database. So, to use Salesforce also, a model and context class is required. To easily create these classes, DataConnector also provides scaffolding.
For scaffolding these classes, Microsoft.EntityFrameworkCore.Tools NuGet package is required. Please make sure to install 2.1.0 version of this package.
After installing this package, open the package manager console by clicking on Tools → NuGet Package Manager → Package Manager Console. Once the console is displayed, use the following command to generate code:
Scaffold-DbContext "Username=****;Password=****;Security Token=****;OAuth Client Id=****; OAuth Client Secret=*****; OAuth Token Endpoint=https://ap17.salesforce.com/services/oauth2/token; Url=https://ap17.salesforce.com/services/data/v42.0" C1.EntityFrameworkCore.Salesforce -OutputDir "GeneratedCode" -Tables Subscription__c
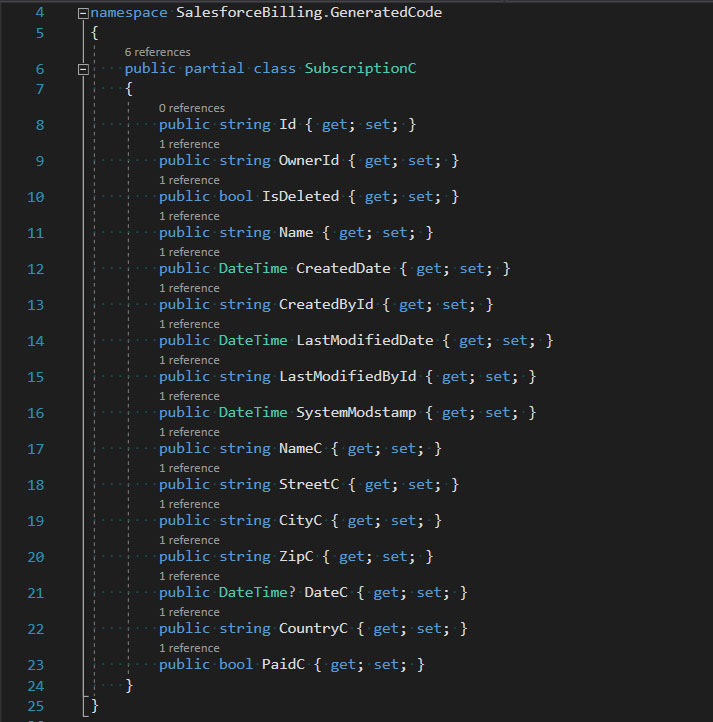
Make sure to update all the credentials accordingly. After the execution of this command, a new folder called Generated Code will be added to the project. This folder will contain the context and the model class of the Subscription__c object. Now, use Linq to query the database stored on Salesforce.
The SubscriptionC class will look something similar to this. This class will contain all the appropriate properties corresponding to the each column in the Salesforce object/table.
And this will be MainContext.cs file:
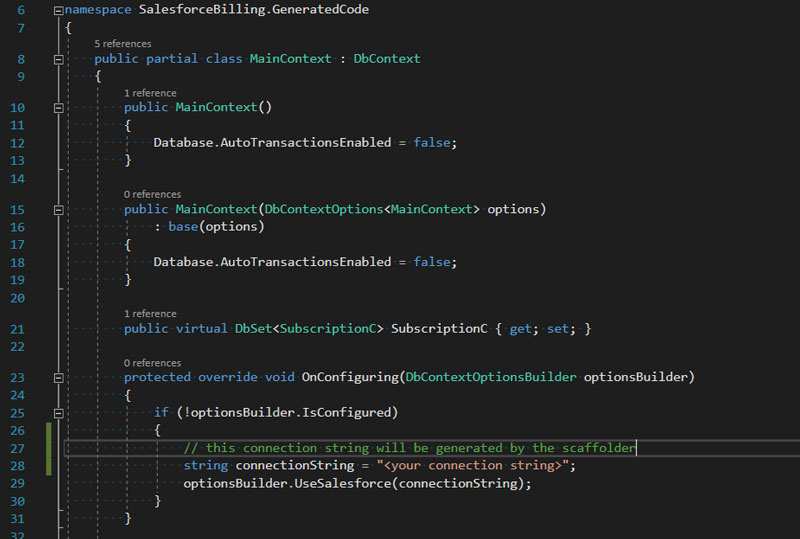
The connection string will be generated by the scaffolder automatically. It is recommended to move the connection string into a configuration file in the project.
In the MainContext class, observe the OnConfiguring method. In this method, the UseSalesforce method uses the connection string provided to connect to Salesforce and perform operations on it's database.
We can also provide multiple objects by separating the object's name using comma:
Scaffold-DbContext "Username=****;Password=****;Security Token=****;OAuth Client Id=****; OAuth Client Secret=*****; OAuth Token Endpoint=https://ap17.salesforce.com/services/oauth2/token; Url=https://ap17.salesforce.com/services/data/v42.0" C1.EntityFrameworkCore.Salesforce -OutputDir "GeneratedCode" -Tables Table1, Table2
Note that these classes can also be created manually without using scaffolding. Please go through this documentation to learn more.
These are the steps required to integrate to SalesForce in EntityFramework using DataConnectors. We can easily initialize this class and use the Subscription__c object to perform operations using Linq.
Step 4: Fetching Subscription Data from Salesforce
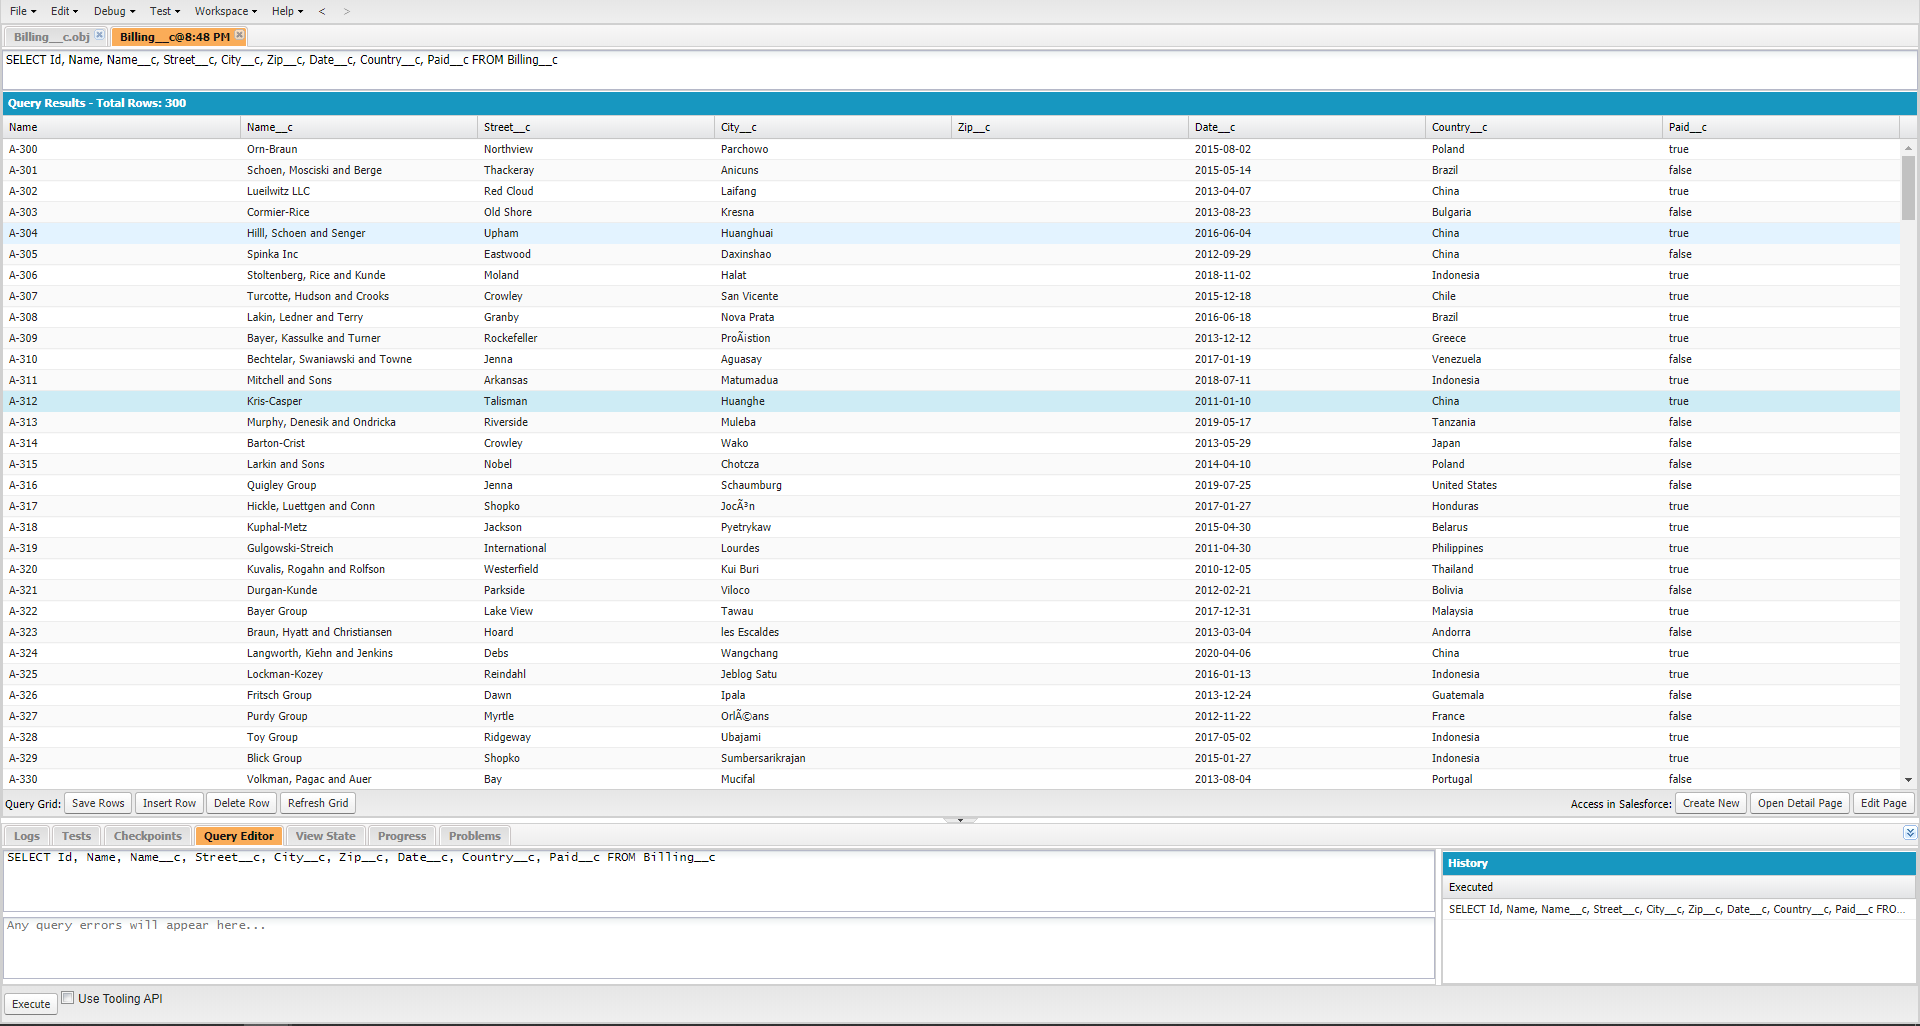
The process below describes how to fetch data from Salesforce and display in FlexGrid. For fetching the data, create SubscriptionRepo class to provide a layer of abstraction on the SubscriptionContext class. After adding this class, add the following code:
public class SubscriptionRepo
 {
     private MainContext db { get; set; }
     public SubscriptionRepo()
     {
         this.db = new MainContext();
     }
     public List<SubscriptionC> Get()
     {
         return this.db.SubscriptionC.ToList();
     }
}
The Get method in the SubscriptionRepo can be used to fetch the list of all the Subscription records stored in the Salesforce object.
Step 5: Display Subscription Data in FlexGrid
Now, lets add the FlexGrid control to display the subscription data. In the HomeController.cs class, there should be an Index method already created by the MVC Core template. Update this method to return the list of Subscriptions as the model for the controller:
public IActionResult Index()
 {
      var repo = new SubscriptionRepo();
      return View(repo.Get());
 }
And in the Index.cshtml file, add a FlexGrid control bound to this model:
@using C1.Web.Mvc.Grid
@model IEnumerable<SubscriptionC>
<script type="text/javascript">
   function getError(item, prop) {
       if (prop === 'Paid' && !item[prop]) {
           return 'Subscription is not paid';
       }
   }
</script>
<p id="theSearch"></p>
<c1-flex-grid id="theGrid" auto-generate-columns="false" height="500px" is-read-only="true" selection-mode="Row">
    <c1-items-source get-error="getError" source-collection="Model"></c1-items-source>
    <c1-flex-grid-column binding="Name" header="ID" width="100"></c1-flex-grid-column>
    <c1-flex-grid-column binding="NameC" header="Company Name" width="2*"></c1-flex-grid-column>
    <c1-flex-grid-column binding="DateC" header="Date" format="MMM dd, yyyy" width="*"></c1-flex-grid-column>
    <c1-flex-grid-column binding="StreetC" header="Street" width="*"></c1-flex-grid-column>
    <c1-flex-grid-column binding="CityC" header="City" width="*"></c1-flex-grid-column>
    <c1-flex-grid-column binding="CountryC" header="Country" width="*"></c1-flex-grid-column>
    <c1-flex-grid-column binding="ZipC" header="Zip" width="50"></c1-flex-grid-column>
    <c1-flex-grid-column binding="PaidC" header="Paid" width="60"></c1-flex-grid-column>
    <c1-flex-grid-filter></c1-flex-grid-filter>
    <c1-flex-grid-group-panel id="thePanel" placeholder="Drag columns here to create groups"></c1-flex-grid-group-panel>
</c1-flex-grid>
<c1-flex-grid-search id="theSearch" grid="theGrid" placeholder="Search..."></c1-flex-grid-search>
The code above, adds a FlexGrid ,FlexGridSearch control and a GroupPanel control which can be used to perform searching and grouping respectively.
It also contains a getError method which will be used to highlight records for unpaid subscriptions
Also, initialize the FlexGrid's script and styles.
In the ~/Shared/_Layout.cshtml file, add the following code at the end of the <head> tag:
<c1-styles />
<c1-scripts>
   <c1-basic-scripts />
</c1-scripts>
That's all the configuration we need , now lets see the application in action.
Common Operations
Searching:
Use the FlexGridSearch control to perform search operations in FlexGrid. Observe that as soon as we type in some search keywords, searching is performed.
Add the following code in the application to add the FlexGridSearch control:
<c1-flex-grid-search id="theSearch" grid="theGrid" placeholder="Search..."></c1-flex-grid-search>
Filtering:
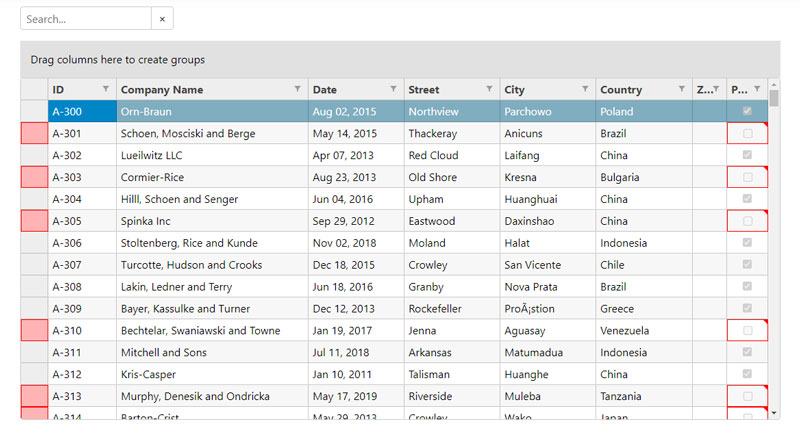
Filter out the data by using the FlexGridFilter control. To display the records where the subscription is paid, apply the filter on the Paid column by clicking on the filter icon next to the column header.
To enable filtering, add the following code inside the <c1-flex-grid> control:
<c1-flex-grid-filter></c1-flex-grid-filter>
This will automatically enable filtering in the grid.
Grouping:
To group the data by a particular column, use the GroupPanel control.
Simply drag the column by which we need to group the data to the group panel and the data will be grouped. Similar to adding the FlexGridFilter control, add the GroupPanel control inside the <c1-flex-grid> control and a group panel will be added above the FlexGrid
<c1-flex-grid-group-panel id="thePanel" placeholder="Drag columns here to create groups"></c1-flex-grid-group-panel>
Sorting:
For sorting the FlexGrid, simply click on the header of the column and apply sorting.
Validation:
Use the getError method to validate the data. In the image below, observe the red border that is displayed on the records where the Subscription is unpaid.
To enable validation, create a javascript function that takes 2 parameters, item, and prop.
The item parameter is the current item and the prop is the current property of that particular item. If there is an error in the current value, return the error message, else do not return 0
<script type="text/javascript">
   function getError(item, prop) {
       if (prop === 'PaidC' && !item[prop]) {
           return 'Subscription is not paid';
       }
   }
</script>
Once the method is added, provide this method in the get-error property of the <c1-items-source> tag:
<c1-items-source get-error="getError" source-collection="Model"></c1-items-source>
And each item will be validated.

Incremental Cache
Some application contain large amounts of data that need to cached on the client-side to improve performance. Most often, only some of records in the data set are updated, so entire the cache does not require an update.
Incremental caching is a way to update the records of a table by using the time stamp of the record. If the timestamp of a particular record in the cache is less than that of the timestamp of same record on the server, then the cache will be updated. For incremental caching to work, the table (or object) needs to have a timestamp column and it should be updated whenever a new record is added or an existing record is updated.
To implement incremental caching in the DataConnectors, use the Increment Update and Increment Update Column properties.
The Increment Update property is used to set whether incremental caching should be enabled and the Increment Update Column property is used to set the column name which stores the timestamp of the record.
Update the connection string as follows for Salesforce.
string connectionString = "Username=****;Password=****;Security Token=****;OAuth Client Id=****; OAuth Client Secret=****; OAuth Token Endpoint=https://ap16.salesforce.com/services/oauth2/token; Url=https://ap16.salesforce.com/services/data/v45.0; Incremental Update=true; Incremental Update Column=LastModifiedDate";
At the end of the connection string, the Increment Update and Increment Update Column properties have been added. In Salesforce, by default, the Increment Update Column is LastModifiedDate.
Now, incremental caching is enabled for the application.
To learn more incremental caching in detail, please go through the documentation link here.
Conclusion
This article will get you started with Salesforce and C1 DataConnectors. For a complete guide about DataConnectors with Salesforce, please go through this documentation link.
You can also download an offline sample. Make sure that you have updated your credentials in the appsettings.json file. Also, the Subscription__c object is a custom object and is not present in Salesforce.
You will need to create this custom object on your Salesforce account. Please go through this resource that describes how to create objects in Salesforce.
There are many additional new features and controls added in the 2020v2 release of ComponentOne.
Please leave us your thoughts in the comments below, and happy coding!

Ashwin Saxena