Programmatically Use Comments on PDF with a JavaScript PDF Viewer
In this big connected world we all live in. It is increasingly important to communicate effectively and quickly. This has never been more prevalent than with the current pandemic situation with Covid-19 and its variants. Although these challenging times have made it difficult to connect in person, as a society, we have come a long way in improving our electronic communications and our ability to get things done without being together in person.
While there is no replacement for in-person contact, our current situation has made it abundantly clear that the world may slow down, but it doesn't stop. We need to work together, collaborate, and communicate to ensure things get done.
With this in mind, there is never a better time to discuss how Document Solutions for PDF Viewer (DsPdfViewer), previously GrapeCity Documents for PDF Viewer (GcPdfviewer), allows individuals worldwide to easily communicate and collaborate using various JavaScript-based tools and C# .NET API Library components. With this combination of tools, users can markup, place sticky notes, comments/annotations and communicate in real-time while reviewing PDF documents online. This post runs programmatically and with a UI. Use a JavaScript PDF Viewer (DsPdfViewer) to accomplish these goals efficiently and quickly for your team or your client's needs.
Some of the items this article covers are as follows:
- Using Sticky Notes (AKA Text Annotations)
- Add/Edit/View/Delete and Reply to comments
- Enable Editing tools in the JavaScript PDF Viewer (DsPdfViewer)
- Configure the C# .NET API Library to help support the front end (SupportAPI)
- Configure DsPdfViewer's User Interface to enable appropriate editing controls (Annotation Editor & Form Editor)
Let's get started.
Programmatically Configure Document Solutions JavaScript PDF Viewer to Use Comments and Annotations
Configure Document Solutions PDF Viewer to enable the PDF editing tools, Annotation Editor, and Form Editor with the steps below.
-
Create a new ASP.NET Core Web Application, choosing the Web Application project template. Choose .NET Core 3.1 as the project's target framework.
-
Run the following command in the Package Manager Console in Visual Studio to install Document Solutions PDF Viewer. Make sure the directory location in the command prompt is set to the lib folder in the project. The Document Solutions PDF Viewer will be installed in the <app_name>\<app_name>\wwwroot\lib\node_modules folder.
npm install @grapecity/gcpdfviewer-
Get the SupportApi project (from DsPdf Distribution zip or DsPdfViewer Sample zip), contained in a sub-folder named GcPdfViewerWeb.
-
Add the SupportApi project to the application solution. Right-click the solution, Add Existing Project. Select SupportApi.csproj from the SupportApi project folder downloaded in the previous step.
-
In your project, right-click the Dependencies | Add Project Reference to SupportApi.csproj.
-
Modify the default content of Index.cshtml file (<app_name>\<app_name>\Pages\Index.cshtml) with the following code:
@page
@model IndexModel
@{ ViewData["Title"] = "Home page"; }
<style>
    .container {
        height: calc(100% - 128px);
        max-width: inherit;
    }

    #host, .pb-3 {
        height: 100%;
    }
</style>
<div id="host"></div>
<script src="~/lib/node_modules/@@grapecity/gcpdfviewer/gcpdfviewer.js" asp-append-version="true"></script>
<script>
    var viewer = new GcPdfViewer("#host", { supportApi: 'api/pdf-viewer' });
    viewer.addDefaultPanels();
    viewer.addAnnotationEditorPanel();
    viewer.addFormEditorPanel();
    viewer.beforeUnloadConfirmation = true;
    viewer.newDocument();
</script>- Create a 'Controllers' folder in your project and add a class file 'SupportApiController.cs'. Replace the code in 'SupportApiController.cs' with the below code snippet:
using GcPdfViewerSupportApi.Controllers;
using Microsoft.AspNetCore.Mvc;

namespace <app_name>
{
    [Route("api/pdf-viewer")]
    [ApiController]
    public class SupportApiController : GcPdfViewerController
    {

    }
}- Modify Startup.cs by adding the following lines of code to the default ConfigureServices() method:
services.AddMvc((opts) => { opts.EnableEndpointRouting = false; });
services.AddRouting();
and following line of code to the Configure() method:
app.UseMvcWithDefaultRoute();
- Build and run the application to view the PDF Viewer in your browser, containing the Annotation Editor tool and Form Editor tool to edit PDF documents.
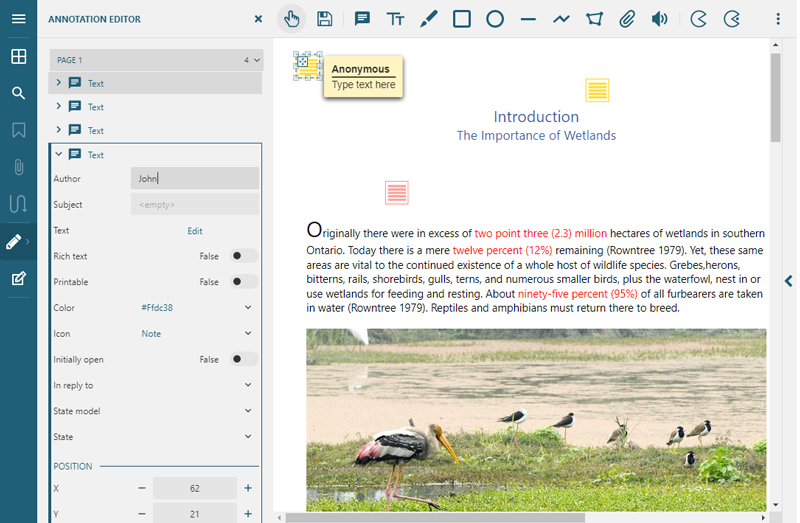
Annotation Editor Overview
The Annotation Editor adds different types of annotations to PDF documents. Annotations include text annotation, redact annotation, file attachments, stamps, watermarks, etc.
For more details, refer to this documentation.
Click on the Annotation Editor option in the left panel of DsPdfViewer to open the Annotation Editor. This changes the menu at the top of the JavaScript viewer to display different annotations. A panel on the left shows any existing annotations in the document.
Click on any annotation in the left panel, and a property panel opens listing all annotation properties. This property panel allows users to edit any existing annotation by setting text, color, author, and more. Each annotation has a different set of properties, altered through its corresponding property panel.

Working With Comments
DsPdfViewer uses Text Annotation type, also known as sticky notes, to add comments and comment replies to PDF documents. The comment is displayed with a note icon by default. However, this can be altered by setting the Icon property of the Text Annotation in the property panel. The comment text is visible when a user hovers the mouse over the note icon. It appears as a sticky note when the user clicks on it.
Clicking on the note icon again hides the sticky note. Text Annotation also has a context menu associated with it. The menu displays the options "Copy", "Add Sticky Note", "Show Comment Panel", and "Print" when the PDF document is in read-only mode, and the Annotation Editor is closed. When the Annotation editor is open, the options change to "Cut", "Copy", and "Delete".

How to Add Comments/Annotations
Add a new comment to the PDF document loaded in the JavaScript PDF viewer (DsPdfViewer):
- Open the Annotation editor by clicking on the Annotation Editor option in the left panel of DsPdfViewer.
- Click on the Add Sticky Note option in the top menu. Click on the desired location, and add a comment in the PDF document. A note icon and a pop-up note representing the Text Annotation appear at that location.
- Double-click the pop-up note to enable the editor and add the comment text. After typing the comment, click on OK in the top menu to post the comment in the document.
- Close the Annotation editor.
After closing the Annotation editor, all the comments are represented as a note icon in the PDF document.

How to Programmatically Add Comments and Annotations to Your PDF Using JavaScript
Use the addAnnotation method of DsPdfViewer as shown in the JavaScript code example below:
function addComment() {
        //Find comment with id 8R:
        viewer.findAnnotation("8R").then(function (searchResult) {
            //Clone TextAnnotation to create new comment:
            var clonedField = viewer.cloneAnnotation(searchResult[0].annotation);
            //Configure new comment options:
            clonedField.rect = [300, 725, 378, 747]
            clonedField.title = "Amy";
            clonedField.contents = "New test comment";
            //Add new comment to the first page.
            viewer.addAnnotation(0, clonedField);
        });
    }
How to View Comments/Annotations in GcPdfViewer
View comments in a PDF document by either hovering over the comment or clicking on the comment, or using the Comments Panel to view all the comments together. DsPdfViewer provides a Comments Panel, which is used to view or reply to comments. The Comments Panel is not added to DsPdfViewer by default. Follow the instructions below to enable the Text Annotation Reply tool and make it available.
Enable the Text Annotation Reply Tool in GcPdfViewer
The Text Annotation Reply tool can be enabled by invoking the addReplyTool method of DsPdfViewer, as shown below:
viewer.addReplyTool();It can also be enabled in the expanded state, displaying the comments panel by default. The below code is used to enable this functionality:
viewer.addReplyTool("expanded")
After the Text Annotation Reply tool is enabled, the Comments Panel is opened by choosing any of the following options:
- Right-click on any text annotation in the PDF document
- Select 'Show Comment Panel' from its context menu
- Click on the arrow at the extreme right of DsPdfViewer
Once the comments panel is visible, users can view all the comments and replies.

How to Reply to Comments/Annotations
Once the Text Annotation Reply tool is enabled (see above), use the following steps to reply to a comment:
- Open the Comments Panel and click on the comment you want to add a reply. It pops up a reply textbox
- Type in a reply and click Post to add it to the comment

How to Programmatically Add a Comment/Annotation to Your PDF Using JavaScript:
Use the addAnnotation method of DsPdfViewer. Here is a JavaScript code example:
function addCommentReply() {
        //Find comment with id 8R:
        viewer.findAnnotation("8R").then(function (searchResult) {
           var userName = "Jane Donahue";
           //Configure comment reply
           var replyAnnotation = viewer.cloneAnnotation(searchResult[0].annotation);
           //Set comment reply author name
           replyAnnotation.title = userName;
           //Set comment reply text
           replyAnnotation.contents = 'Yes, surely...';
           //Set comment reply's parent comment
           replyAnnotation.referenceAnnotationId = '8R';
           //Add comment reply
           viewer.addAnnotation(0, replyAnnotation);
        });
    }
Set Author Name for Comments in DsPdfViewer
The author name for a new comment or reply is set to "Anonymous" by default. Change the author name in the following ways:
- Set author name in the properties panel of Annotation editor. Once set, it is stored on the client and is used for subsequent replies.
- Set author name directly in Comments Panel by clicking on author name's label in the comment, enabling the built-in text editor.


How to Programmatically Set the Comment/Annotation Author in Your PDF Using JavaScript
Use the title option of AnnotationBase client-side API like this sample JavaScript code snippet:
 function setAuthorName() {
        //Find comment with author "James" on 1st page of PDF document:
        viewer.findAnnotation("James", { findField: 'title', pageNumberConstraint: 1 })
            .then(function (searchResult) {
                var annotation1 = searchResult[0].annotation;
                //Change author name, by setting 'title' property:
                annotation1.title = "John";
                //Update Annotation
                viewer.updateAnnotation(0, annotation1);
            });
    }
How to Set a Status in the DsPdfViewer
- Open the Comments Panel
- Click and select the comment to which the status is to be set
- Click on the ellipses (...) icon displayed at the top right corner of the comment box
- Select the appropriate status from the displayed status list

The status is added as an icon to the comment and displays the assignee's name when hovered over. The review status is also visible in the PDF document below the original comment. Multiple users can assign a status to a text annotation, but each user can only assign one status.
How to Programmatically Set Comment/Annotation Status in Your PDF Using JavaScript
Use the state, stateModel, and referenceAnnotationId properties of AnnotationBase client-side API. Here is a sample JavaScript code snippet:
function setStatus() {
        //Find comment with id 8R:
        viewer.findAnnotation("8R").then(function (searchResult) {
           var userName = "Jane Donahue";
           //Add new annotation to set Status on original annotation
           var statusAnnotation = viewer.cloneAnnotation(searchResult[0].annotation);
           statusAnnotation.title = userName;
           statusAnnotation.stateModel = 'Review';
           statusAnnotation.state = 'Completed';
           statusAnnotation.referenceAnnotationId = '8R';
           statusAnnotation.contents = 'Status Completed set by ' + userName;
           viewer.addAnnotation(0, statusAnnotation);
        });
    }
How to Programmatically Parse Comments in a PDF
How to programmatically find comments in the PDF document based on the comment's id, title, or contents using the findAnnotation method of DsPdfViewer client-side API with JavaScript.
Here is a sample JavaScript code snippet:
function findComment() {
        //Find annotation with id '8R':
        viewer.findAnnotation("8R").then(function (dataArray) {
            if (dataArray[0])
                alert(`Annotation ${dataArray[0].annotation.id} found on page with index ${dataArray[0].pageNumber - 1}.`);
            else
                alert('Annotation not found.');
        });
    }
How to Delete Comments in DsPdfViewer
Comments are deleted in a PDF using either the Delete option in the Annotation Editor or the Comments Panel. To delete a comment using Annotation editor, use the following steps:
- Open the Annotation editor.
- In the left panel of the Annotation editor, click on the comment or comment reply that needs deleting. This opens the annotation's property panel.
- At the bottom of the property panel, find the Delete option, and click on it to delete the comment.

To delete a comment using the Comments Panel, follow these steps:
- Open the Comments Panel.
- Click on the comment or comment reply you want to delete in the Comments Panel.
- Click on the ellipses (...) icon displayed at the top right corner of the comment, the dialog that appears has a Delete option.
- Click the Delete option to delete the comment.

How to Programmatically Delete Comments in a PDF Using JavaScript
Use the removeAnnotation method of DsPdfViewer client-side API with JavaScript. Here is a sample JavaScript code snippet:
function deleteComment() {
        //Delete comment with id '8R'
        viewer.removeAnnotation(0, '8R');
   }
Thanks for following along! If you have any questions about the new features, please leave them in the comments below.
Happy Coding!
Tags:
Related Blogs
Try Our .NET PDF Document API
PDF Viewer Resources

Sean Deegan