Use .NET to Build Opportunities Reports for Salesforce and Crystal Reports
Crystal Reports provides a Visual Studio integrated report designer to create reports. It has an in-built feature to integrate with project data sources that developers can quickly create reports in a familiar environment.
When it comes to generating reports based on internet-based data sources, the integration is not that straightforward; as a developer, you either have to design a disconnected report and bind it at runtime with data received from the web services or create your typed classes, map with web service and then design the report.
ComponentOne solves this problem by providing DataConnectors for popular online CRM such as Salesforce & Dynamics365, accounting systems like QuickBooks Online, workflow solutions like Kintone, website analytics like Google Analytics, and even OData. These data connectors provide many features like CRUD, Caching, Batching, SQL, and LINQ query support, to name a few.
In the 2021 v2 release of ComponentOne, these data connectors have been integrated with Visual Studio, meaning you can use Server Explorer to connect to any of the above sources using these data connectors, generate datasets, visually build queries or write SQL.
This also means that a table from these online data sources is available as 'Project Data Source' when you create a dataset.
This makes it easy for a developer to create reports using Crystal Reports designer against the above-mentioned internet-based data sources. This blog will walk through the steps required to build a report using the Salesforce Opportunities table to get information about sales leads at various stages.
ComponentOne DataConnectors are available under DataServicesin the installer. When you install the DataServices, it would integrate the data connectors with visual Studio and install the samples.
Connect to Salesforce
-
Create a WinForms application.
-
Open ServerExplorer, right-click the "Data Connections" node, click "Add Connection". On the "Add Connection" screen, click "Change." This should open the below screen, select "C1 Salesforce Data Source" from the list and click "OK".

The next screen will ask you to enter credentials for your Salesforce instance. The Salesforce data connector supports OAuth-based credentials.

This document explains how to set up an app to enable OAuth. The following information is required to connect to Salesforce:
- Token endpoint
- API URL
- Client ID
- Client secret
- Salesforce username and password
-
Security token
-
Enter the above details on this screen and click "OK". This should connect to Salesforce and show all available tables, as below:

Add DataSet
- Right-click on the project in the solution explorer and select "Add Item" from the context menu. On the "Add New Item" screen, select "DataSet", name it "Salesforce," and click "Add".

- Open the Salesforce dataset designer and drag-and-drop the "Opportunity" table from the "Tables" node of Salesforce:

- Save the project.
Design Opportunity Report in Crystal Reports
-
On Form1, drop a CrystalReportViewer control from the toolbox. If you do not have CrystalReports in your toolbox, you can get it here.
-
From the smart-tag of the CrystalReportViewer, click the "Create a New Crystal Report" option.

- Specify a report name on the next screen.

- On the Crystal Report Gallery screen, select the "Using the Report Wizard" radio button, choose "Standard" under "Choose an Expert," and click OK.

- On the next screen, select the "Opportunity" table from the Salesforce dataset. Click "Next".

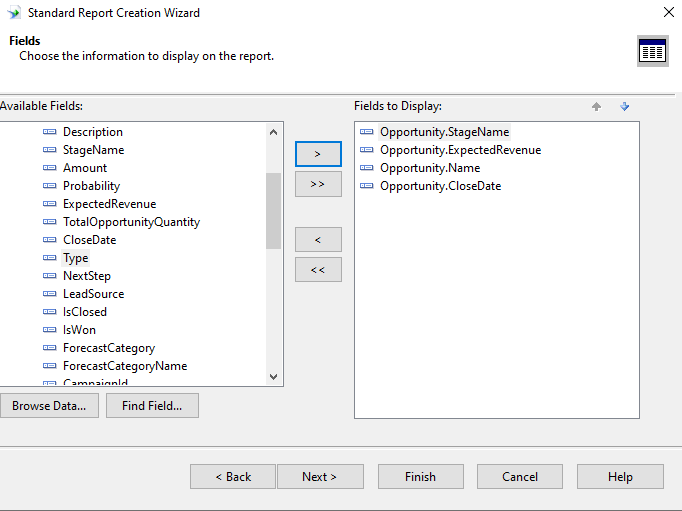
- On the "Fields" screen, select the following fields: StageName, ExtendedRevenue, Name, and CloseDate. Click "Next".
- On the next screen, choose "StageName" to group the report. Click "Next".

- On the summaries screen, choose to summarize the report by the "ExpectedRevenue" field. Click "Next".

- On the next screen, choose to sort by StageName and click "Next".

- On the chart screen, select the "Bar Chart" radio button, use the default chart title, set "On change of" to StageName, and set "Show summary" to "ExpectedRevenue".

- On the next screen, select "Next" and then "Finish". The report viewer is configured and shows the report layout at design time. It also creates the "Opportunity.rpt" report file and adds an "Opportunity1" CrystalReport control to the component tray.

Fill Data and View Report
We now need to fill the dataset with data from Salesforce, so in the Form_Load event, we fill the Opportunity table of the dataset with data using Salesforce DataAdapter.
private void Form1_Load(object sender, EventArgs e)
        {
            //Create an instance of salesforce dataadapter
            SalesforceTableAdapters.OpportunityTableAdapter oa = new SalesforceTableAdapters.OpportunityTableAdapter();
            //create an instance of Salesforce dataset
            Salesforce ds = new Salesforce();
            //fill opportunity table of the salesforce dataset
            oa.Fill(ds.Opportunity);
            // set the data source of Opportunity CrystalReport instance
            Opportunities1.SetDataSource(ds);
        }
Run the application to view the report:

It is always good to cache data from internet data sources and refreshes it after a certain threshold. ComponentOne DataConnectors provide an in-built feature to cachedata locally. It can be configured in the connection string itself.
In this case, the connection string was saved in the app.config, we would need to set "Use Cache" to true, set a "Cache Location" for the cache database, and a value for "Cache Tolerance," after which the data would be refreshed.
You also have the option to cache data to SQLite(default) or SQL Server. You can also incrementally update the cache for further performance gains.

Prabhakar Mishra