Use a .NET DataConnector to Create a Web API Over Salesforce Data
ComponentOne DataConnectors lets you bind to different types of datasources, including OData, Kintone, Salesforce, Dynamics365Sales, GoogleAnalytics, and more. In this blog, we will use the Salesforce .NET DataConnector to create a Web API and consume it in multiple ways, i.e., invoking the API methods using a browser, consuming it to create a chart in Excel, and performing CRUD operations on FlexGrid using Javascript.
The blog will describe each of the implementations mentioned above in detail through the listed sections:
- Create a Web API over Salesforce
- Consume Web API in a browser using Postman
- Consume Web API to create a chart in Excel
- Consume Web API to perform CRUD operations on FlexGrid using JavaScript
So, we will begin by creating a Web API over Salesforce data.
Create a Web API over Salesforce
Step 1: Create a Web API project
- Open Visual Studio 2019 and select Create a new project
- From the available list of project templates, choose the ASP.NET Core Web API template and click Next

- In the Configure project window, set the project name to SalesforceAPI, assign an appropriate location and click Create
- In the Additional Information dialog box that pops up next, confirm that the Target Framework is set to .NET Core 3.1 and click Create

Step 2: Install NuGet Packages
After successfully creating the project, we will add the required NuGet packages for working with Salesforce data using ComponentOne DataConnectors. We will be specifically working with Salesforce .Net DataConnector.
To get started, we must install the following NuGet Packages in the Web API project from NuGet:
- C1.AdoNet.Salesforce
- C1.EntityFrameworkCore.Salesforce
- Microsoft.EntityFrameworkCore.Tools

Step 3: Add a model class and a database context
Now, let's generate the model class and database context for each table we are looking forward to interacting with via Web API. ComponentOne DataConnectors support Scaffolding to generate the model and database context classes, as described here.
We will be using the same scaffolding approach to automatically generate the Model and database context class for the Customer__c table. The steps ahead will guide you in generating and registering the model and database context classes:
- In Solution Explorer, right-click the project. Select Add > New Folder. Name the new folder Models and execute the following scaffold command to generate the Model and Context classes in the Models folder. Please note that the command below does not specifies the actual values for the connection string attributes. It would help if you replaced the placeholders with the true values
Scaffold-DbContext "Username = *****; Password = *****; Security Token = *****; OAuth Client Id = *****; OAuth Client Secret = *****; OAuth Token Endpoint = https://ap16.salesforce.com/services/oauth2/token; Url=https://ap16.salesforce.com/services/data/v42.0; Use Cache = 'true'; Cache provider = 'Microsoft.Data.SqlClient'; Cache connection = 'Server=*****;Database=*****;User Id=*****;Password=*****;'" C1.EntityFrameworkCore.Salesforce -OutputDir "Models" -Context CustomerContext -Tables Customer__c
- In the command above, we connect to the database using SQL Server Cache to enhance the DataConnector performance further. For details on Salesforce DataConnector caching, refer to the following documentation topic.
- Next, we would register the database context in Startup.cs file by adding the following code in the ConfigureServices method:
public void ConfigureServices(IServiceCollection services)
{
   services.AddControllers();

   string connectionString = @"Username = ******; Password = ******; Security Token = ******; OAuth Client Id = ******; OAuth Client Secret = ******; OAuth Token Endpoint = https://ap16.salesforce.com/services/oauth2/token; Url=https://ap16.salesforce.com/services/data/v42.0; Use Cache = 'true'; Cache provider = 'Microsoft.Data.SqlClient'; Cache connection = 'Server=******;Database=******;User Id=******;Password=******;'";

   services.AddDbContext<CustomerContext>(opt => opt.UseSalesforce(connectionString));
}
Step 4: Scaffold a controller with CRUD methods
This step will define the CRUD methods in an API controller using the standard VS scaffolder. The steps ahead will guide you with the same:
- Right-click the Controllers folder and select Add > New Scaffolded Item.
- Select API Controller with actions, using Entity Framework, and then choose Add.

- In the Add API Controller with actions, using Entity Framework dialog, select CustomerC (SalesforceAPI.Models) in the Model class and CustomerContext (SalesforceAPI.Models) in the Data context class.
- Click Add button to add the controller and automatically generate all the CRUD methods to work on Salesforce data. The code snippet below depicts the generated controller:
using System;
using System.Collections.Generic;
using System.Linq;
using System.Threading.Tasks;
using Microsoft.AspNetCore.Http;
using Microsoft.AspNetCore.Mvc;
using Microsoft.EntityFrameworkCore;
using SalesforceAPI.Models;

namespace SalesforceAPI.Controllers
{
    [Route("api/[controller]")]
    [ApiController]
    public class CustomerCsController : ControllerBase
    {
        private readonly CustomerContext _context;

        public CustomerCsController(CustomerContext context)
        {
            _context = context;
        }

        // GET: api/CustomerCs
        [HttpGet]
        public async Task<ActionResult<IEnumerable<CustomerC>>> GetCustomerC()
        {
            return await _context.CustomerC.ToListAsync();
        }

        // GET: api/CustomerCs/5
        [HttpGet("{id}")]
        public async Task<ActionResult<CustomerC>> GetCustomerC(string id)
        {
            var customerC = await _context.CustomerC.FindAsync(id);

            if (customerC == null)
            {
                return NotFound();
            }

            return customerC;
        }

        // PUT: api/CustomerCs/5
        // To protect from overposting attacks, enable the specific properties you want to bind to, for
        // more details, see https://go.microsoft.com/fwlink/?linkid=2123754.
        [HttpPut("{id}")]
        public async Task<IActionResult> PutCustomerC(string id, CustomerC customerC)
        {
            if (id != customerC.Id)
            {
                return BadRequest();
            }

            _context.Entry(customerC).State = EntityState.Modified;

            try
            {
                await _context.SaveChangesAsync();
            }
            catch (DbUpdateConcurrencyException)
            {
                if (!CustomerCExists(id))
                {
                    return NotFound();
                }
                else
                {
                    throw;
                }
            }

            return NoContent();
        }

        // POST: api/CustomerCs
        // To protect from overposting attacks, enable the specific properties you want to bind to, for
        // more details, see https://go.microsoft.com/fwlink/?linkid=2123754.
        [HttpPost]
        public async Task<ActionResult<CustomerC>> PostCustomerC(CustomerC customerC)
        {
            _context.CustomerC.Add(customerC);
            await _context.SaveChangesAsync();

            return CreatedAtAction("GetCustomerC", new { id = customerC.Id }, customerC);
        }

        // DELETE: api/CustomerCs/5
        [HttpDelete("{id}")]
        public async Task<ActionResult<CustomerC>> DeleteCustomerC(string id)
        {
            var customerC = await _context.CustomerC.FindAsync(id);
            if (customerC == null)
            {
                return NotFound();
            }

            _context.CustomerC.Remove(customerC);
            await _context.SaveChangesAsync();

            return customerC;
        }

        private bool CustomerCExists(string id)
        {
            return _context.CustomerC.Any(e => e.Id == id);
        }
    }
}
The controller implements the GET, GET(ID), PUT, POST, and DELETE methods to perform the Read, Update, Create and Delete operations over the Salesforce data, respectively.
This completes the creation of a Web API over Salesforce. In the next step, we will set the application's startup path to execute and test the working of this API.
Step 5: Update the launchUrl
To launch the Web API on project execution, you will need to update launchUrl from "weatherforecast" to "api/CustomerCs" in Properties > launchSettings.json file, as depicted in the screenshot below:

The Web API project is now ready to compile and execute.
The controller’s READ method, which is equivalent to invoking the GET method of API, is invoked on project execution. It returns all the records from the Customer__c table as depicted in the screenshot below:

Similarly, you can invoke the GET(id) method by passing the id column value of a particular row as a parameter in the browser request. Refer to the screenshot below, which depicts the same:

All the other API methods, i.e., PUT, POST, and DELETE, cannot be executed directly in the browser. You would either need to use an API platform to test the methods in the browser, or you can create a JS application to invoke the methods and display the results.
The sections will describe both these approaches to consuming an API in detail.
Consume Web API in a browser using Postman
As described above, we can invoke the GET methods of an API directly through the browser; however, we would need an API platform to execute them in the browser for all other methods. So, in this blog post, we will be using POSTMAN, an API platform that helps you build and use APIs to consume the Web API in a browser.
This section will help you understand how each API method can be invoked via POSTMAN and what results to expect when invoking an API method.
Let's start by installing the Postman app. After successful installation, you can find the Postman app on your system by searching in the installed apps. Open the POSTMAN app and observe the default view as depicted in the screenshot below:

Now, let's move on to invoking and executing the Web API methods. Ensure that the Web API project is executing in the background to invoke all Web API methods via POSTMAN successfully.
Create a new Request
Before we move on to invoke the methods, let's just quickly learn how to create a new API request in POSTMAN:
- Switch to "My Workspace" by clicking on the Workspace menu bar option
- Click on the "+" icon available in the left corner of the workspace view to create a new request

This is what the newly created request looks like:

Test GET methods for Salesforce Web API
The following two GET endpoints have been implemented in the Web API created above. We will learn to invoke these and observe the output in the following sections.
- GET /api/customerCs
- GET /api/customerCs/{id}
Test GET with Postman
- Create a new request
- Set the HTTP method to GET
- Set the request URI to https://localhost:<port>/api/CustomerCs. For example, https://localhost:5001/api/CustomerCs. This URI is basically referring to the one generated when executing your Web API project from Visual Studio
- Select Send
In the screenshot below, you can observe how the request has been defined, sent by clicking the Send button, and returned response displayed in the bottom tab:

Test GET(ID) with Postman
Next, set the request URI to https://localhost:<port>/api/CustomerCs/<id>, where id is the value of the record's id column you want to fetch. Click Send and observe the response containing only one requested record:

Test POST method for Salesforce Web API
- Create a new request
- Set the HTTP method to POST
- Set the request URI to https://localhost:<port>/api/CustomerCs. For example, https://localhost:5001/api/CustomerCs. This URI is basically referring to the one generated when executing your Web API project from Visual Studio
- Select the Body tab
- Select the raw radio button
- Set the type to JSON (application/json)
- In the request body, enter JSON for a customer item:
{
     "ownerId": "0052w000005wGkWAAU",
     "name": "a002w000008NmEA",
     "contactNameC": "Mary Jane"
}
Select Send and observe the RESPONSE tab at the bottom displaying the newly inserted record:

Test PUT method for Salesforce Web API
- Create a new request
- Set the HTTP method to PUT
- Set the request URI to https://localhost:<port>/api/CustomerCs/<id>, where id is the value of the record's id column you want to update. This URI is basically referring to the one generated when executing your Web API project from Visual Studio
- Select the Body tab
- Select the raw radio button
- Set the type to JSON (application/json)
- In the request body, enter JSON for a customer item:
{
    "id": "a002w000008NmEAAA0",
    "ownerId": "0052w000005wGkWAAU",
    "isDeleted": false,
    "name": "a002w000008NmEA",
    "createdDate": "2020-08-18T19:02:42",
    "createdById": "0052w000005wGkWAAU",
    "lastModifiedDate": "2022-04-05T00:47:58",
    "lastModifiedById": "0052w000005wGkWAAU",
    "systemModstamp": "2022-04-05T00:47:58",
    "lastActivityDate": null,
    "lastViewedDate": "2022-04-05T00:47:58",
    "lastReferencedDate": "2022-04-05T00:47:58",
    "contactNameC": "Maria Janes",
    "regionC": null,
    "countryC": "UK",
    "contactTitleC": "Sales Representative",
    "addressC": "120 Hanover Sq.",
    "faxC": "(171) 555-6750",
    "cityC": "London",
    "companyNameC": "Around the Horn",
    "postalCodeC": "WA1 1DP",
    "phoneC": "(171) 555-7788",
    "customerIdC": "AROUT"
}
In this first screenshot, you can observe that a particular record has been fetched using the GET(ID) method and has the value "Maria Andrews" for the contactNameC field.

The following screenshot displays the successfully executed PUT command, which returns no response text:

And finally, we again invoke the GET(ID) method to verify the updated record as depicted below:

Test DELETE method for Salesforce Web API
- Create a new request
- Set the HTTP method to DELETE
- Set the request URI to https://localhost:<port>/api/CustomerCs/<id>, where id is the value of the record's id column you want to delete. This URI refers to the one generated when executing your Web API project from Visual Studio
The screenshot below depicts a successfully executed DELETE request:

This completes verifying the working of all Web API methods through the browser. Now, let's understand how to consume this API in Excel and a JS application.
Consume Web API to create a chart in Excel
This section will learn how to import data from a Web API into Excel and create a chart using the imported data. The steps below will guide you ahead:
- Open Excel and create a new Workbook.
- Switch to the Data tab and choose Get Data>From other Sources> From Web.

- In the prompt window that appears, paste the API URL (The URL generated on executing the Salesforce Web API project.)

- On the result window prompt, choose Transform >To Table on the menu and then click OK.
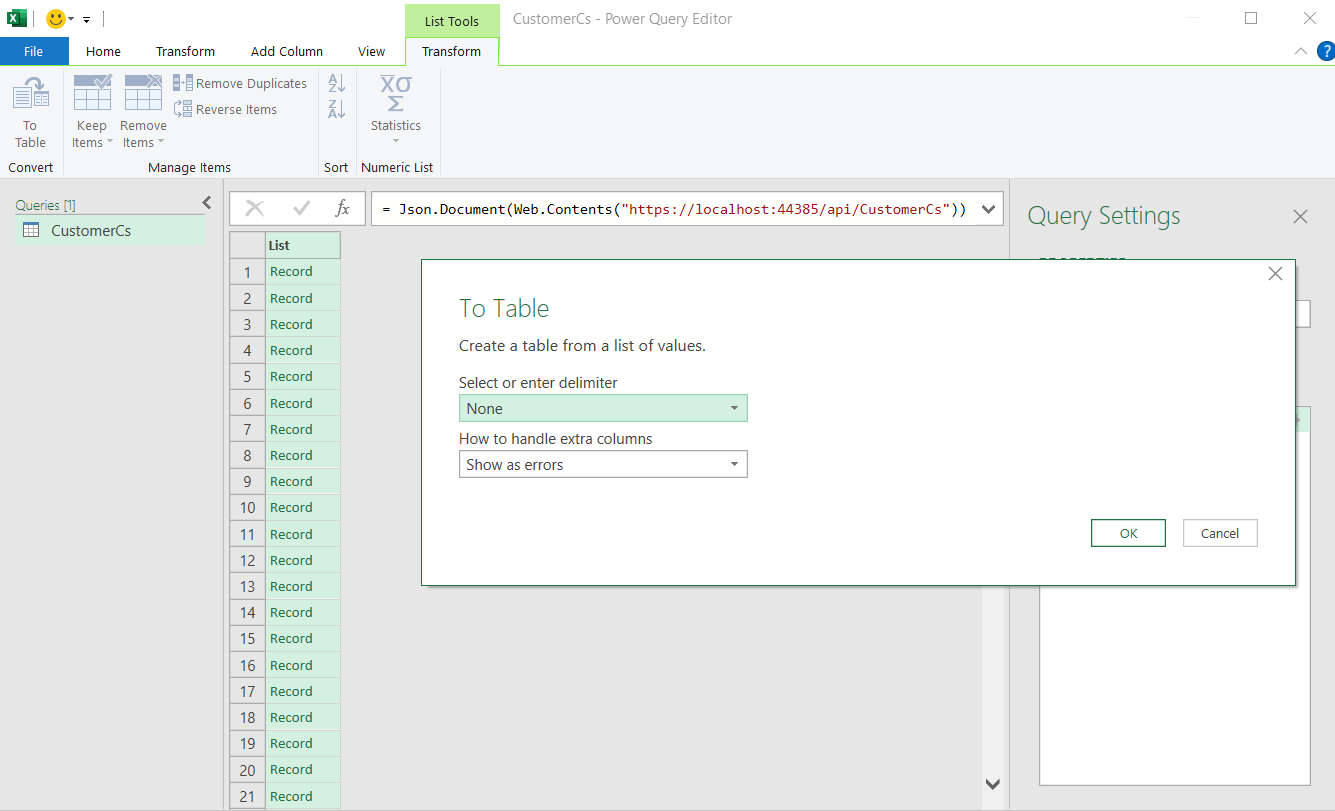
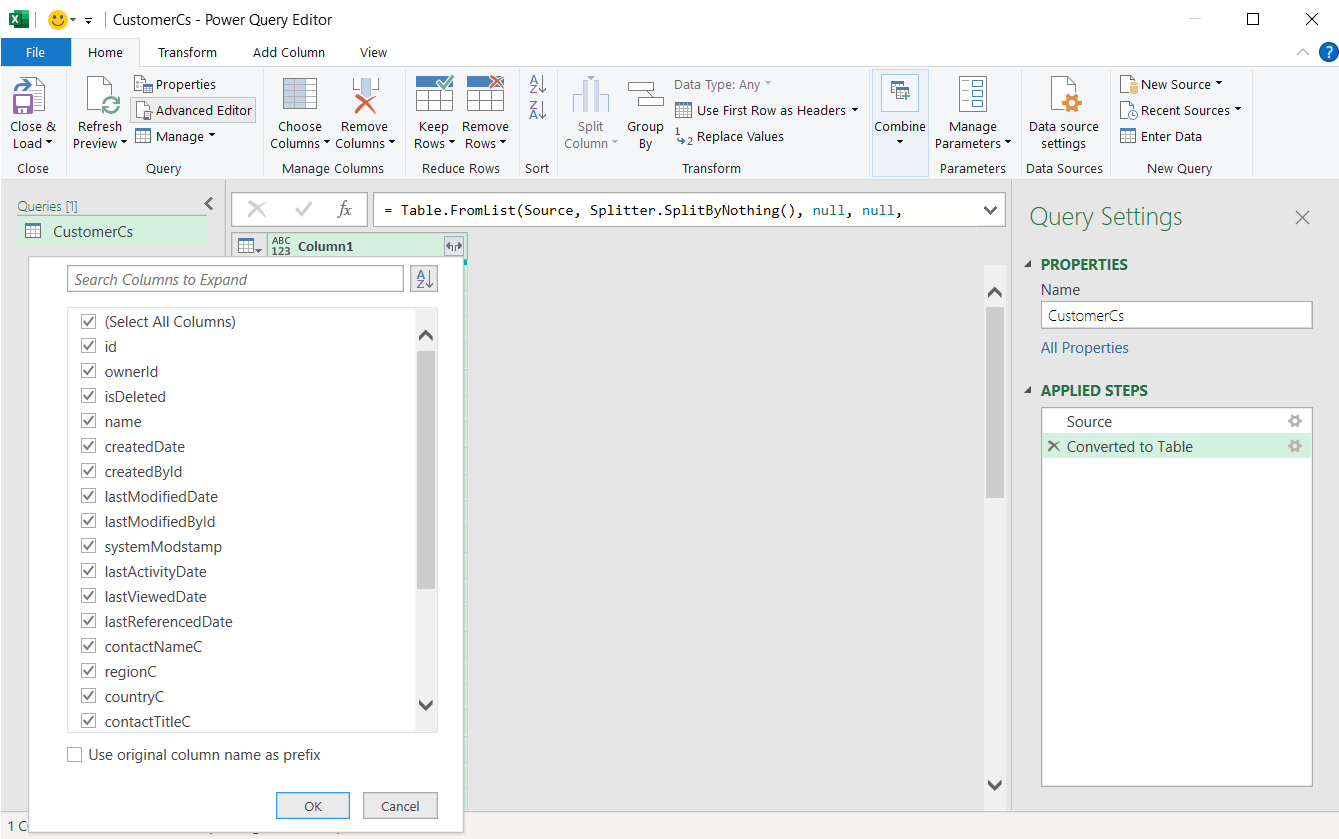
- Click on the left and right arrow buttons in the column header cell (having text Column1), uncheck "Use Original name as prefix" in the dialog, then click OK. Finally, click Close & Load on the Home menu.


- This displays the JSON data imported from a Web API loaded into a new worksheet, as depicted in the screenshot below:

- After importing the data, it is like any random sheet of data added to an Excel Workbook. You can use it to create PivotViews or Charts.
As an example, we created both. Since the data is too huge, so we created a PivotView, and using the aggregated data from the Pivot, we inserted a chart as depicted in the image below:

Consume Web API to perform CRUD operations on FlexGrid using JavaScript
This section will learn how to consume the Web API in JavaScript to perform CRUD operations on FlexGrid control.
Step 1: Create a View
To begin with, we create a view containing the FlexGrid control and other buttons, using which the end-user can perform database operations. We are creating this view by adding an HTML page named "index.html" to the Web API project. We will add this page under the wwwroot folder by creating the folder in the project. This would help us access the page from the browser by adding the following line of code in Configure method of the Startup.cs file:
//Adding Static Files Middleware to serve the static files
app.UseStaticFiles();
And reset the launchUrl attribute in Properties\launchSettings.json, from "api/CustomerCs" to "index.html".
Step 2: Add and configure FlexGrid
- We will start by adding the Wijmo references required for working with FlexGrid control in the <HEAD> section of index.html as described below:
<!-- Wijmo -->
<link href="https://cdn.grapecity.com/wijmo/5.latest/styles/wijmo.min.css" rel="stylesheet" />
<script src="https://cdn.grapecity.com/wijmo/5.latest/controls/wijmo.min.js"></script>
<script src="https://cdn.grapecity.com/wijmo/5.latest/controls/wijmo.grid.min.js"></script>
<script src="https://cdn.grapecity.com/wijmo/5.latest/controls/wijmo.input.min.js"></script>- In the <BODY>section of index.html, add elements to host the create, update, delete buttons, the FlexGrid control, and the Pager control.
<button onclick="create()">Create</button>
<button onclick="update()">Update</button>
<button onclick="deleteRec()">Delete</button>
<div id="flexGrid" style="height: 300px;"></div>
<div id="thePager"></div>- At the end of the <HEAD>section of index.html, add the following JavaScript code to generate CollectionView and the FlexGrid control:
<script>
  var cv = new wijmo.collections.CollectionView();
  var flexGrid = new wijmo.grid.FlexGrid('#flexGrid');
  flexGrid.itemsSource = cv;
  cview.trackChanges = true;
  flexGrid.allowAddNew = true;
  flexGrid.allowDelete = true;
</script>
Since, the CollectionView has yet not been populated with some actual data, an empty FlexGrid control, the pager control, and the "Create," "Update," and "Delete" buttons will appear on the index page when you run the project. The screenshot below depicts the same:

Step 3: Populate data in FlexGrid using the GET method
This step will read the data from the database and populate the CollectionView. Later, we will bind the CollectionView to FlexGrid using the itemSource property to populate the FlexGrid with data.
There are different methods used to call the Web API (to send an HTTP request) such as jQuery's ajax function or XMLHttpRequest, but here, we are using Wijmo's wijmo.httpRequest method. This method allows you to send HTTP requests by using much simpler code than XMLHttpRequest, even if you are not using jQuery.
Add the following JavaScript code to send a GET request to the Web API. When the request is successful, it converts the loaded JSON data to a JavaScript array object and sets it to the CollectionView, which is then set as the itemsSource for FlexGrid.
The code below enables paging by setting the pageSize property of CollectionView to 6 and assigning the CollectionView to the pager control:
<script>
        var cview;
        window.onload = function () {
            cview = new wijmo.collections.CollectionView();
            wijmo.httpRequest('/api/CustomerCs', {
                success: function (xhr) {

                    // create a paged CollectionView with 6 data items per page
                    cview.sourceCollection = JSON.parse(xhr.response);
                    cview.pageSize = 6;

                    // navigate the pages
                    new wijmo.input.CollectionViewNavigator('#thePager', {
                        byPage: true,
                        headerFormat: 'Page {currentPage:n0} of {pageCount:n0}',
                        cv: cview
                    });
                }
            });

            var flexGrid = new wijmo.grid.FlexGrid('#flexGrid', {
                autoGenerateColumns: false,
                columns: [
                    { binding: 'id', header: 'Id', width: '2*' },
                    { binding: 'contactNameC', header: 'Contact Name', width: '*' },
                    { binding: 'countryC', header: 'Country', width: '*' }
                ],
                itemsSource: cview
            });
        }
</script>
On executing the project, you will find the paged FlexGrid control populated with data. You can navigate through the pages using the Pager control displayed below the FlexGrid control, as depicted in the screenshot below:

Step 4: Insert new records using the POST method
To insert new records into the database, we must first add the new row to FlexGrid. To accomplish the same, we should set the allowAddNew property of FlexGrid to true, as depicted in Step2 above. This property adds an empty row to the end of FlexGrid with an asterisk symbol, as shown in the screenshot below:
One can directly edit this new row to add a new data populated row to the FlexGrid.
Next, we add the following JavaScript code to the click event of Create button. This code gets a list of added data using the itemsAdded property of CollectionView and sends a POST request to the Web API. In the POST request, specify the added data in the data parameter.
function create()
{
   alert("Create begins \nNew items count: " + cview.itemsAdded.length);
   for (var i = 0; i < cview.itemsAdded.length; i++)
   {
       wijmo.httpRequest('/api/CustomerCs/', {
            method: 'POST',
            data: cview.itemsAdded[i]
       });
    }
    alert("Record created !!!");
}
Run the project, add a new data record, and click the Create button to add the record to the database. When you reload the page, you can see the added data records in the database.
The GIF below depicts the Create/Insert operation in action:

Step 5: Update records using the PUT method
Next, we update the database with the data edited in FlexGrid.
Here, we are using a batch update, where multiple edits are updated in the database in one go instead of the normal update mode, where the database is updated every time a data record is edited. To perform a batch update, it is necessary to keep track of changed data and manage a list of changes. The CollectionView can automatically handle such operations when setting the trackChanges property of CollectionView to true, as depicted in Step2 above.
Add the following JavaScript code to the click event of the Update button. This code gets a list of updated data using the itemsEdited property of CollectionView and sends a PUT request to the Web API. The PUT request specifies the ID of the updated data in the URL and the data to be sent in the data parameter.
function update()
{
    alert("Update begins \nEdited items count: " + cview.itemsEdited.length + "\n Edited item accountid: " + cview.itemsEdited[0].id);
    for (var i = 0; i < cview.itemsEdited.length; i++)
    {
       wijmo.httpRequest('/api/CustomerCs/' + cview.itemsEdited[i].id, {
           method: 'PUT',
           data: cview.itemsEdited[i]
       });
    }
    alert("Record updated !!!");
}
Run the project, edit data records, and press the Update button. When you reload the page, you can see the updated data in the database. The GIF below depicts the UPDATE operation in action:

Step 6: Delete records using the DELETE method
Lastly, we will learn how to reflect the data deleted from FlexGrid to the database. To accomplish the same, we should set the allowDelete property of FlexGrid to true, as depicted in Step 2 above. This would enable the user to delete a row by selecting the row and hitting the DELETE key on the keyboard.
Add the following JavaScript code to the click event of the Delete button. This code gets a list of the deleted data using the itemsRemoved property of CollectionView and sends a DELETE request to the Web API. In the DELETE request, we specify the ID of the deleted data in the URL.
flexGrid.allowDelete = true;

function deleteRec()
{
   alert("Delete begins \nDeleted items count: " + cview.itemsRemoved.length);
   for (var i = 0; i < cview.itemsRemoved.length; i++)
   {
       wijmo.httpRequest('/api/CustomerCs/' + cview.itemsRemoved[i].id, {
             method: 'DELETE'
       });
    }
    alert("Record deleted !!!");
}
Run the project, delete a record, and press the Delete button. When you reload the page, you can see that the data record has been deleted from the database. The GIF below depicts the DELETE operation in action:

With the above implementation, we executed the database CRUD operations on FlexGrid using JavaScript and Web API.
Download the sample implementing the Web API and JavaScript functions here. To know more about DataConnectors, refer to demos and documentation.
Related Blogs
Try Our .NET UI Components & Datagrid
Getting Started With ComponentOne

Manpreet Kaur