Using Firestore Databases with Wijmo
Firestore is Google's new flexible, scalable NoSQL cloud database. It was designed to store and sync data for client- and server-side development. It is a flexible, scalable database for mobile, web, and server development from Firebase and Google Cloud Platform.
Like Firebase Realtime Database, it keeps your data in sync across client apps through realtime listeners and offers offline support for mobile and web so you can build responsive apps that work regardless of network latency or Internet connectivity.
Firestore is extremely easy to set up, use, and scale. It provides high performance, even with huge collections. On the negative side, it provides limited querying capabilities.
Wijmo's Firestore class uses the Firestore REST API to allow you to load, view, and edit Firestore databases. It is light and fast but does not provide advanced features provided by Firestore web client library, such as off-line caching and real time updates. If you need those features or have already decided to use the web client library, then you may want to use the Snapshot class instead.
Read more about Realtime Firestore Updates with Wijmo Snapshot Class.
Let's look at how to use Wijmo's Firestore class with a simple example based on the traditional Northwind database.
Create the Database
Creating a Firestore database is very easy.
All you need to do is:
- Go to the Firebase console,
- Create a new project (or select an existing one),
- Click the Database button,
- Add a Firestore database
- Use the UI to configure the database
There are many detailed tutorials and videos that cover this step, including:
For our sample project, we created a Northwind database by adding a collection for each table in the original database.
We populated the collections by copying data from the Northwind spreadsheet and pasting it into a FlexGrid bound to our Firestore database.
We could also have imported the data using Google's Cloud Shell, but that would not have been as much fun.
Here's a screenshot of our database in the console:

Get an API Key
Our app will need an API key to access the database. API keys are unique codes passed to the APIs to identify the calling application. They are used by Firestore to track and control how the API is being used, for example to prevent malicious use or abuse of the API.
We will use the API key we created earlier, on the Google API Console, but will add the Cloud Datastore and Token Service APIs to the list of key restrictions:
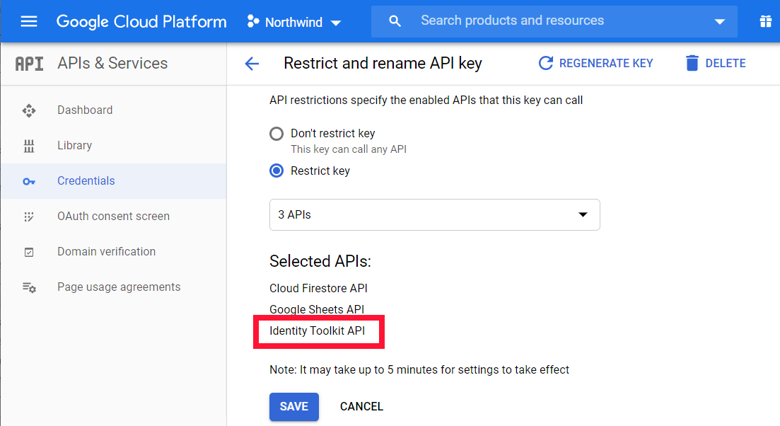
The Identity Toolkit API is required to convert OAuth2 tokens into Firebase ID tokens. We will talk more about this in the "Enable Authentication" section below. Without this service, the app will not be able to use the Firestore security rules. This is also the place where you can specify access restrictions, so your app can only be used by specific web sites, servers, or application types.
Access Firestore from the App
Now that we have a database and an API key, we can use the Firestore class to connect to the database.
We will create a simple UI like the one in the previous example. It allows users to select product categories from a list. When a category is selected, the app will show a grid with the product information and a chart with product unit prices.
We will start by creating a Firestore object connected to our database:
 const API_KEY = 'AIzaSyCvuXEzP57I5CQ9ifZDG2_K8M3nDa1LOPE';
 const PROJECT_ID = 'test-9c0be';
 let fsNWind = new Firestore(PROJECT_ID, API_KEY, {
     collections: [ 'Products', 'Categories', 'Suppliers' ]
 });
Next, let's add a ComboBox so users can see and select product categories:
 let categoryCombo = new ComboBox('#categoryCombo', {
     placeholder: '(All Categories)',
     isRequired: false,
     displayMemberPath: 'CategoryName',
     itemsSource: fsNWind.getCollection('Categories'),
     selectedIndexChanged: (s, e) => {
         let cat = s.selectedItem;
         fsNWind.getSheet('Products').filter = (item => {
             return cat == null || cat.CategoryID == item.CategoryID;
         });
     }
 });
This is 100% standard Wijmo code, the data could have been loaded from any data source.
When the user selects a category, the combo applies a filter to the "Products" collection to show only products in that category.
This is the code used to show the products in a FlexGrid:
 let supplierMap = new DataMap(fsNWind.getCollection('Suppliers'),
                               'SupplierID', 'CompanyName');
 let productGrid = new FlexGrid('#productGrid', {
     ...gridOptions,
     autoGenerateColumns: false,
     columns: [
         { binding: 'ProductName', header: 'Product Name' },
         { binding: 'UnitPrice', header: 'Unit Price', format: 'n2' },
         { binding: 'QuantityPerUnit', header: 'Quantity Per Unit' },
         { binding: 'SupplierID', header: 'Supplier', dataMap: supplierMap },
         { binding: 'UnitsInStock', header: 'In Stock', format: 'n0' },
         { binding: 'UnitsOnOrder', header: 'On Order', format: 'n0' },
     ],
     itemsSource: fsNWind.getCollection('Products')
 });
As before, this is 100% standard Wijmo code.
We apply a DataMap to the "SupplierID" column so the grid will show company names instead of supplier IDs. The DataMap is based on the "Suppliers" collection.
Finally, we add a FlexChart to show the unit price for the products:
 let productChart = new FlexChart('#productChart', {
     chartType: 'Bar',
     axisX: { majorGrid: true, axisLine: false },
     axisY: { majorGrid: false, axisLine: false, reversed: true },
     legend: { position: 'Bottom' },
     bindingX: 'ProductName',
     series: [
         { binding: 'UnitPrice', name: 'Product Unit Prices (US$)' }
     ],
     itemsSource: fsNWind.getCollection('Products')
 });
And the app is ready.
It will look and behave exactly like the version, based on Google Sheets: when the user selects a category or sorts the data, the grid and the chart will update automatically.
This time; however, we must enable authentication before we can run the app.
Enable Authentication
For authentication, the Firestore REST API accepts either a Firebase Authentication ID token or a Google Identity OAuth 2.0 token.
- If you use a Firebase ID token, Firestore uses Cloud Firestore Security Rules to determine if a request is authorized. This is the preferred option since it leverages the Firestore Security Rules (which are flexible and powerful), and because it is the only option supported by the Snapshot class.
- If you use a Google Identity OAuth 2.0 token, Firestore uses Cloud Identity and Access Management (IAM) to determine if a request is authorized. This option bypasses the Firestore Security Rules and uses the authorizations granted to users by the IAM administrator. This is like the authentication used by the GoogleSheet class.
In our example, we will use a Firebase ID token.
We can use the same OAuth2 object we used before:
 const SCOPES = [ 'https://www.googleapis.com/auth/userinfo.email' ];
 let auth = new OAuth2(API_KEY, CLIENT_ID, SCOPES);

 // button to log in/out
 let oAuthBtn = document.getElementById('auth_btn');

 // click button to log user in or out
 oAuthBtn.addEventListener('click', () => {
     if (auth.user) {
         auth.signOut();
     } else {
         auth.signIn();
     }
 });
To finish, we must also apply the idToken to the Firestore object when the user changes (to use an OAuth2 token, we would set the accessToken property instead):
// update button/sheet state when user changes
 auth.userChanged.addHandler(s => {
     let user = s.user;

     // update button caption
     oAuthBtn.textContent = user ? 'Sign Out' : 'Sign In';

     // update Firestore ID token
     fsNWind.idToken = user ? s.idToken : null;
 });
And the app is ready.
It looks and behaves just like the first version, except this one uses a Firestore database as the backend instead of a Google Sheet.
Committing Changes
Whenever a user changes, adds or removes an item, the Firestore class commits changes to the data store immediately. This default behavior minimizes the chances of data loss.
If you prefer to defer the commit operations and apply them on demand, set the Collection's deferCommits property to true and call the commitChanges (or cancelChanges) methods whenever you want.
For example, the code shows how you can use the hasPendingChanges property to determine whether the Collection has pending changes and the commitChanges and cancelChanges methods to apply or cancel them:
// get the collection and configure it
 let collection = fs.getCollection('restaurants');
 collection.deferCommits = true;

 // commit/cancel changes buttons
 let btnCommit = document.getElementById('btn-commit') as HTMLButtonElement,
     btnCancel = document.getElementById('btn-cancel') as HTMLButtonElement;

 // commit or cancel pending changes
 btnCommit.addEventListener('click', () => collection.commitChanges());
 btnCancel.addEventListener('click', () => collection.cancelChanges());

 // enable buttons when there are pending changes
 collection.hasPendingChangesChanged.addHandler((s, e) => {
     btnCommit.disabled = btnCancel.disabled = !collection.hasPendingChanges;
 });
Limiting the Amount of Data to Load
So far, we have been loading entire collections at once. This works fine for relatively small collections, with a couple of thousand items.
But Firebase collections may contain millions or billions of items, so we need a way to limit the amount of data and load only what the user is interested in. Narrowing down and getting only the data you need will not only make the application more user friendly but also more efficient and less expensive (cloud services are not always free).
There are three simple ways to limit the amount of data loaded into a Collection object:
- Use the fields property to specify the fields you want to load. This option can be useful when your collections contain many fields and you are interested only in a few. Getting only a subset of the fields is a feature available in SQL databases, OData sources, and graphQL.
- Set the pageSize property to a reasonable number of records (say 10 or 20) and make sure the pageOnServer property is set to true. This way the Collection will load only a few records at a time, and you can use the pageIndex property to navigate through the data one page at a time.
- Use the where method to apply a server-side filter. For example, you may want to see customers in one or two countries only.
The three options above can be combined and used simultaneously.
For example, the code below loads a collection with customers. Only a few selected fields are retrieved, and only six customers are loaded at a time:
// load the Customers collection
 let customers = new Collection(fsNWind, 'Customers', {
     sortDescriptions: ['CustomerID'],
     fields: [ 'CustomerID', 'CompanyName', 'ContactName', 'City', 'Country' ],
     pageOnServer: true,
     pageSize: 6 // load only six customers per page
 });
We will allow users to filter the data by country. We will use a ComboBox to allow users to select the country they are interested in:
let cmbCountries = new ComboBox('#cmbCountries', {
     placeholder: '(Select a Country)',
     itemsSource: 'Brazil,France,Germany,UK,USA'.split(','),
     isRequired: false,
     text: '',
     textChanged: (s, e) => {
         customers.where('Country', '==', s.text);
     }
 });
When the user selects a country, the textChanged event fires, and the code updates the queryFilter property to show all customers in the selected country.
To show the data, we will use a CollectionViewPager and a FlexGrid:
let fsCustomerPager = new CollectionViewNavigator('#fsCustomerPager', {
     cv: customers,
     byPage: true,
     headerFormat: 'Page {current:n0}'
 });
 let fsCustomerGrid = new FlexGrid('#fsCustomerGrid', {
     showMarquee: true,
     formatItem: addRowHeaderIndex,
     autoGenerateColumns: false,
     columns: customers.fields.map(fld => {
         return { binding: fld }
     }),
     itemsSource: customers
 });
This is what the application looks like:

It shows customers from the currently selected country, six at a time. Users may switch the current page using the navigator control above the grid.
Our database has about 100 customers, but if it had 100 million our app would still work just fine. Only up to six (or whatever page size you choose) would be loaded at a time.
Performing Simple and Composite Queries
Firestore provides efficient but somewhat limited querying capabilities compared to traditional databases.
To apply server-side filters, use the where method and specify the fields you want to filter on, the operator to apply, and the value to filter by.
For example, to get the items that have the Country field set to "Brazil", you could use:
customers.where('Country', '==', 'Brazil');
To get the items that have the Country field set to "Brazil" or "Argentina", you could use:
customers.where('Country', 'IN', ['Brazil', 'Argentina');
You can chain multiple calls to the where method to create composite filters. For example, to get the items that have the Country field set to "Brazil" and Sales greater than 1000, you could use:
  customers
     .where('Country', '==', 'Brazil')
     .where('Sales', '>', 1000);</pre>
This is simple and efficient, but there are limitations. For example, composite filters combine individual filters with an 'AND' operation. You could not build a query that would get the items where Country is set to "Brazil" OR have Sales greater than 1000.
Also, if you combine equality (==) and range operators (>, >=, <, <=), you will need to create a composite index. You cannot use range operators in multiple fields. And there are no operators for inequality or full-text search.
These limitations apply only to server queries. If you download the data, then you can perform whatever filtering operations you want on the client.
For more details on querying Firestore databases, please see the Perform simple and compound queries in Cloud Firestore topic in Google's documentation.
Try the Live Demos
Firestore Realtime API
This example so far has used the Firestore REST API to be lightweight and simple. But Firestore offers many more features like realtime updates and offline storage in the Client SDK. The good news is that we support both! Learn more about using our Firestore Snapshot class for realtime updates.

Bernardo de Castilho