Blazor | ComponentOne
Controls / Input Controls / Masked Text Box / Quick Start
In This Topic
    Quick Start
    In This Topic

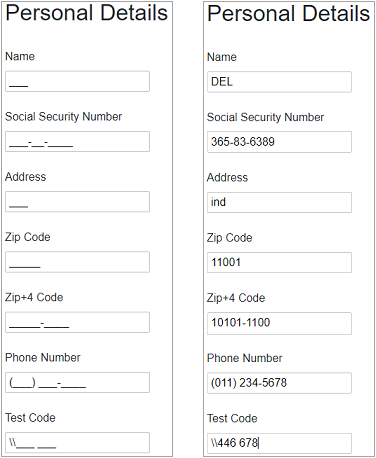
    The following quick start guide is intended to get you up and running with the MaskedTextBox control. In this quick start, you add a MaskedTextBox control to your application and add various masks to it. In the following example, we created a personal details form for an employee with seven MaskedTextBoxes having different input masks for each field (Name, Social Security Number, Address, Zip Code, Zip+4 Code, Phone Number, and Text Code).

    The following Images show how the masked text boxes appear at runtime and after the information is filled in them.

    Appearance of Masked TextBox at runtime after filling information.

    Create a Blazor App

    1. In Visual Studio, select Create a new project from the Get started pane.
    2. In the Create a new project dialog, select Blazor WebAssembly App, and click Next. Alternatively, you can also create a Blazor Server App.
      Note: Blazor Server App or server-side app can be created using the Blazor Server App template. For more details, see Blazor Server topic under Blazor Project Types.
    3. In the Configure your new project dialog, provide name of the project you want to create in the Project name field and location for the project in the Location field. Click Next.
    4. In the Additional information dialog, select the target framework from the Framework dropdown, if required and click Create. By default, the selected framework is .NET 6.0.
      A new client-side Blazor app is created.

    Back to Top

    Configure References

    1. In the Solution Explorer, right click Dependencies and select Manage NuGet Packages.
    2. In NuGet Package Manager, select nuget.org as the Package source.
    3. Search for C1.Blazor.Input package and click Install.
    4. Navigate to the wwwroot, open index.html file.
    5. Register the client resources by adding the following lines of code to the <head> tag.
      HTML
      Copy Code
      <link rel="stylesheet" href="/_content/C1.Blazor.Core/styles.css" />
      <link rel="stylesheet" href="/_content/C1.Blazor.Input/styles.css" />
      
    6. Add the following code to the <body> tag.
      HTML
      Copy Code
      <script src="/_content/C1.Blazor.Core/scripts.js"></script>
      <script src="/_content/C1.Blazor.Input/scripts.js"></script>
      
    7. Right click on Pages folder, click Add | Razor Component to add a new Razor page and then provide a name, say MTBQuickStart.
    8. Add the required directives to initialize and use the MaskedTextBox control in the new Razor page.
      MTBQuickStart.razor
      Copy Code
      @using C1.Blazor.Input
      

    Back to Top

    Configure the MaskedTextBox control

    Display details of an employee using several MaskedTextBox controls and applying different masks on them using the Mask property of the C1MaskedTextBox class as shown in the following code:

    MTBQuickStart.razor
    Copy Code
    <h2>Personal Details</h2>
    <br />
    
    <form>
        <label>Name</label>
        <br />
        <C1MaskedTextBox Mask=">LLL"></C1MaskedTextBox>
        <br />
    
        <br />
        <label>Social Security Number</label>
        <br />
        <C1MaskedTextBox Mask="000-00-0000"></C1MaskedTextBox>
        <br />
    
        <br />
        <label>Address</label>
        <br />
        <C1MaskedTextBox Mask="<LLL"></C1MaskedTextBox>
        <br />
    
        <br />
        <label>Zip Code</label>
        <br />
        <C1MaskedTextBox Mask="00000"></C1MaskedTextBox>
        <br />
    
        <br />
        <label>Zip+4 Code</label>
        <br />
        <C1MaskedTextBox Mask="00000-0000"></C1MaskedTextBox>
        <br />
    
        <br />
        <label>Phone Number</label>
        <br />
        <C1MaskedTextBox Mask="(999) 000-0000"></C1MaskedTextBox>
        <br />
    
        <br />
        <label>Test Code</label>
        <br />
        <C1MaskedTextBox Mask="\\\\### ###"></C1MaskedTextBox>
        <br />
    </form>
    
    @code {
    
    }
    

    Back to Top

    Build and Run the Project

    1. Click Build | Build Solution to build the project.
    2. Press F5 to run the project.

    Back to Top