This quick start is intended to get you up and running with the RangeSlider control. In this quick start, you start with creating a new application, adding a C1RangeSlider and two C1NumericBox controls to it, and integrating both these controls so that the NumericBox can be used to interact with the RangeSlider control.
| HTML |
Copy Code
|
|---|---|
<link rel="stylesheet" href="/_content/C1.Blazor.Core/styles.css" /> <link rel="stylesheet" href="/_content/C1.Blazor.Input/styles.css" /> |
|
| HTML |
Copy Code
|
|---|---|
<script src="/_content/C1.Blazor.Core/scripts.js"></script> <script src="/_content/C1.Blazor.Input/scripts.js"> </script> |
|
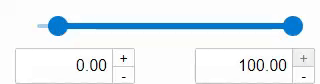
Add the C1RangeSlider control and two C1NumericBox controls and configure the controls using the following code. In the following example, the value for upper and lower magnitudes of the RangeSlider control is set through the NumericBox control. Here, Value property of the C1NumericBox class is set for the two NumericBox controls which binds them to the upper and lower magnitude values of the RaneSlider using UpperValue and LowerValue properties of the C1RangeSlider class respectively.
| Index.razor |
Copy Code
|
|---|---|
<C1RangeSlider @bind-LowerValue="lowerValue" @bind-UpperValue="upperValue" Minimum="-10" Maximum="100" /> <div style="width: 300px; display: flex; flex: 1 1; justify-content: space-between;"> <C1NumericBox Min="-100" Max="100" TNumeric="double" @bind-Value="lowerValue" Format="N2" ButtonDisplayMode="ButtonDisplayMode.Right" FinishEditingKeys=@(new []{ NumericBoxFinishEditingKey.Enter}) /> <C1NumericBox Min="-100" Max="100" TNumeric="double" @bind-Value="upperValue" Format="N2" ButtonDisplayMode="ButtonDisplayMode.Right" FinishEditingKeys=@(new []{ NumericBoxFinishEditingKey.Enter}) /> </div> @code { private double lowerValue; private double upperValue = 100.0; } |
|