Blazor | ComponentOne
Controls / TreeView / Quick Start
In This Topic
    Quick Start
    In This Topic

    The following quick start guide is intended to get you up and running with the TreeView control. In this quick start, you'll start with creating a new application, add the TreeView control to it, add child nodes and leaf nodes to the treeview.

    Treeview control

    Create a Blazor App

    1. In Visual Studio, select Create a new project from the Get started pane.
    2. In the Create a new project dialog, select Blazor WebAssembly App, and click Next. Alternatively, you can also create a Blazor Server App.
      Note: Blazor Server App or server-side app can be created using the Blazor Server App template. For more details, see Blazor Server topic under Blazor Project Types.
    3. In the Configure your new project dialog, provide name of the project you want to create in the Project name field and location for the project in the Location field. Click Next.
    4. In the Additional information dialog, select the target framework from the Framework dropdown, if required and click Create. By default, the selected framework is .NET 6.0.
      A new client-side Blazor app is created.

    Back to Top

    Configure References

    1. In the Solution Explorer, right click Dependencies and select Manage NuGet Packages.
    2. In NuGet Package Manager, select nuget.org as the Package source.
    3. Search and select the following packages and click Install.
      • C1.Blazor.TreeView
      • C1.Blazor.Core
    4. Navigate to the wwwroot, open index.html file.
    5. Register the client resources by adding the following lines of code to the <head> tag.
      Example Title
      Copy Code
      <link rel="stylesheet" href="/_content/C1.Blazor.Core/styles.css" />
      <link rel="stylesheet" href="~/_content/C1.Blazor.TreeView/styles.css" />
      

    6. Add the following code to the <body> tag.
      HTML
      Copy Code
      <script src="/_content/C1.Blazor.Core/scripts.js"></script>
      <script src="~/_content/C1.Blazor.TreeView/scripts.js"></script>


    Back to Top

    Configure the TreeView control

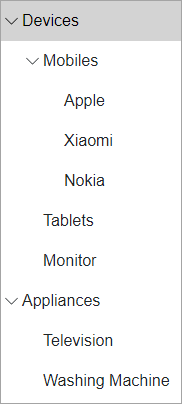
    Display the TreeView with child and leaf nodes by binding the TreeView control with unbound data. In this example, we have used the TreeViewItem class as a data source object class to add nodes to the TreeView as shown in the following code:

    C#
    Copy Code
    @using C1.Blazor.TreeView
    
    <C1TreeView>
        <TreeViewItem Header="Devices">
            <TreeViewItem Header="Mobiles">
                <TreeViewItem Header="Apple" />
                <TreeViewItem Header="Xiaomi" />
                <TreeViewItem Header="Nokia" />
            </TreeViewItem>
            <TreeViewItem Header="Tablets" />
            <TreeViewItem Header="Monitor" />
        </TreeViewItem>
        <TreeViewItem Header="Appliances">
            <TreeViewItem Header="Television" />
            <TreeViewItem Header="Washing Machine" />
        </TreeViewItem>
    </C1TreeView>
    

    You can also bind the TreeView control with bound data. To know more about data binding in TreeView, see Data Binding topic.

    Back to Top

    Build and Run the Project

    1. Click Build | Build Solution to build the project.
    2. Press F5 to run the project.

    Back to Top