The quick start guides you through the steps of adding an AutoComplete control to your MVC web application and add data to it. For information on how to add ASP.NET MVC Edition controls, see Adding Controls.
Follow the steps given below to get started:
Create a new MVC application using the ComponentOne or VisualStudio templates. For more information about creating an MVC application, see Configuring your MVC Application topic.
Countries.cs).| C# |
Copy Code
|
|---|---|
using System; using System.Collections.Generic; using System.Linq; using System.Web; namespace MVCFlexGrid.Models { public class Countries { public static List<string> GetCountries() { return new List<string> { "Afghanistan", "Albania", "Algeria", "American Samoa", "Andorra", "Angola", "Anguilla", "Antigua", "Argentina", "Armenia", "Aruba", "Australia", "Austria", "Azerbaijan", "Bahamas", "Bahrain", "Bangladesh", "Barbados", "Belarus", "Belgium", "Belize", "Benin", "Bermuda", "Bhutan", "Bolivia", "Bonaire", "Bosnia", "Botswana", "Brazil", "Brunei", "Bulgaria", "Burkina Faso", "Burundi", "Cambodia", "Cameroon", "Canada", "Canary Islands", "Cape Verde", "Cayman Islands", "Central African Republic", "Chad", "Channel Islands", "Chile", "China", "Christmas Island", "Cocos Island", "Colombia", "Comoros", "Congo", "Cook Islands", "Costa Rica", "Cote D'Ivoire", "Croatia", "Cuba", "Curacao", "Cyprus", "Czech Republic", "Denmark", "Djibouti", "Dominica", "Dominican Republic", "East Timor", "Ecuador", "Egypt", "El Salvador", "Equatorial Guinea", "Eritrea", "Estonia", "Ethiopia", "Falkland Islands", "Faroe Islands", "Fiji", "Finland", "France", "French Guiana", "French Polynesia", "French Southern Ter", "Gabon", "Gambia", "Georgia", "Germany", "Ghana", "Gibraltar", "Great Britain", "Greece", "Greenland", "Grenada", "Guadeloupe", "Guam", "Guatemala", "Guinea", "Guyana", "Haiti", "Honduras", "Hong Kong", "Hungary", "Iceland", "India", "Indonesia", "Iran", "Iraq", "Ireland", "Isle of Man", "Israel", "Italy", "Jamaica", "Japan", "Jordan", "Kazakhstan", "Kenya", "Kiribati", "Korea North", "Korea South", "Kuwait", "Kyrgyzstan", "Laos", "Latvia", "Lebanon", "Lesotho", "Liberia", "Libya", "Liechtenstein", "Lithuania", "Luxembourg", "Macau", "Macedonia", "Madagascar", "Malaysia", "Malawi", "Maldives", "Mali", "Malta", "Marshall Islands", "Martinique", "Mauritania", "Mauritius", "Mayotte", "Mexico", "Midway Islands", "Moldova", "Monaco", "Mongolia", "Montserrat", "Morocco", "Mozambique", "Myanmar", "Nambia", "Nauru", "Nepal", "Netherland Antilles", "Netherlands", "Nevis", "New Caledonia", "New Zealand", "Nicaragua", "Niger", "Nigeria", "Niue", "Norfolk Island", "Norway", "Oman", "Pakistan", "Palau Island", "Palestine", "Panama", "Papua New Guinea", "Paraguay", "Peru", "Philippines", "Pitcairn Island", "Poland", "Portugal", "Puerto Rico", "Qatar", "Republic of Montenegro", "Republic of Serbia", "Reunion", "Romania", "Russia", "Rwanda", "St Barthelemy", "St Eustatius", "St Helena", "St Kitts-Nevis", "St Lucia", "St Maarten", "Saipan", "Samoa", "Samoa American", "San Marino", "Saudi Arabia", "Scotland", "Senegal", "Serbia", "Seychelles", "Sierra Leone", "Singapore", "Slovakia", "Slovenia", "Solomon Islands", "Somalia", "South Africa", "Spain", "Sri Lanka", "Sudan", "Suriname", "Swaziland", "Sweden", "Switzerland", "Syria", "Tahiti", "Taiwan", "Tajikistan", "Tanzania", "Thailand", "Togo", "Tokelau", "Tonga", "Trinidad Tobago", "Tunisia", "Turkey", "Turkmenistan", "Turks & Caicos Is", "Tuvalu", "Uganda", "Ukraine", "United Arab Emirates", "United Kingdom", "United States of America", "Uruguay", "Uzbekistan", "Vanuatu", "Vatican City State", "Venezuela", "Vietnam", "Virgin Islands (British)", "Virgin Islands (USA)", "Wake Island", "Yemen", "Zaire", "Zambia", "Zimbabwe" }; } } } |
|
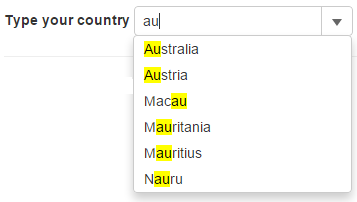
Complete the following steps to initialize an AutoComplete control.
Add a new Controller
Default1Controller).| C# |
Copy Code
|
|---|---|
using C1.Web.Mvc.Serializition;
|
|
Index() with the following method.
| C# |
Copy Code
|
|---|---|
public ActionResult Index() { ViewBag.Countries = MVCFlexGrid.Models.Countries.GetCountries(); return View(); } |
|
Add a View for the Controller
QuickStartController to open it.QuickStart().| HTML |
Copy Code
|
|---|---|
@using TagFlexGrid.Models
@{
    List<string> countries = ViewBag.Countries;
}

<style>
    .highlight {
        background-color: #ff0;
        color: #000;
    }
</style>

<div>
    <label>Type your country</label>
    <c1-auto-complete css-match="highlight">
        <c1-items-source source-collection="@countries">
        </c1-items-source>
    </c1-auto-complete>
</div>
|
|