The TreeView control allows you to display custom content in nodes. You can customize the content of the TreeView nodes using the formatItem event. The event handler's parameters include the element that represents the node and the data item being rendered.
The example uses the OnClientFormatItem event to add a "new" badge to the right of new items on the treeview. The below example code uses Property model added in the QuickStart section.
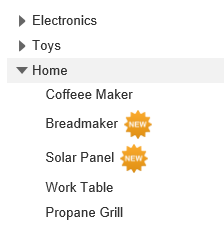
In the code example below, we subscribe the OnClientFormatItem method by assigning the JavaScript function name in the razor code. In the <Script> section, we declare the formatItem function to check, if the dataItem is a new item in the list, then it will add a custom image beside the new nodes. The image is stored inside the Content folder of your MVC application.
In the code example below, OnClientFormatItem() method raises the formatItem event. In the formatItem(treeview, args) function, treeview is the sender, and args is a type of FormatNodeEventArgs class.
CustomNode.cshtml
| HTML |
Copy Code
|
|---|---|
@using <ApplicationName.Models> @model Property[] <script type="text/javascript"> function formatItem(treeview, args) { if (args.dataItem.NewItem) { args.element.innerHTML += '<img style="margin-left:6px" src="@Href("~/Content/new.png")"/>'; } } </script> <c1-tree-view display-member-path="Header" child-items-path="Items" source="Model" format-item="formatItem"></c1-tree-view> |
|