Scaffolding is a code generation technique used by some MVC frameworks, like ASP.NET MVC applications. It is added to an MVC project to quickly add code that interacts with data models. Using scaffolding can reduce the amount of time to develop standard data operations in your project.
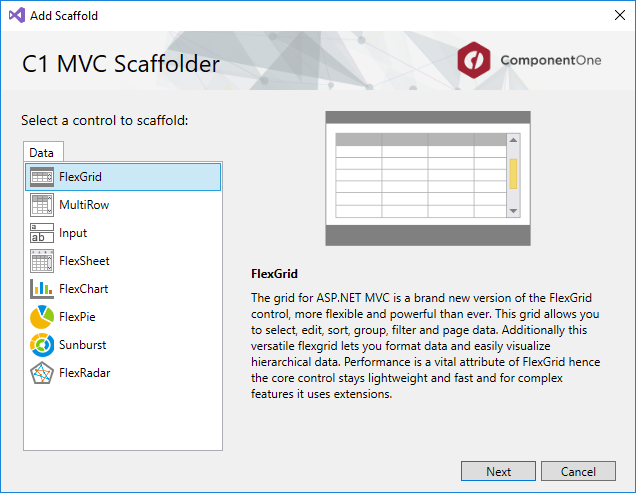
This topic helps you understand how to add an ASP.NET MVC control in your application using C1 Scaffolding. The ComponentOne ASP.NET MVC Edition provides scaffolding for FlexGrid, MultiRow, FlexSheet, FlexChart, FlexPie, Sunburst Chart, FlexRadar and Input controls.
Note that ASP.NET Core MVC Scaffolder uses HtmlAgilityPack, an open source software, with MIT.
Using Scaffolding, you can perform the following tasks:
To add C1 MVC control in ASP.NET MVC application, follow these steps:
To configure the data source in ASP.NET Core application, see Razor Pages with Entity Framework Core in ASP.NET Core.
Back to Top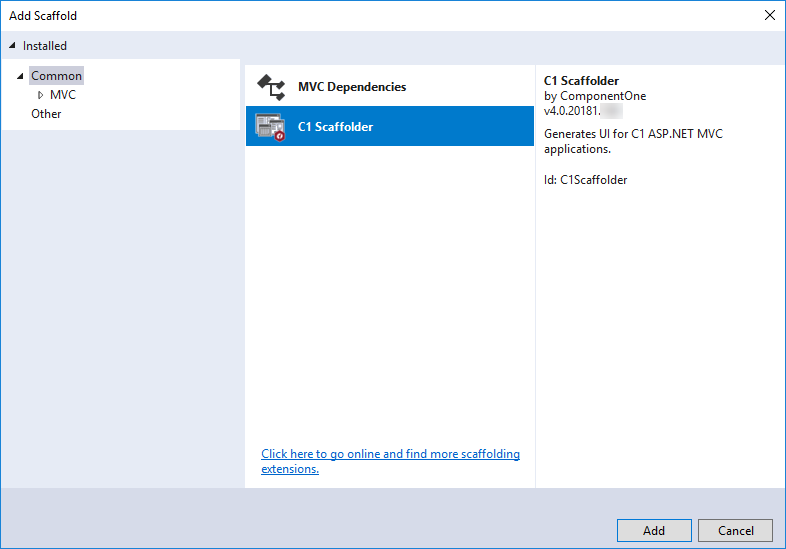

FlexGridController.cs
| FlexGrid1Controller.cs |
Copy Code
|
|---|---|
using System; using System.Collections.Generic; using System.Linq; using C1.Web.Mvc; using C1.Web.Mvc.Serialization; using System.Data; using System.Data.Entity; using System.Data.Entity.Validation; using System.Web; using System.Web.Mvc; //This code was generated by C1 Scaffolder. namespace C1MvcWebApplication1.Controllers { public class FlexGridController : Controller { C1MvcWebApplication1.Models.C1NWindEntities db = new C1MvcWebApplication1.Models.C1NWindEntities(); public ActionResult Index() { return View(db.Products); } public ActionResult Flexgrid_Update([C1JsonRequest]CollectionViewEditRequest<C1MvcWebApplication1.Models.Product> requestData) { return Update(requestData, db.Products); } private ActionResult Update<T>(CollectionViewEditRequest<T> requestData, DbSet<T> data) where T : class { return this.C1Json(CollectionViewHelper.Edit<T>(requestData, item => { string error = string.Empty; bool success = true; try { db.Entry(item as object).State = EntityState.Modified; db.SaveChanges(); } catch (DbEntityValidationException e) { error = string.Join(",", e.EntityValidationErrors.Select(result => { return string.Join(",", result.ValidationErrors.Select(err => err.ErrorMessage)); })); success = false; } catch (Exception e) { error = e.Message; success = false; } return new CollectionViewItemResult<T> { Error = error, Success = success && ModelState.IsValid, Data = item }; }, () => data.ToList<T>())); } public ActionResult Flexgrid_Delete([C1JsonRequest]CollectionViewEditRequest<C1MvcWebApplication1.Models.Product> requestData) { return Delete(requestData, db.Products, item => new object[] { item.ProductID }); } private ActionResult Delete<T>(CollectionViewEditRequest<T> requestData, DbSet<T> data, Func<T, object[]> getKeys) where T : class { return this.C1Json(CollectionViewHelper.Edit<T>(requestData, item => { string error = string.Empty; bool success = true; try { var resultItem = data.Find(getKeys(item)); data.Remove(resultItem); db.SaveChanges(); } catch (DbEntityValidationException e) { error = string.Join(",", e.EntityValidationErrors.Select(result => { return string.Join(",", result.ValidationErrors.Select(err => err.ErrorMessage)); })); success = false; } catch (Exception e) { error = e.Message; success = false; } return new CollectionViewItemResult<T> { Error = error, Success = success && ModelState.IsValid, Data = item }; }, () => data.ToList<T>())); } } } |
|
Index.cshtml
| Razor (Index.cshtml) |
Copy Code
|
|---|---|
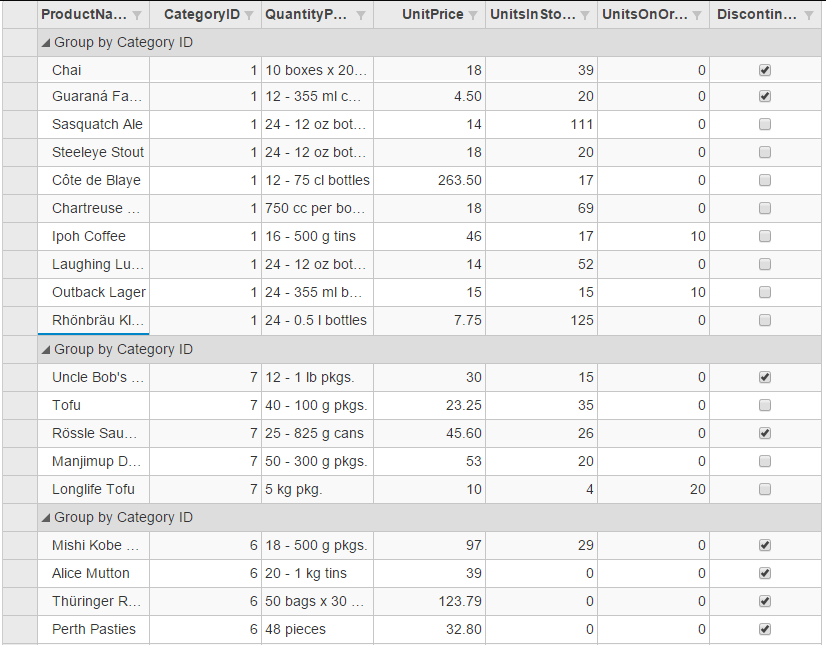
@using C1.Web.Mvc @using C1.Web.Mvc.Grid @addTagHelper *, C1.AspNetCore.Mvc @model IEnumerable<C1MvcApplication1.Models.Product> <script type="text/javascript"> function beginningEdit(sender, e) { // Implement the event handler for beginningEdit. } </script> <c1-flex-grid id="flexgrid" auto-generate-columns="false" allow-delete="true" group-header-format="Group by Category ID" beginning-edit="beginningEdit"> <c1-items-source source-collection="Model" update-action-url="@(Url.Action("FlexGrid_Update"))" delete-action-url="@(Url.Action("FlexGrid_Delete"))" group-by="CategoryID"></c1-items-source> <c1-flex-grid-column binding="ProductName"></c1-flex-grid-column> <c1-flex-grid-column binding="CategoryID"></c1-flex-grid-column> <c1-flex-grid-column binding="QuantityPerUnit"></c1-flex-grid-column> <c1-flex-grid-column binding="UnitPrice"></c1-flex-grid-column> <c1-flex-grid-column binding="UnitsInStock"></c1-flex-grid-column> <c1-flex-grid-column binding="UnitsOnOrder"></c1-flex-grid-column> <c1-flex-grid-column binding="Discontinued"></c1-flex-grid-column> <c1-flex-grid-filter default-filter-type="FilterType.Both"></c1-flex-grid-filter> </c1-flex-grid> |
|
In addition to adding C1 MVC controls at the time of application creation, you can also insert C1 MVC controls in an existing application using the Insert C1 MVC Control option. The Insert C1 MVC Control option allows you to easily add a fully functional control in the view code of an application. This option can be accessed through the context menu displayed in the design area of a View file in ASP.NET MVC application.
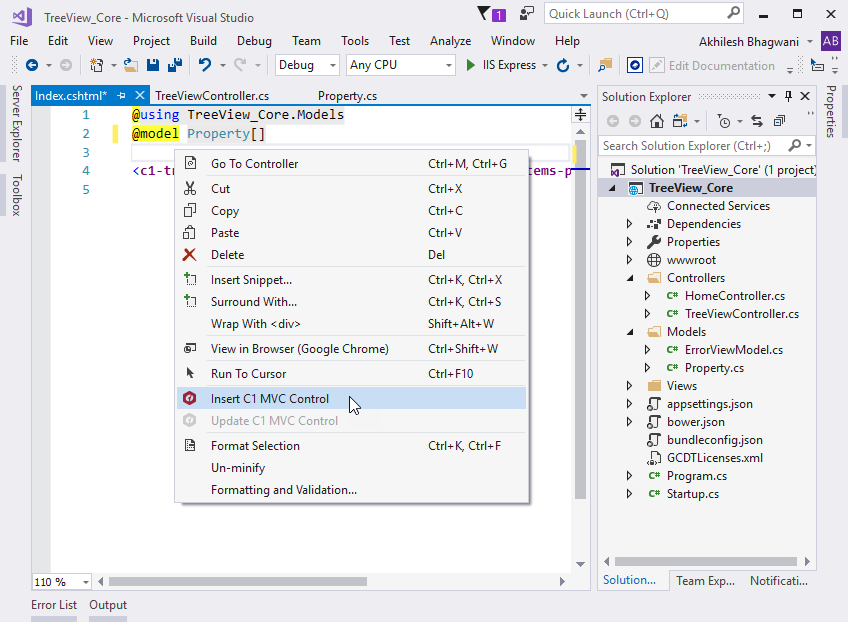
Selecting the Insert C1 MVC Control option from the menu invokes the Add Scaffold dialog, which can further be used the same way as described in step 2 and 3 of the above section.
Back to TopBesides inserting C1 MVC Controls, you can also update C1 MVC controls in an existing application using the Update C1 MVC Control option. The Update C1 MVC Control option allows you to update the properties of a control. This option can be accessed through the context menu displayed in the design area of a View file in ASP.NET MVC application.
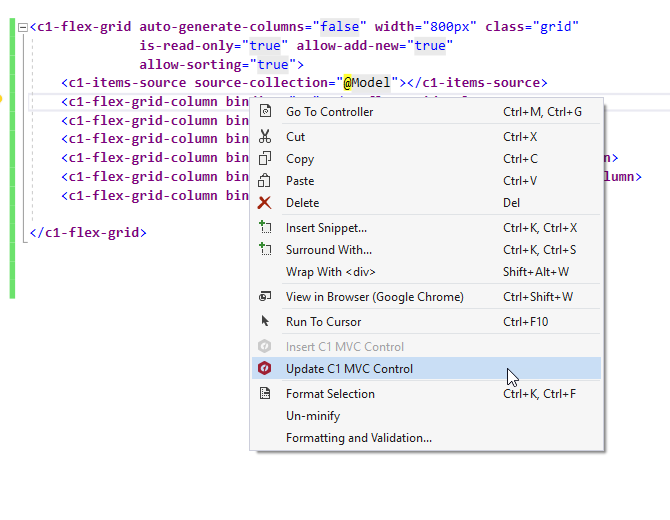
Selecting the Update C1 MVC Control option from the menu invokes the Add Scaffold dialog, which can further be used the same way as described in step 2 and 3 of the using C1 Scaffolder section above .
Back to Top