Tab ordering is used in many modern applications which have dynamic pages/views that constantly change with user interaction. In such applications, the TabIndex can be set on all controls at runtime using the TabOrder property. This property allows the user to customize the tab navigation order of the input controls added in the application. You can specify the TabOrder property for each control, a tab order follows relationships in the content without following the order of the interactive elements in the code.
TabIndex attribute value can be defined statically for an ASP.NET MVC control by specifying it in the control's host HTML element. However, the value can't be modified later during application lifecycle. Therefore, to read or modify the input control's tab index dynamically you can use the TabOrder property.
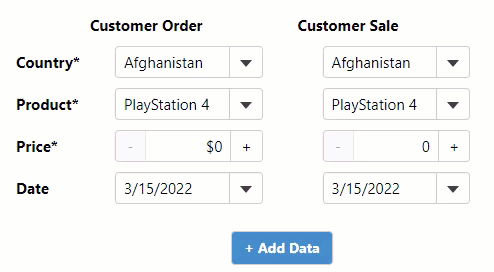
The following image shows how you can customize the tab order navigation:
 |
Create a new MVC application using the ComponentOne or VisualStudio templates. For more information about creating an MVC application, see Configuring your MVC Application topic.
Products.cs).| Products |
Copy Code
|
|---|---|
public static List<string> GetProducts() { return new List<string> { "PlayStation 4", "XBOX ONE", "Wii U", "PlayStation Vita", "PlayStation 3", "XBOX 360", "PlayStation Portable", "3 DS", "Dream Cast", "Nintendo 64", "Wii", "PlayStation 2", "PlayStation 1", "XBOX" }; } public static List<string> GetCountries() { return new List<string> { "Algeria", "American Samoa", "Argentina", "Armenia", "Australia", "Austria", "Bahrain", "Bangladesh","Belarus", "Belgium", "Bhutan", "Bolivia", "Brazil", "Bulgaria", "Cambodia", "Cameroon", "Canada", "Colombia", "Costa Rica", "Cuba", "Croatia", "Curacao", "Cyprus", "Czech Republic", "Denmark", "Dominican Republic", "Egypt", "Ethiopia", "Finland", "France", "French Guiana", "Georgia", "Germany", "Ghana", "Gibraltar", "Great Britain", "Greece", "Greenland", "Hong Kong", "Hungary", "Iceland", "India", "Indonesia", "Iran", "Iraq", "Ireland", "Israel", "Italy", "Jamaica", "Japan", "Jordan", "Kenya", "Korea North", "Korea South", "Kuwait", "Liberia", "Libya", "Lithuania", "Madagascar", "Malaysia", "Maldives", "Mauritius", "Mexico", "Myanmar", "Nambia", "Nepal", "Netherlands", "New Zealand", "Nigeria", "Norway", "Oman", "Panama", "Paraguay", "Peru", "Philippines","Poland", "Portugal", "Puerto Rico", "Qatar", "Romania", "Russia", "Samoa", "Saudi Arabia", "Scotland", "Serbia", "Singapore", "Slovakia", "South Africa", "Spain", "Sri Lanka", "Sweden", "Switzerland", "Syria", "Taiwan", "Tanzania", "Thailand", "Turkey", "Uganda", "Ukraine", "United Arab Emirates", "United Kingdom", "United States of America", "Uruguay", "Uzbekistan", "Venezuela", "Vietnam", "Yemen", "Zambia", "Zimbabwe" }; } |
|
Complete the following steps to add Input controls in your application.
Add a new Controller
TabOrderController).Index() with the following method.
| Products |
Copy Code
|
|---|---|
public ActionResult Index() { return View(); } |
|
Add a View for the Controller
TabOrderController to open it.Index().| Products |
Copy Code
|
|---|---|
@using <ApplicationName>.Models @using C1.Web.Mvc @model IEnumerable<Products> <table class="input-form"> <tr> <th></th> <th>Customer Order</th> <th>Customer Sale</th> </tr> <tr> <th>Country*</th> <td> <c1-combo-box id="orderCountry" is-required="true" tab-order="1"> <c1-items-source source-collection="@Products.GetCountries()"></c1-items-source> </c1-combo-box> </td> <td> <c1-combo-box id="saleCountry" is-required="true" tab-order="5"> <c1-items-source source-collection="@Products.GetCountries()"></c1-items-source> </c1-combo-box> </td> </tr> <tr> <th>Product*</th> <td> <c1-combo-box id="orderProduct" is-required="true" tab-order="2"> <c1-items-source source-collection="@Products.GetProducts()"></c1-items-source> </c1-combo-box> </td> <td> <c1-combo-box id="saleProduct" is-required="true" tab-order="6"> <c1-items-source source-collection="@Products.GetProducts()"></c1-items-source> </c1-combo-box> </td> </tr> <tr> <th>Price*</th> <td> <c1-input-number id="orderPrice" min="0" step="10" value="0" format="c0" is-required="true" tab-order="3"> </c1-input-number> </td> <td> <c1-input-number id="salePrice" min="0" step="10" value="0" is-required="true" tab-order="7"> </c1-input-number> </td> </tr> <tr> <th>Date</th> <td> <c1-input-date id="orderDate" value="@DateTime.Today" is-required="false" tab-order="4"> </c1-input-date> </td> <td> <c1-input-date id="saleDate" value="@DateTime.Today" is-required="false" tab-order="8"> </c1-input-date> </td> </tr> </table> <br /> <button id="add-row" class="btn btn-primary col-sm-offset-2"> <b><i class="glyphicon-plus"></i> Add Data</b> </button> |
|