ASP.NET MVC Controls | ComponentOne
Working with Controls / OLAP / Work with OLAP / Filtering / Filtering Data in Field
In This Topic
    Filtering Data in Field
    In This Topic

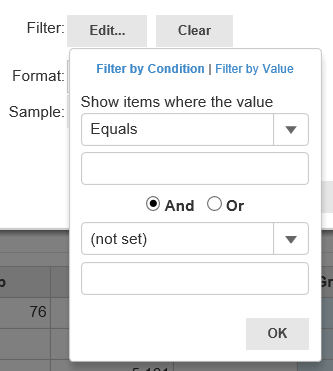
    In the PivotPanel control, you can filter the data in a field from the Drag fields between areas below section of the panel at run time. Each field has two filters: the value filter, which allows you to check specific values in a list, and the range filter, which allows you to specify one or two criteria. The two filters are independent, and values must pass both the filters in order to be included in the OLAP PivotGrid.

    Using the Value Filter

    1. Right-click a field in the Filter, Column Fields, Row Fields, or Values area.
    2. Click Field Settings in the context menu. The Field Settings dialog box opens.
    3. Click the Edit button beside the Filter option and, then select Filter by Value tab. You can clear the selection for any of the fields that you do not want to display in the OLAP table.
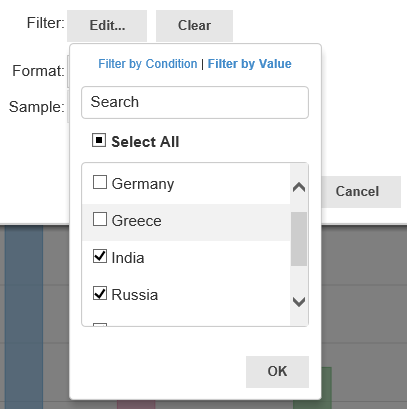
    4. Once you have selected the fields to appear in the table, click OK to filter the data in the PivotGrid and PivotChart.

    Using the Range Filter

    1. Right-click a field in the Filter, Column Fields, Row Fields, or Values area.
    2. Click Field Settings in the context menu. The Field Settings dialog box opens.
    3. Click the Edit button beside the Filter option and, then select Filter by Condition tab. You can clear the selection for any of the fields that you do not want to display in the OLAP table.    
    4. Select one of the following items from the drop-down list box.
      Equals Create a filter to show items that are equal to the value specified in the field.
      Does Not Equal Create a filter where items that are not the same as the specified value are shown.
      Begins With Create a filter where items that begin with the specified values are shown.
      Ends With Create a filter where items that end with the specified values are shown.
      Contains Create a filter where items that contain the specified values are shown.
      Does Not Contain Create a filter where items that do not contain the specified values are shown.
    5. Add an item to filter on, in the first blank text box.

    6. Select And or Or.
    7. Add a second filter condition, if necessary. If you select an option other than None, the second text box becomes active and you can enter an item.
    8. Click OK to close the Custom Filter dialog box and click OK again to close the Field Settings dialog box.