ASP.NET MVC Controls | ComponentOne
Working with Controls / FlexRadar / Quick Start
In This Topic
    Quick Start
    In This Topic

    The quick start guides you through the steps of adding a FlexRadar chart to your MVC web application and add data to it.

    To accomplish this, follow these steps:

    FlexRadar showing downloads and sales of different countries

    Create an MVC Application

    Create a new MVC application using the ComponentOne or VisualStudio templates. For more information about creating an MVC application, see Configuring your MVC Application topic.

    Create a Data Source for FlexRadar

    1. Add a new class to the Models folder (for example: Sale.cs). For more information on how to add a new model, see Adding Controls.
    2. Add the following code to Sale.cs model. We are using Sale class to represent sales data in the database. Each instance of Sale object will correspond to the data on the FlexChart.
    Sale.cs
    Copy Code
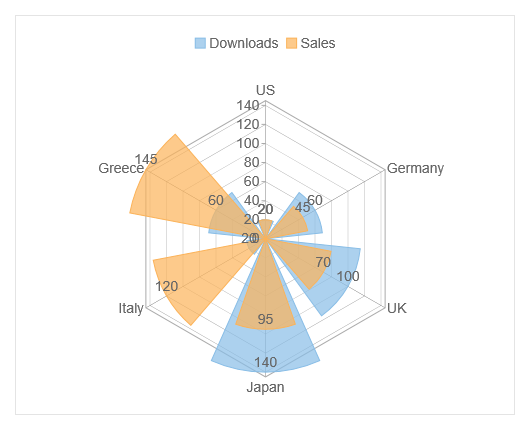
    using System.Collections.Generic;
    
    namespace FlexRadarChart.Models
    {
        public class Sale
        {
            public int Id { get; set; }
            public string Country { get; set; }
            public int Downloads { get; set; }
            public int Sales { get; set; }
            public static List<Sale> GetData()
            {
                var countries = "US,Germany,UK,Japan,Italy,Greece".Split(new char[] { ',' });
                List<Sale> data = new List<Sale>();
                for (var i = 0; i < countries.Length; i++)
                {
                    data.Add(new Sale()
                    {
                        Country = countries[i],
    
                        Downloads = ((i % 4) * 40) + 20,
    
                        Sales = ((i % 7) * 25) + 20
                    });
                }
                return data;
            }
        }
    }
    
    Back to Top

    Add a FlexRadar chart

    To add a FlexRadar chart to the application, follow these steps:

    Add a new Controller

    1. In the Solution Explorer, right click the folder Controllers.
    2. From the context menu, select Add | Controller. The Add Scaffold dialog appears.
    3. In the Add Scaffold dialog, follow these steps:
      1. Select the MVC 5 Controller - Empty template.
      2. Set name of the controller (for example: FlexRadarController).
      3. Click Add.
    4. Include the MVC references as shown below.
      C#
      Copy Code
      using C1.Web.Mvc;
      using C1.Web.Mvc.Serializition;
      using C1.Web.Mvc.Chart;
      
    5. Replace the method Index() with the following method.
      FlexRadarController.cs
      Copy Code
      public ActionResult Index()
              {
                  return View(Models.Sale.GetData());
              }
      
    Add a View for the Controller
    1. From the Solution Explorer, expand the folder Controllers and double click the FlexRadarController.
    2. Place the cursor inside the method Index().
    3. Right click and select Add View. The Add View dialog appears.
    4. In the Add View dialog, verify that the View name is Index and View engine is Razor (CSHTML).
    5. Click Add to add a view for the controller. Copy the following code and paste it inside Index.cshtml.
      Index.cshtml
      Copy Code
      @using FlexRadarChart.Models;
      @model IEnumerable<Sale>
      @using C1.Web.Mvc.Chart;
      
      @(Html.C1().FlexRadar()
      .Bind("Country", "Downloads", Model)
      .ChartType(RadarChartType.Column)
      .DataLabel(label =>{
      label.Content("{y}");})
      .Series(ser =>
      {
          ser.Add().Name("Downloads");
      
          ser.Add().Binding("Sales").Name("Sales");
      })
      .Legend(Position.Top)
      .Width("500px")
      .Height("400px"))
      
    Back to Top

    Build and Run the Project

    1. Click Build | Build Solution to build the project.
    2. Press F5 to run the project.
      Append the folder name and view name to the generated URL (for example: http://localhost:1234/FlexRadar/Index) in the address bar of the browser to see the view.
    Back to Top