ASP.NET MVC Controls | ComponentOne
Working with Controls / TreeMap / Quick Start
In This Topic
    Quick Start
    In This Topic

    The quick start guides you through the steps of adding the TreeMap control to your MVC web application and add data to it using model binding.

    To accomplish this, follow these steps:

    TreeMapControl

    Create an MVC Application

    Create a new MVC application using the ComponentOne or VisualStudio templates. For more information about creating an MVC application, see Configuring your MVC Application topic.

    Back to Top

    Create a Datasource for TreeMap

    1. Add a new class to the Models folder (Name: FoodSale.cs). For more information on how to add a new model, see Adding Controls.
    2. Add the following code to FoodSale.cs model. We are using FoodSale class to represent a list of hierarchical data.
      C#
      Copy Code
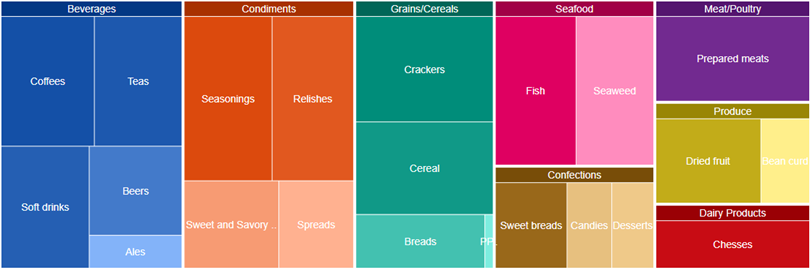
      using System;
      using System.Collections.Generic;
      
      namespace TreeMapQuickStart.Models
      {
          public class FoodSale
          {
              private static List<string> Categories = new List<string> { "Beverages", "Condiments", "Confections", "Dairy Products", "Grains/Cereals", "Meat/Poultry", "Produce", "Seafood" };
              private static List<string[]> SubCategories = new List<string[]>
              {
                  new string[] { "Soft drinks", "Coffees", "Teas", "Beers", "Ales" },
                  new string[] { "Sweet and Savory sauces", "Relishes", "Spreads", "Seasonings" },
                  new string[] { "Desserts", "Candies", "Sweet breads" },
                  new string[] { "Chesses" },
                  new string[] { "Breads", "Crackers", "Pasta", "Cereal" },
                  new string[] { "Prepared meats" },
                  new string[] { "Dried fruit", "Bean curd" },
                  new string[] { "Seaweed", "Fish" }
              };
              public string Category { get; set; }
              public string SubCategory { get; set; }
              public double Sales { get; set; }
              public static IEnumerable<FoodSale> GetData()
              {
                  var result = new List<FoodSale>();
                  var rand = new Random(0);
                  var index = 0;
                  foreach (var cat in Categories)
                  {
                      var subCategories = SubCategories[index++];
                      foreach (var subCat in subCategories)
                      {
                          result.Add(new FoodSale
                          {
                              Category = cat,
                              SubCategory = subCat,
                              Sales = rand.NextDouble() * 100
                          });
                      }
                  }
                  return result;
              }
              public static IEnumerable<FoodSale> GetGroupData()
              {
                  var result = new List<FoodSale>();
                  var rand = new Random(0);
                  var catLen = Categories.Count;
                  for (var i = 0; i < 1000; i++)
                  {
                      var randomC = rand.Next(0, catLen - 1);
                      var subCat = SubCategories[randomC];
                      var randomSC = rand.Next(0, subCat.Length - 1);
                      result.Add(new FoodSale
                      {
                          Category = Categories[randomC],
                          SubCategory = subCat[randomSC],
                          Sales = rand.NextDouble() * 100
                      });
                  }
                  return result;
              }
          }
      }
      
    Back to Top

    Add a TreeMap Control

    Steps to add a TreeMap control to the application, are as follows:

    Add a new Controller

    1. In the Solution Explorer, right click the folder Controllers.
    2. From the context menu, select Add | Controller. The Add Scaffold dialog appears.
    3. In the Add Scaffold dialog, follow these steps:
      1. Select the MVC 5 Controller - Empty template, and then click Add.
      2. Set name of the controller (for example: DashboardLayoutController).
      3. Click Add.
    4. Include the following references as shown below.
      C#
      Copy Code
      using <ApplicationName>.Models;       
      

    5. Replace the Index() method with the following method.
      TreeMapController.cs
      Copy Code
      public ActionResult Index()
      {
         return View(FoodSale.GetData());
      }
      
    Add a View for the Controller

    In the view, we create an instance of TreeMap and bind it to a data source using Bind method. The Type property allows you to select the type of TreeMap you want to use in the application.
    1. From the Solution Explorer, expand the folder Controllers and double click the TreeMapController.
    2. Place the cursor inside the method Index().
    3. Right click and select Add View. The Add View dialog appears.
    4. In the Add View dialog, verify that the View name is Index and View engine is Razor (CSHTML).
    5. Click Add to add a view for the controller, and then copy the following code and paste it inside Index.cshtml.
      Index.cshtml
      Copy Code
      @using <ApplicationName>.Models;
      @using System.Drawing;
      @model IEnumerable<FoodSale>
      
      @(Html.C1().TreeMap().Id("TreeMap")
          .Type(TreeMapType.Squarified)
          .Binding("Sales")
          .BindingName("Category", "SubCategory")
          .Bind(Model)
          .DataLabel(dlb => dlb.Position(C1.Web.Mvc.Chart.LabelPosition.Center).Content("{name}")))                                              
      
    Back to Top

    Build and Run the Project

    1. Click Build | Build Solution to build the project.
    2. Press F5 to run the project.
      Append the folder name and view name to the generated URL (for example: http://localhost:1234/DashboardLayout/Index) in the address bar of the browser to see the view.
    Back to Top