ASP.NET MVC Controls | ComponentOne
Working with Controls / TreeView / Work with TreeView / Data Binding / Model Binding
In This Topic
    Model Binding
    In This Topic

    The topic describes how to add TreeView control to your MVC web application and add data to it using model binding.

    To accomplish this, follow these steps:

    Create a Datasource for TreeView

    1. Add a new class to the Models folder (Name: 
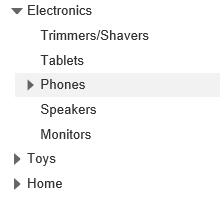
Property.cs). For more information on how to add a new model, see Adding Controls.
    2. Add the following code to Properties.cs model. We are using Property class to represent a list of hierarchical data.
      C#
      Copy Code
      using System;
      using System.Collections.Generic;
      using System.Linq;
      using System.Web;
      
      public class Property
          {
              public string Header { get; set; }
              public string Image { get; set; }
              public bool NewItem { get; set; }
              public Property[] Items { get; set; }
              public static Property[] GetData()
              {
                  return new Property[]
                  {
                      new Property
                      {
                          Header = "Electronics",
                          Items = new Property[]
                          {
                              new Property { Header="Trimmers/Shavers" },
                              new Property { Header="Tablets" },
                              new Property { Header="Phones",
                                  Items = new Property[] {
                                      new Property { Header="Apple" },
                                      new Property { Header="Motorola", NewItem=true },
                                      new Property { Header="Nokia" },
                                      new Property { Header="Samsung" }}
                              },
                              new Property { Header="Speakers", NewItem=true },
                              new Property { Header="Monitors" }
                          }
                      },
                      new Property{
                          Header = "Toys",
                          Items = new Property[]{
                              new Property{ Header = "Shopkins" },
                              new Property{ Header = "Train Sets" },
                              new Property{ Header = "Science Kit", NewItem = true },
                              new Property{ Header = "Play-Doh" },
                              new Property{ Header = "Crayola" }
                          }
                      },
                      new Property{
                          Header = "Home",
                          Items = new Property[] {
                              new Property{ Header = "Coffeee Maker" },
                              new Property{ Header = "Breadmaker", NewItem = true },
                              new Property{ Header = "Solar Panel", NewItem = true },
                              new Property{ Header = "Work Table" },
                              new Property{ Header = "Propane Grill" }
                          }
                      }
                  };
              }
          }
      
    Back to Top

    Add a TreeView Control

    Steps to add a TreeView control to the application, are as follows:

    Add a new Controller

    1. In the Solution Explorer, right click the folder Controllers.
    2. From the context menu, select Add | Controller. The Add Scaffold dialog appears.
    3. In the Add Scaffold dialog, follow these steps:
      1. Select the MVC 5 Controller - Empty template.
      2. Set name of the controller (For example: TreeViewController).
      3. Click Add.
    4. Include the following references as shown below.
      C#
      Copy Code
      using <ApplicationName>.Models;       
      

    5. Replace the Index() method with the following method.
      TreeViewController.cs
      Copy Code
      public ActionResult Index()
      {
         return View(Property.GetData(Url));
      }
      
    Add a View for the Controller

    In the view, we create an instance of TreeView control and bind it to a data source using Bind method. The DisplayMemberPath sets the text to be displayed in the tree nodes and ChildItemsPath sets the array of child nodes.
    1. From the Solution Explorer, expand the folder Controllers and double click the TreeViewController.
    2. Place the cursor inside the method Index().
    3. Right click and select Add View. The Add View dialog appears.
    4. In the Add View dialog, verify that the View name is Index and View engine is Razor (CSHTML).
    5. Click Add to add a view for the controller, and then copy the following code and paste it inside Index.cshtml.
      Index.cshtml
      Copy Code
      @using TreeView.Models
      @model Property[]
      
      @(Html.C1().TreeView()
          .Bind(Model)
          .DisplayMemberPath("Header")
          .ChildItemsPath("Items"))
      

    Build and Run the Project

    1. Click Build | Build Solution to build the project.
    2. Press F5 to run the project.
      Append the folder name and view name to the generated URL (for example: http://localhost:1234/TreeView/Index) in the address bar of the browser to see the view.
    Back to Top
    See Also