In This Topic
The quick start guides you through the steps of adding a RadialGauge control to your MVC web application and set its value. For information on how to add a control, See Adding controls.
To accomplish this, follow these steps:
Create an MVC Application
Create a new MVC application using the ComponentOne or VisualStudio templates. For more information about creating an MVC application, see Configuring your MVC Application topic.
Add a new Controller and View
Add a new Controller:
- In the Solution Explorer, right click the folder Controllers.
- From the context menu, select Add | Controller. The Add Scaffold dialog appears.
- Complete the following steps in the Add Scaffold dialog:
- Select MVC 5 Controller - Empty template.
- Set name of the controller (for example:
Default1Controller).
- Click Add.
- A new controller is added to the application.
Add a View for the controller:
- From the Solution Explorer, expand the folder Controllers and double click the controller (for example:
Default1Controller) to open it.
- Place the cursor inside the method
Index().
- Right click and select Add View. The Add View dialog appears.
- In the Add View dialog, verify that the View name is Index and View engine is Razor (CSHTML).
- Click Add. A view is added for the controller.
Add a Model
Models are required to fetch data for the controls.
- In the Solution Explorer, right click the folder Models and select Add | Class. The Add New Item dialog appears.
- In the New Item dialog, set the name of the class (for example:
Class1.cs).
- Click Add. A new class is added to the application.
Add the Control
- From the Solution Explorer, expand the folder Views.
- Double click
Index.cshtml to open it.
- Replace the default code of the
Index.cshtml file with the code given below to initialize a RadialGauge and set the following properties:
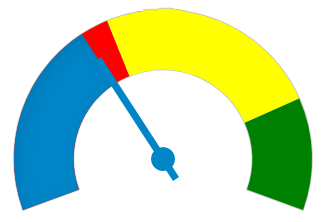
- Set the gauge Value to 35. The Value property denotes the gauge's current value.
- Set the Min and Max properties to 0 and 100 respectively. The Min and Max properties specify the range of the gauge. You can add multiple ranges to a single gauge.
- Set the Gauge's isReadOnly property to False. The isReadOnly specifies whether a user can edit the gauge's Value using a keyboard or a mouse.
- Set the StartAngle property to -20, and SweepAngle property to 220. The StartAngle property specifies the RadialGauge's starting angle and the SweepAngle property specifies an angle representing the length of the RadialGauge's arc.
- Set the AutoScale property to True. The AutoScale property automatically scales the radial gauge to fill its containing element.
- Set the ShowTicks and ShowTickText properties to False. The ShowTicks property determines whether the gauge should display tick marks at each step value and the ShowTickText property determines whether the gauge should display the text value of each tick mark.
- Set the NeedleShape property to NeedleShape.Rectangle. This property specifies the shape of the gauge's needle element.
- Set the NeedleLength property to NeedleLength.Middle. This property specifies the length of the gauge's needleElement with respect to the pointer range.
| Razor |
Copy Code
|
@(Html.C1().RadialGauge()
                .Value(35)
                .Width(500)
                .Height(200)
                .Min(0).Max(100)
                .StartAngle(-20)
                .SweepAngle(220)
                .ShowTicks(false)
                .ShowTickText(false)
                .ShowText(ShowText.None)
                .NeedleShape(NeedleShape.Rectangle)
                .NeedleLength(NeedleLength.Middle)
                .AutoScale(true)
                     .Ranges(items => items
                        .Add(item => item.Min(0).Max(40).Color(System.Drawing.Color.Red))
                        .Add(item => item.Min(40).Max(80).Color(System.Drawing.Color.Yellow))
                        .Add(item => item.Min(80).Max(100).Color(System.Drawing.Color.Green))
                           )
)
|
- Click Build | Build Solution to build the project.
- Press F5 to run the project.
Append the folder name and view name to the generated URL (for example: http://localhost:1234/
Default1/index) in the address bar of the browser to see the view. Or link the view to the home page.
Back to Top
See Also