The Gauge control allows to customize its appearance using CSS. You can create your own custom CSS and then apply it to the Gauge control using CssClass property.
The example uses CssClass property to apply custom cascading styling sheets in the Gauge control. In this example, we customize the default CSS rules to make the following customizations to the Gauge control.
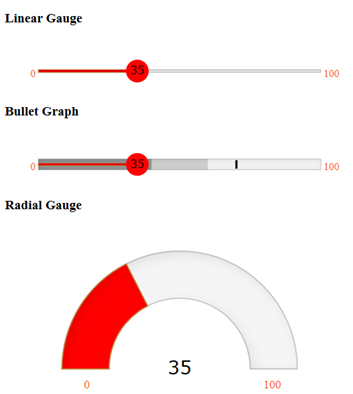
The following image shows how the Gauge control appears after using a custom CSS class.
Create a new ASP.NET MVC application. Once you have created the application, a Content folder is created in the Solution Explorer after adding the view to the application. To add a custom style sheet in your application, follow these steps:
| app.css |
Copy Code
|
|---|---|
<style>
    .gauge .wj-gauge .wj-min, .gauge .wj-gauge .wj-max {
        font-size: 15px;
        opacity: .9;
        fill: orangered;
    }

    .radialgauge .wj-gauge .wj-min, .radialgauge .wj-gauge .wj-max {
        font-size: 10px;
        opacity: .9;
        fill: orangered;
    }

    .wj-pointer path {
        fill: #ff0000;
        stroke: #cd853f;
    }

    .wj-gauge .wj-value {
        font-size: 100%;
        font-weight: 500;
        font-family: Verdana, sans-serif;
        fill: black !important;
    }
</style>
<br /><br />
|
|
| Styling.cshtml |
Copy Code
|
|---|---|
<div class="gauge" style="min-width:500px; width:33.33%"> <h3>Linear Gauge</h3> <br /><br /> @(Html.C1().LinearGauge().Id("secondGauge") .HasShadow(false).Value(35).Min(0).Max(100).Step(5).IsReadOnly(false) .ShowText(ShowText.All).Face(face => face.Thickness(0.25)) .Pointer(pointer => pointer.Thickness(0.25) .Color(System.Drawing.Color.Red))) </div> <br /> <div class="gauge"> <h3>Bullet Graph</h3> <br /><br /> @(Html.C1().BulletGraph() .Min(0).Max(100).Good(60).Bad(40) .Value(35).Target(70).ShowText(ShowText.All) .IsReadOnly(false).Step(1).Width(500) .IsAnimated(true) .Pointer(pointer => pointer.Thickness(0.25).Color(System.Drawing.Color.Red))) </div> <br /> <h3>Radial Gauge</h3> <br /><br /> <div class="radialgauge"> @(Html.C1().RadialGauge() .Value(35) .Width(500) .Height(200) .Min(0).Max(100) .ShowText(ShowText.All) .AutoScale(true)) </div> |
|