CalcEngine for .NET
Walkthrough / Cross Sheet Referencing in FlexGrid
In This Topic
    Cross Sheet Referencing in FlexGrid
    In This Topic

    This walkthrough demonstrates the implementation of cross-sheet referencing using CalcEngine in a WinForms App. Here, CalcEngine is used to parse and compute algebraic expressions, mathematical functions, and formulas using variables and across multiple spreadsheets or controls. In this walkthrough, you understand how to use a bound FlexGrid and an unbound custom FlexGrid as the datasource for CalcEngine. The former FlexGrid control has been bound to a custom DataTable which implements the IDataSheet interface. And the latter, custom FlexGrid, has been defined by implementing the IDataSheet interface.

    The walkthrough generates a list of type IDataSheet. Each element in the list is an instance of either C1FlexGrid or custom C1FlexGrid. This list is used as a data source for C1CalcEngine and each element of the list acts as a sheet for C1CalcEngine. The expressions  evaluated by the CalcEngine use these sheets and the sheet names to implement cross-sheet referencing.

    Set up the Application

    1. Create a new Windows Forms App named TestCrossSheet.
    2. Add a Button control to evaluate the result and set its Text to Evaluate. This button is used to evaluate the result.
    3. Add a TextBox control to display excel expression and resize it as required.
    4. Add a Label to the Form and set its Text to "Result: “.
    5. Add another TextBox control to display the expression evaluation result and resize it as required.
    6. Add a FlexGrid control to the Form.

    Add References

    1. Install C1CalcEngine Nuget package using NuGet Package Manager.
    2. Switch to the code view and add the following namespaces:
      • using C1.CalcEngine;
      • using C1.Win.C1FlexGrid;

    Configure the FlexGrid Control

    1. Create a class named ExcelFlexGrid which implements the IDataSheet interface, to generate an unbound custom C1FlexGrid to be used as a datasource for C1CalcEngine.
      C#
      Copy Code
      //Custom FlexGrid implementing IDataSheet
      public class ExcelFlexGrid : C1FlexGrid, IDataSheet
      {
          public object GetValue(int col, int row) => Rows[row + 1][col + 1];
      }
      

    2. Save and build the project.
    3. Switch to design view and navigate to the ToolBox. Observe ExcelFlexGrid, the class created in code behind, appears as a component in the Toolbox, as depicted in image below:
      ExcelFlexGrid in Toolbox
    4. From the Toolbox, drag drop the ExcelFlexGrid component on the Form. Navigate to the Properties window and rename it to sheet2.

    Create Data Source

    Create a custom DataTable that implements the IDataSheet interface, used as the datasource for FlexGrid. This generates a bound FlexGrid control to be used as a datasource for CalcEngine.

    C#
    Copy Code
    //Custom DataTable implementing IDataSheet
    public class SheetTable : DataTable, IDataSheet
    {
        public string Name
        {
            get => TableName;
            set => TableName = value;
        }
    
        public object GetValue(int col, int row)
        {
            return Rows[row][col];
        }
    }
    

    Bind CalcEngine to Data Source

    1. Define C1CalcEngine and a string variable globally using the following code:
      C#
      Copy Code
      private C1CalcEngine _calcEngine;
      private const string Abc = "ABCDEF";
      

    2. Add the following method to initialize SheetTable class to be used as C1FlexGrid’s datasource:
      C#
      Copy Code
      //Generate DataTable to be used as FlexGrid's datasource
      public SheetTable GetDataTable(string sheetName)
      {
          var table = new SheetTable();
          table.Name = sheetName;
          foreach (var c in Abc)
              table.Columns.Add(c.ToString(), typeof(int));
          for (int i = 0; i < 80; i++)
              table.Rows.Add(new object[] { i * 2, i * 3, i * 4, i * 5, i * 6, i * 7 });
          return table;
      }
      

    Populate the Custom FlexGrid Control

    Add the following method to populate ExcelFlexGrid with unbound data.

    C#
    Copy Code
    //Populate ExcelFlexGrid using unbound data
    private void LoadUnboundGrid(C1FlexGrid grid)
    {
        grid.Rows.Count = 81;
        grid.Cols.Count = 7;
        for (int i = 1; i <= Abc.Length; i++)
            grid.Rows[0][i] = Abc[i - 1];
        for (int i = 0; i < 80; i++)
            for (int j = 1; j <= Abc.Length; j++)
                grid.Rows[i + 1][j] = i * j;
    }
    

    Assign Expression and Evaluate Result

    1. Define the following method to be used as the event handler for the SelChange event of C1FlexGrid and ExcelFlexGrid to generate C1CalcEngine expressions based on the current selection of FlexGrid:
      C#
      Copy Code
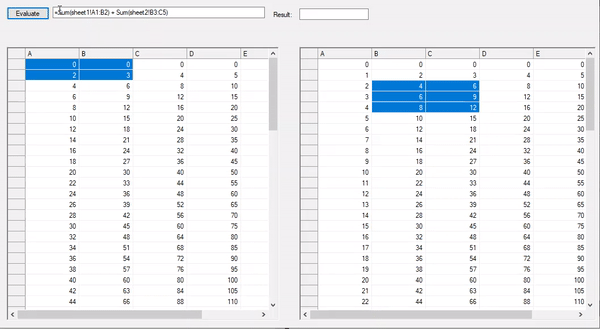
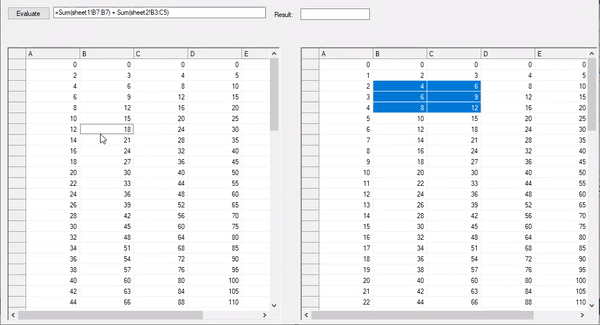
      //Get grid selection and create Excel expression
      private void grid_SelChange(object sender, System.EventArgs e)
      {
          textBox1.Text = string.Format("=Sum(sheet1!{0}) + Sum(sheet2!{1})", 
              GetMark(c1FlexGrid1), GetMark(sheet2));
      }
      

    2. Switch to the design view. In the Properties window, navigate to the SelChange event of C1FlexGrid, click the drop-down button and select the event handler method defined in the above step. This binds the defined event handler method to the SelChange event of C1FlexGrid and ExcelFlexGrid.
    3. Switch to the code view. Define the following method to translate the C1FlexGrid and ExcelFlexGrid selection to Excel expression notation, so that it gets evaluated by C1CalcEngine:
      C#
      Copy Code
      private string GetMark(C1FlexGrid grid)
      {
          var sel = grid.Selection;
          return string.Format("{0}{1}:{2}{3}", Abc[sel.LeftCol - 1], 
              sel.TopRow, Abc[sel.RightCol - 1], sel.BottomRow);
      }
      

    4. Switch back to the design view and generate the event handler method for the button click event by double clicking on the button and add the following code to it to evaluate the created Excel expressions using the TryEvaluate method of the C1CalcEngine class:
      C#
      Copy Code
      //Evaluate the created Excel expression
      private void button1_Click(object sender, EventArgs e)
      {
          _calcEngine.Expression = textBox1.Text;
          if (_calcEngine.TryEvaluate(out object result))
              textBox2.Text = (result ?? "").ToString();
          else
              textBox2.Text = _calcEngine.GetErrors().FirstOrDefault()?.FullMessage ?? "";
      }
      

    5. Add following namespace to the project to initialize C1CalcEngine using ExcelEngine:
      using C1.CalcEngine.ExcelEngine;
    6. Add the following code to the Form_Load event to initialize C1CalcEngine, set it's datasource and populate C1FlexGrid/ExcelFlexGrid with data and perform default selection to generate a default expression when the application is executed for the first time:
      C#
      Copy Code
      private void Form1_Load(object sender, EventArgs e)
      {
          //Initialize and populate C1FlexGrid with custom DataTable(SheetTable)            
          var sheet1 = GetDataTable("Sheet1");
          c1FlexGrid1.DataSource = sheet1;
      
          //Initialize custom FlexGrid(ExcelFlexGrid) and populate unbound data
          LoadUnboundGrid(sheet2);
      
          //Initialize C1CalcEngine and assign datasource
          _calcEngine = new C1CalcEngine(new ExcelEngine());
          _calcEngine.DataSource = new List<IDataSheet> { sheet1, sheet2 };
      
          //Perform default selection in FlexGrid/ExcelFlexGrid
          c1FlexGrid1.Select(1, 1, 2, 2);
          sheet2.Select(3, 2, 5, 3);
      }
      

    Run the application.

    1. Click the Evaluate button to evaluate the default expression.
      evaluating expression
    2. Alter the C1FlexGrid/ExcelFlexGrid selection to observe the generation of new expression based on the current selection and click on the evaluate button again to calculate the result of the newly created expression.
      evaluate-expression at runtime