The C1FlexPivotEngine class provided by the C1.PivotEngine Assembly, can be used to apply pivot transform on large sets of data. The DataEngine library performs blazing-fast analysis by using column-oriented and memory-mapped file techniques to query data from large data sets. Pivot transformations are done over the resulting data using the FlexPivotEngine. As a result, data queried by the DataEngine is pivot-transformed by the FlexPivotEngine in various formats to suit your business requirements.
Once the data is imported from various sources such as JSON files, SQL database, CSV files etc., the FlexPivotEngine can be easily connected to the DataEngine to pivot-transform the data.
Let's observe pivot transformation in depth:
To explain pivot transformation, we will connect the workspace to an SQL Database data source:
| C# |
Copy Code |
|---|---|
SqlConnection conn = new SqlConnection(GetConnectionString()); conn.Open(); var command = new SqlCommand("Select * from Invoices", conn); | |
Once a connection is created, the DbConnector class is used to connect this SqlConnection to this workspace:
| C# |
Copy Code |
|---|---|
var connector = new DbConnector(this._workSpace, conn, command); connector.GetData("Invoices"); this.invoice = this._workSpace.table("Invoices"); | |
After initializing the workspace and data source, you can query the data engine on the Invoices table, and, further connect the DataEngine to the FlexPivotEngine.
Note that FlexPivotEngine requires the table or query name for initialization. That's why we first need to execute a query on data engine and then create a generic method that returns an instance of FlexPivotEngine initialized according to the query.
| C# |
Copy Code |
|---|---|
var queryName = “AllQuery”; var settings = new { invoice.Country, invoice.ProductName, invoice.Salesperson, invoice.OrderDate, Sales = Op.Sum(invoice.ExtendedPrice), Quantity = Op.Count(invoice.Quantity), QuantityTotal = Op.Sum(invoice.Quantity) }; this.ExecuteQuery(queryName, settings); this.engine = new C1FlexPivotEngine(); this.engine.Workspace = this._workSpace; this.engine.ConnectDataEngine(queryName); private void ExecuteQuery(string queryName, object settings) { dynamic query = GetQuery(queryName, settings); query.Query.Execute(); } private IDataList GetQueryResults(string queryName, object settings) { this.ExecuteQuery(queryName, settings); return this._workSpace.GetQueryData(queryName); } private dynamic GetQuery(string queryName, object settings) { return this._workSpace.query(queryName, settings); } private C1FlexPivotEngine CreateFlexPivotEngine(string queryName, string[] colFields, string[] rowFields, string[] valFields) { var fp = this.engine; //this.engine.Fields.Clear(); fp.BeginUpdate(); this.engine.ColumnFields.Clear(); this.engine.RowFields.Clear(); this.engine.ValueFields.Clear(); fp.ColumnFields.Add(colFields); fp.RowFields.Add(rowFields); fp.ValueFields.Add(valFields); fp.EndUpdate(); return fp; } | |
We will query using the DataEngine and fetch all the required columns along with aggregates. Then, we can use the FlexPivotEngine to apply different transforms to this single query result. In DataEngine, we can use the query method of the Workspace class. This method takes an optional name parameter that stores the results using this name so we can use it in the future (the queryName parameter in the CreateFlexPivotEngine method).
As you can observe from the code snippet, the queryName parameter will be the name of the query or the table name. The RowFields and ColumnFields are dimension fields using which the DataEngine groups the data. The ValueFields are measure fields on which the aggregation is applied. The FlexPivotEngine is initialized by providing the workspace and then connected to the DataEngine using the query name. Once the FlexPivotEngine is created, we can get the transformed data using the FlexPivotDefaultView property.
A single-column pivot transform, lets the users apply transform on a single column, that is the data is aggregated on the basis of a single column only.
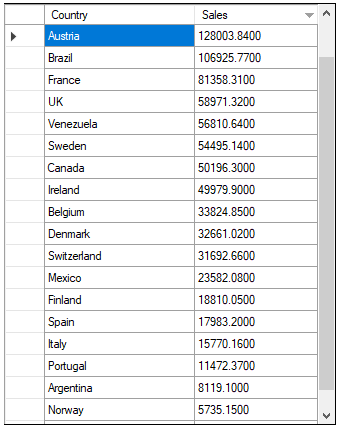
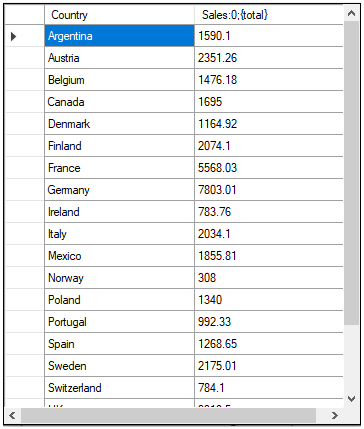
Let's say we want to know the amount of sales in each country from the Invoices table. For this purpose, we can apply single column pivot transform where we will group the data by country and add all the sales in that particular country.
The data will be pivot-transformed according to the fields. The country column will be displayed in a column since it is added as a row field and the aggregated sales data for each country will be displayed alongside each country on a different column.
| C# |
Copy Code |
|---|---|
public IBindingList SalesByCountry() { var fp = this.CreateFlexPivotEngine(“SalesByCountry”, new string[] { "" }, new string[] { "Country" }, new string[] { "Sales" }); return fp.FlexPivotDefaultView; } | |
The snapshot below depicts single-column pivot transform for sales by countries:

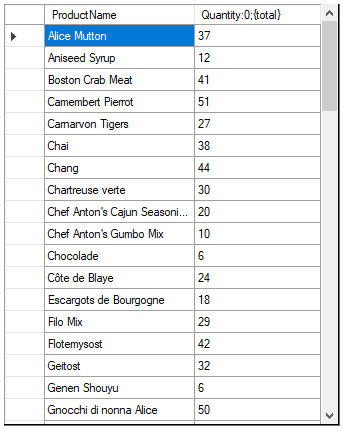
The single-column pivot transform can also be used to find out the quantities of sold single product. For this, the data will be grouped on the Product column and aggregation can be applied on the Quantity column:
| C# |
Copy Code |
|---|---|
public IBindingList ProductQuantitySold() { var fp = this.CreateFlexPivotEngine(“ProductQuantitySold”, new string[] { "" }, new string[] { "ProductName" }, new string[] { "Quantity" }); return fp.FlexPivotDefaultView; } | |
The snapshot below depicts single-column pivot transform for product quantities sold:
Multi-column pivot transform refers to the type of pivot transform where the data is grouped by multiple columns, such that the top-level column is grouped first, then the column below that level, and so on.
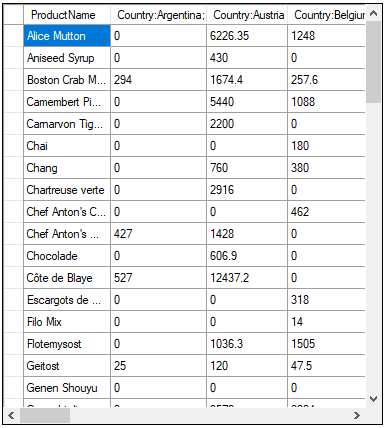
For example, let's say we wish to know the total sales of each product inside a particular country. For this purpose, we can apply multi-column pivot transform with the country as the top-level column, and then the product and summary of sales for each item.
| C# |
Copy Code |
|---|---|
public IBindingList ProductSalesByCountry() { var fp = this.CreateFlexPivotEngine(“ProductSalesByCountry”, new string[] { "Country" }, new string[] { "ProductName" }, new string[] { "Sales" }); return fp.FlexPivotDefaultView; } | |
Note that the resulting data will contain a column for each distinct product followed by the aggregated sales of each country in multiple columns. Also, each of the distinct values of the country will have its own sales column.
The snapshot below depicts multi-column pivot transform for product sales by countries:
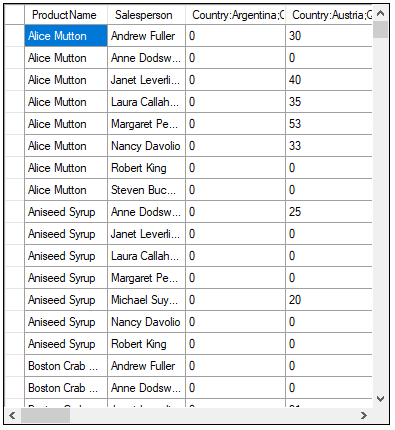
Further, we can also apply the transformation at a deeper level on columns. For instance, if we add a column for the name of the persons who completed the sale, then the pivot transform will be applied on three columns:
| C# |
Copy Code |
|---|---|
public IBindingList QuantitySoldByPerson() { var fp = this.CreateFlexPivotEngine(“QuantitySoldByPerson”, new string[] { "Country" }, new string[] { "ProductName", "Salesperson" }, new string[] { "QuantityTotal" }); return fp.FlexPivotDefaultView; } | |
The snapshot below depicts multi-column pivot transform for quantity sold by persons:
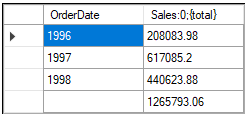
A user can also perform Pivot transform on a date-type column. We can use the FlexPivotEngine to aggregate dates on a single property basis like a year or month. This will reduce the number of items returned significantly and also make the data more comprehensible. Let's say, we want to find the total sales done in a particular year. For this, we can use the Format and RangeType properties of the pivot fields:
| C# |
Copy Code |
|---|---|
public IBindingList SalesGroupByYear() { var fp = this.CreateFlexPivotEngine(SalesGroupByYear, new string[] { }, new string[] { "OrderDate" }, new string[] { "Sales" }); var fld = fp.RowFields[0]; fld.Range.RangeType = RangeType.Format; fld.Format = "yyyy"; fld.Caption = "Year"; return fp.FlexPivotDefaultView; } | |
The snapshot below depicts the output:
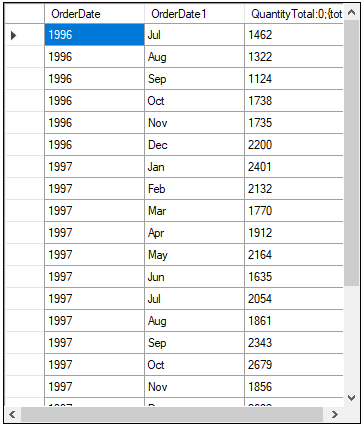
We can also perform multi-column grouping. Let's say we wish to divide the above sales into years and months. For this, we need to add two row fields for OrderDate and change the format of each field:
| C# |
Copy Code |
|---|---|
public IBindingList ProductsSoldInYearMonthly() { var fp = this.CreateFlexPivotEngine(ProductsSoldInYearMonthly, new string[] { }, new string[] { "OrderDate", "OrderDate" }, new string[] { "QuantityTotal" }); var year = fp.RowFields[0]; year.Range.RangeType = RangeType.Format; year.Format = "yyyy"; year.Caption = "Year"; var month = fp.RowFields[1]; month.Range.RangeType = RangeType.Format; month.Format = "MMM"; month.Caption = "Month"; return fp.FlexPivotDefaultView; } | |
The snapshot below depicts the output:
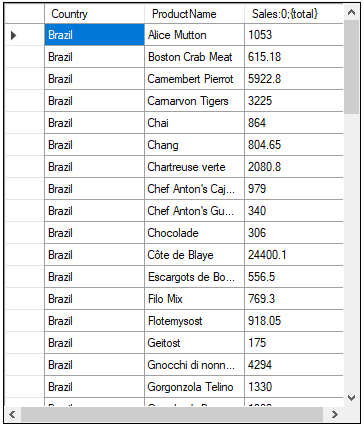
Users can perform filtering by using the C1FlexPivotFilter class, which is exposed by the Filter property of the C1FlexPivotField object. This class comprises many properties to combine different filter types. For example, we can filter the ProductSalesByCountry to only display the country Brazil.
| C# |
Copy Code |
|---|---|
public IBindingList FilterESalesByCountry() { var fp = this.CreateFlexPivotEngine(FilterESalesByCountry, new string[] { }, new string[] { "Country", "ProductName" }, new string[] { "Sales" }); var fld = fp.RowFields[0].Filter; fld.Condition1.Operator = ConditionOperator.Equals; fld.Condition1.Parameter = "Brazil"; return fp.FlexPivotDefaultView; } | |
The snapshot below depicts the output:
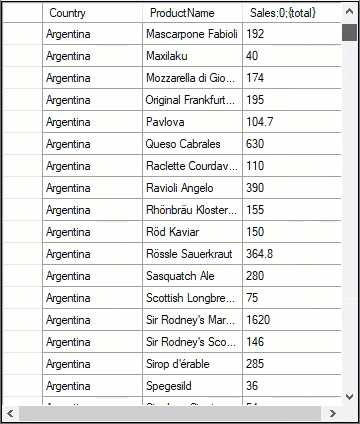
We can also use the NotEquals operator instead of Equals operator in the above query to filter out Brazil and display the rest of the countries:
| C# |
Copy Code |
|---|---|
public IBindingList FilterNESalesByCountry() { var fp = this.CreateFlexPivotEngine(FilterNESalesByCountry, new string[] { }, new string[] { "Country", "ProductName" }, new string[] { "Sales" }); var fld = fp.RowFields[0].Filter; fld.Condition1.Operator = ConditionOperator.NotEquals; fld.Condition1.Parameter = "Brazil"; return fp.FlexPivotDefaultView; } | |
The GIF below depicts the output:
You can also combine different operators to perform complex filtering. For example, if you want to only aggregate those items where Sales is less than 200 and greater than 100, then a combination of GreaterThanOrEqualTo and LessThanOrEqualTo operators along with AndConditions property can be used:
| C# |
Copy Code |
|---|---|
public IBindingList FilteredSalesByCountry() { var fp = this.CreateFlexPivotEngine(FilteredSalesByCountry, new string[] { }, new string[] { "Country" }, new string[] { "Sales" }); var fld = fp.ValueFields[0].Filter; fld.Condition1.Operator = ConditionOperator.GreaterThanOrEqualTo; fld.Condition1.Parameter = 100; fld.Condition2.Operator = ConditionOperator.LessThanOrEqualTo; fld.Condition2.Parameter = 200; fld.AndConditions = true; return fp.FlexPivotDefaultView; } | |
The snapshot below depicts the output:
The C1.DataEngine.Api package exposes a DataList class that has a static method known as Sort. This method takes an IDataList, column name, and an optional ascending parameter and sorts the list according to the column name and ascending. Let's see how to apply a descending sort on the Sales column in the SalesByCountry query.
| C# |
Copy Code |
|---|---|
public IDataList SalesByCountrySorted() { var result = this.GetQueryResults("SalesByCountrySorted", new { this.invoice.Country, Sales = Op.Sum(invoice.ExtendedPrice) }); DataList.Sort(result, "Sales", false); return result; } | |
Notice how the GetQueryData method is used directly without creating the query object. This is because once the SalesByCountry query runs, the data engine stores the results in the workspace folder so that it can be used again even after restarting the application without querying the database again.