In This Topic
This quick start topic guides you through a step-by-step process of creating Expression Editor control, and binding it to an object to demonstrate creating expressions and performing operations on its fields.
The steps to create an application with Expression Editor control are as follows:
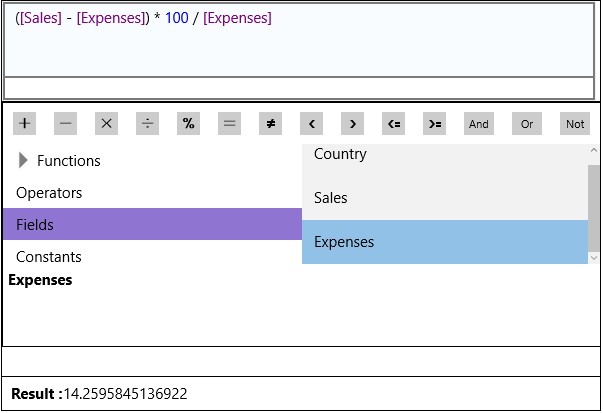
The following image exhibits the Expression Editor control which is bound to an instance of a class that represents sales and expenses for different countries.
Back to Top
Step 1: Add Expression Editor components to application
- Create a Universal Windows application, and open MainPage.xaml.
- Add C1ExpressionEditor and C1ExpressionEditorPanel components to your page. The Xaml code appears as follows.
<c1:C1ExpressionEditor x:Name="ExpressionEditor"
                       Width="{Binding ActualWidth, ElementName=ExpressionPanel}"
                       HorizontalAlignment="Left"
                       VerticalAlignment="Top"
                       MinHeight="100" />
<c1:C1ExpressionEditorPanel x:Name="ExpressionPanel"
                            HorizontalAlignment="Left"
                            Height="300"
                            Width="599" />
Back to Top
Step 2: Bind the components
Bind the C1ExpressionEditor and C1ExpressionEditorPanel components using ExpressionEditor property exposed by C1ExpressionEditorPanel class, as shown in the following code snippet.
<c1:C1ExpressionEditor x:Name="ExpressionEditor"
                       Width="{Binding ActualWidth, ElementName=ExpressionPanel}"
                       HorizontalAlignment="Left"
                       VerticalAlignment="Top"
                       MinHeight="100" />
<c1:C1ExpressionEditorPanel x:Name="ExpressionPanel"
                            ExpressionEditor="{Binding ElementName=ExpressionEditor}"
                            HorizontalAlignment="Left"
                            Height="300"
                            Width="599" />
Back to Top
Step 3: Add Result and Error panels
- To create result panel, add a StackPanel with two TextBlocks within it after the C1ExpressionEditorPanel block.
- To create error panel, add a TextBlock after the StackPanel.
The following code snippet shows markup for result and error panels
<StackPanel Orientation="Horizontal" Grid.Row="3" Margin="9,36,-9,-27">
    <TextBlock Text="Result : " FontWeight="Bold"/>
    <TextBlock x:Name="Result" Text="" />
</StackPanel>
<TextBlock x:Name="Errors"
           Grid.Row="3"
           Foreground="Red"
           TextWrapping="Wrap"
           HorizontalAlignment="Left"
           VerticalAlignment="Top"
           MinHeight="25" />
Back to Top
Step 4: Subscribe to and handle the ExpressionChanged event
- Subscribe to the ExpressionChanged event of C1ExpressionEditor.
ExpressionEditor.ExpressionChanged += ExpressionEditor_ExpressionChanged;
- Handle the ExpressionChanged event, to show result of the entered expressions, as follows.
private void ExpressionEditor_ExpressionChanged(object sender, EventArgs e)
{
    C1ExpressionEditor edit = sender as C1ExpressionEditor;

    if (!edit.IsValid)
    {
        Result.Text = "";
        Errors.Text = "";
    }
    else
    {
        Result.Text = edit.Evaluate()?.ToString();
        Errors.Text = "";
    }
}
Back to Top
Step 5: Bind Expression Editor to an object
Expression Editor can be bound to instance of a class that represents data to perform operations on. This is possible by DataSource object exposed by the C1ExpressionEditor class.
The following code snippet demonstrates how an object of expression editor binds to object of a class.
// Object binding
ExpressionEditor.DataSource = new DataItem("France", 1210009, 1059000);
In this example, Expression Editor binds to the instance of a class that represents sales and expenses data for an organization in a country.
// Data for object binding
public class DataItem
{
    public DataItem(string country, int sales, int expenses)
    {
        Country = country;
        Sales = sales;
        Expenses = expenses;
    }

    public string Country { get; set; }
    public int Sales { get; set; }
    public int Expenses { get; set; }

}
Back to Top
Step 6: Build and Run the Project
- Click Build | Build Solution to build the project.
- Press F5 to run the project.
You have successfully created a Universal Windows application showing Expression Editor control bound to an object of class depicting sales and expenses figures for countries.
Enter a valid expression, for example calculate profit percentage of a retail store in a country. The Sales and Expenses data for the country has been provided through object.
Back to Top