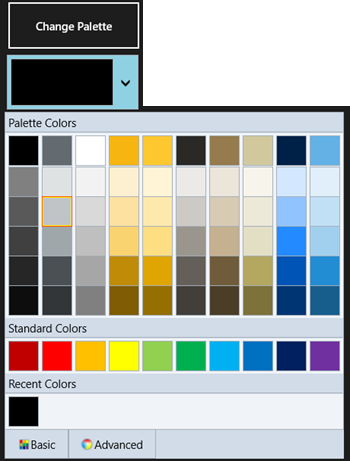
Bored of using the predefined color palettes in ColorPicker within your application! You can choose to customize the color palette in ColorPicker for UWP by simply adding a few more lines to your code. Follow the steps given below to create a custom palette and apply it to the C1ColorPicker through a click of a button.
| Visual Basic |
Copy Code
|
|---|---|
Imports C1.Xaml Imports C1.Xaml.Extended Imports Windows.UI |
|
| C# |
Copy Code
|
|---|---|
using C1.Xaml; using C1.Xaml.Extended; using Windows.UI; |
|
| Visual Basic |
Copy Code
|
|---|---|
Private Sub Button1_Click(sender As Object, e As RoutedEventArgs) Handles Button1.Click
    Dim cp1 As New ColorPalette("Pittsburgh")

    cp1.Clear()

    cp1.Add(Color.FromArgb(255, 0, 0, 0))

    cp1.Add(Color.FromArgb(255, 99, 107, 112))

    cp1.Add(Color.FromArgb(255, 255, 255, 255))

    cp1.Add(Color.FromArgb(255, 247, 181, 18))

    cp1.Add(Color.FromArgb(255, 253, 200, 47))

    cp1.Add(Color.FromArgb(255, 43, 41, 38))

    cp1.Add(Color.FromArgb(255, 149, 123, 77))

    cp1.Add(Color.FromArgb(255, 209, 201, 157))

    cp1.Add(Color.FromArgb(255, 0, 33, 71))

    cp1.Add(Color.FromArgb(255, 99, 177, 229))

    C1ColorPicker.Palette = cp1
End Sub
|
|
| C# |
Copy Code
|
|---|---|
private void Button1_Click(object sender, RoutedEventArgs e) { ColorPalette cp1 = new ColorPalette("Pittsburgh"); cp1.Clear(); cp1.Add(Color.FromArgb(255, 0, 0, 0)); cp1.Add(Color.FromArgb(255, 99, 107, 112)); cp1.Add(Color.FromArgb(255, 255, 255, 255)); cp1.Add(Color.FromArgb(255, 247, 181, 18)); cp1.Add(Color.FromArgb(255, 253, 200, 47)); cp1.Add(Color.FromArgb(255, 43, 41, 38)); cp1.Add(Color.FromArgb(255, 149, 123, 77)); cp1.Add(Color.FromArgb(255, 209, 201, 157)); cp1.Add(Color.FromArgb(255, 0, 33, 71)); cp1.Add(Color.FromArgb(255, 99, 177, 229)); C1ColorPicker1.Palette = cp1; } |
|