InputPanel for UWP | ComponentOne
Features / Data Validation / Property Level Validation
In This Topic
    Property Level Validation
    In This Topic

    InputPanel provides property level validation for validating user input in scenarios where built-in validation fails or remains insufficient. In this type of validation, data validation rules are specified inside the property setter code. InputPanel supports two types of markup to implement property level validation.

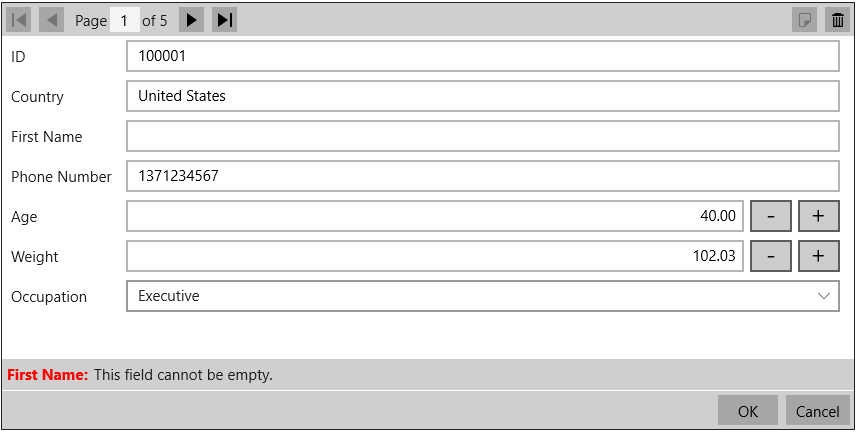
    The following image shows property level validation on entering invalid inputs.

    Standard attribute markup

    You can apply property level validation on user input by adding standard attribute markup inside the property setter code in the application. The control directly uses classes available in System.ComponentModel.DataAnnotations namespace to access the markup.

    The following code illustrates adding standard attribute markup inside property setter code to apply validation. This example uses the sample created in Quick Start.

    <Display(Name:="First Name")>
    <Required(ErrorMessage:="This field cannot be empty.")>
    Public Property Name() As String
        Get
            Return m_Name
        End Get
        Set
            m_Name = Value
        End Set
    End Property
    Private m_Name As String
    
    <Display(Name:="Phone Number")>
    <Required(ErrorMessage:="This field cannot be empty.")>
    Public Property Phone() As String
        Get
            Return m_Phone
        End Get
        Set
            m_Phone = Value
        End Set
    End Property
    Private m_Phone As String
    
    [Display(Name ="First Name")]
    [Required(ErrorMessage = "This field cannot be empty.")]
    public string Name { get; set; }
            
    [Display(Name ="Phone Number")]
    [Required(ErrorMessage = "This field cannot be empty.")]
    public string Phone { get; set; }
    

    Custom attribute markup

    InputPanel also supports custom attribute markup for achieving property level validation. Custom markup is useful in scenarios where users want to customize the validation rules as per their business needs. In addition, custom markup lets you combine multiple validation rules on an input field. For instance, custom markup allows validating Phone Number for null or white spaces as well as for minimum and maximum length in a single validation rule.

    The steps given below illustrate creating and applying customized attribute markup in code for property level validation. This example uses the sample created in Quick Start.

    1. Create a class, CustomValidator, and define validation rules to check for null or white spaces as well as minimum and maximum length of the Phone Number field.
      Public Class CustomValidator
          Public Shared Function ValidatePhoneNumber(PhoneNumber As String) _
              As ValidationResult
              If String.IsNullOrWhiteSpace(PhoneNumber) Then
                  Return New ValidationResult("Phone number cannot be empty.",
                                              New List(Of String)() From {"Phone"})
              ElseIf PhoneNumber.Length > 12 OrElse PhoneNumber.Length < 9 Then
                  Return New ValidationResult("Phone number should be more than 8 digits" +
                       " and less than 12 digits.", New List(Of String)() From {"Phone"})
              Else
      
                  Return ValidationResult.Success
              End If
          End Function
      End Class
      
      public class CustomValidator
      {
          public static ValidationResult ValidatePhoneNumber(string PhoneNumber)
          {
              if (string.IsNullOrWhiteSpace(PhoneNumber))
              {
                  return new ValidationResult("Phone number cannot be empty.",
                                              new List<string>() { "Phone" });
              }
              else if (PhoneNumber.Length > 12 || PhoneNumber.Length < 9)
              {
                  return new ValidationResult("Phone number should be more than 8 digits"
                   + " and less than 12 digits.", new List<string>() { "Phone" });
              } 
      
              else
              {
                  return ValidationResult.Success;
              }
          }
      }
      
    2. Add the custom attribute markup in the property setter code to validate the input entered in Phone Number field.
      <Display(Name:="Phone Number")>
      <CustomValidation(GetType(CustomValidator), "ValidatePhoneNumber")>
      Public Property Phone() As String
          Get
              Return m_Phone
          End Get
          Set
              m_Phone = Value
          End Set
      End Property
      Private m_Phone As String
      
      [Display(Name = "Phone Number")]
      [CustomValidation(typeof(CustomValidator), "ValidatePhoneNumber")]
      public string Phone { get; set; }
      
    See Also