In This Topic
To add template columns to C1GridView, complete the following steps:
- Right-click the C1GridView control and then click Show Smart Tag. On the C1GridView Tasks menu, click Property builder. The C1GridView Properties window appears.
- Click the Columns tab.
- Click the
 button to remove all columns from the Selected columns list.
- Select Template Field from the Available columns list.
- Click the arrow button between the column lists to copy the Template Column to the Selected columns list. Repeat this task three times to create three more (and a total of four) Template Columns.
- Under Column properties, set each column's HeaderText property to "Supplier #", "Contact name", "Company name", and "Address" respectively and click Apply.
Note: To view changes to each Template Column, you must click the Apply button.
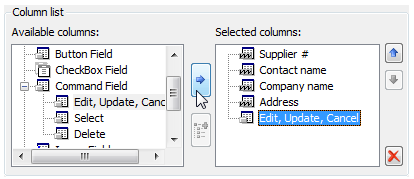
- From the Available columns list, expand the Command Field node and select Edit, Update, Cancel.
- Click the arrow button between the column lists to copy the Edit, Update, Cancel into the Selected columns list.The Selected columns list should look like this:
- Click OK to close the C1GridView Properties dialog box.
See Also