ComponentOne GridView for ASP.NET WebForms
Client-Side Tutorials / Client-Side Editing Tutorial / Step 1 of 4: Binding Data to the control
In This Topic
    Step 1 of 4: Binding Data to the control
    In This Topic

    In this step you begin by creating a new project, adding the C1GridView control to it and then binding it to a datasource.
    Note that in this example, you'll be using the Northwind database, C1Nwind.mdb, installed by default in the ComponentOne Samples\Common folder installed in your Documents folder.

    In the Designer

    1. From the Visual Studio File menu select New │ Project. The New Project dialog box appears.
    2. In the New Project dialog box expand the language node in the left pane and select Web. 
    3. In the right pane, choose ASP.NET Empty Web Application, enter a Name for your application, and select OK. A new application is created.
    4. In the Solution Explorer, right-click the project name and choose Add Reference.
    5. In the Add Reference dialog box, locate and select the C1.Web.Wijmo.Controls and C1.Web.Wijmo.Controls.Design assemblies and click OK. The references are added.
    6. Right-click the project in the Solution Explorer and from the context menu choose Add │ New Item.
    7. In the Add New Item dialog box choose Web Form from the list of templates, name the item Default.aspx, and click Add. The new web form opens.
    8. In the Solution Explorer, right click the project name and choose Add | New Folder. Name the new folder App_Data.
    9. Navigate to the Visual Studio Toolbox and double-click the C1GridView icon to add the control to your project.
    10. In the Design view, select the C1GridView control.
    11. In the Solution Explorer window, right-click the App_Data folder and select Add Existing Item from the context menu.
    12. In the Add Existing Item dialog box, navigate to where the Northwind database is located and select C1Nwind.mdb. By default the Northwind database is in the samples directory. 
    13. Click Add to close the dialog box and add the file to your project.

    In Source View
    Switch to source view and complete the following steps:

    1. Click the C1GridView control to select it and navigate to the Properties window to set C1GridView control properties or set the following text to the <cc1:C1GridView> tag:
      1. Set the HighlightCurrentCell property to True.
      2. Set the AllowKeyboardNavigation property to True.
      3. Set the AutogenerateColumns property to False.
      4. Set the DataKeyNames property to OrderID.

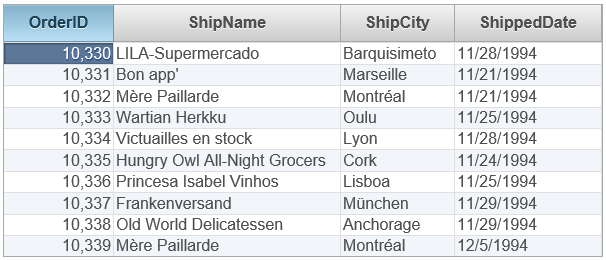
      It will appear similar to the following:

      <cc1:C1GridView ID="C1GridView1" runat="server" DataKeyNames="OrderID" HighlightCurrentCell="true" AllowKeyboardNavigation="true"
              AutogenerateColumns="false">
    2. Add columns to bind data fields using the following code inside the <cc1:C1GridView> … </cc1:C1GridView> tags.
      <Columns>
      <cc1:C1BoundField DataField="OrderID" HeaderText="OrderID"></cc1:C1BoundField>
      <cc1:C1BoundField DataField="ShipName" HeaderText="ShipName"></cc1:C1BoundField>
      <cc1:C1BoundField DataField="ShipCity" HeaderText="ShipCity"></cc1:C1BoundField>
      <cc1:C1BoundField DataField="ShippedDate" HeaderText="ShippedDate"></cc1:C1BoundField>
      </Columns>
    3. Add the following code after </cc1:C1GridView> to set the query:
      <asp:AccessDataSource ID="AccessDataSource1" runat="server" DataFile="~/App_Data/C1Nwind.mdb" SelectCommand="SELECT TOP 10 [OrderID], [ShipName],
          [ShipCity], [ShippedDate] FROM ORDERS WHERE [ShippedDate] IS NOT NULL"></asp:AccessDataSource>

    In Code

    Open the code behind and add the following code:

    1. Add the following code to the Page_Load event to refresh the view in the grid:

      To write code in Visual Basic:

      Visual Basic
      Copy Code
      If Not IsPostBack Then
         UpdateView()
      End If

      To write code in C#:

      C#
      Copy Code
      if (!IsPostBack)
         {
           UpdateView();
         }

    2. Add the following at the top of your page to add  namespaces in your code:

      To write code in Visual Basic:

      Visual Basic
      Copy Code
      Imports System.Collections
      Imports System.Data
      Imports System.Data.OleDb

      To write code in C#:

      C#
      Copy Code
      using System.Collections;
      using System.Data;
      using System.Data.OleDb;
    3. Add the following code to bind the data source to the grid after the Page_Load event:

      To write code in Visual Basic:

      Visual Basic
      Copy Code

      Private Function GetDataSet() As DataTable

       Dim orders As DataTable = TryCast(Page.Session("ClinetOrders"), DataTable)

         If orders Is Nothing Then_
           Using connection As New OleDbConnection("Provider=Microsoft.Jet.OLEDB.4.0;Data_

           Source=|DataDirectory|\C1Nwind.mdb;Persist Security Info=True")
               Using adapter As New OleDbDataAdapter("SELECT TOP 10 [OrderID], [ShipName],_

               [ShipCity], [ShippedDate] FROM ORDERS WHERE [ShippedDate] IS NOT NULL", connection)
                   orders = New DataTable("Orders")
                   adapter.Fill(orders)

                   orders.PrimaryKey = New DataColumn() {orders.Columns("OrderID")}

                   Page.Session("ClinetOrders") = orders
               End Using
           End Using
         End If
       Return orders
      End Function

      Private Sub UpdateView()
        ' Bind the data
        C1GridView1.DataSource = GetDataSet()
        C1GridView1.DataBind()
      End Sub

      To write the code in C#:

      C#
      Copy Code

      private DataTable GetDataSet()
             {
                 DataTable orders = Page.Session["ClinetOrders"] as DataTable;
                 if (orders == null)
                 {
                     using (OleDbConnection connection = new OleDbConnection(@"Provider=Microsoft.Jet.OLEDB.4.0;Data Source=|DataDirectory|\C1Nwind.mdb;Persist Security Info=True"))
                     {
                         using (OleDbDataAdapter adapter = new OleDbDataAdapter("SELECT TOP 10 [OrderID], [ShipName], [ShipCity], [ShippedDate] FROM ORDERS WHERE [ShippedDate] IS NOT NULL", connection))
                         {
                             orders = new DataTable("Orders");
                             adapter.Fill(orders);
                             orders.PrimaryKey = new DataColumn[] { orders.Columns["OrderID"] };
                             Page.Session["ClinetOrders"] = orders;
                         }
                     }
                 }
                 return orders;
             }

             private void UpdateView()
             {
              //Bind the data
                  C1GridView1.DataSource = GetDataSet();
                 C1GridView1.DataBind();
             }

    What You’ve Accomplished
    Run the project and observe that you now have a fully-functional grid application Orders table of the database.
     
    In the next step of this tutorial you'll customize the grid's functionality by setting the client side edit feature and explore the grid's run-time interactions.

    See Also