In the previous step of the tutorial you validated the data entered by the user against a condition. In this step you update the new data back to the server.
Complete the following steps to continue:
In Source View
AutoGenerateDeleteButton="true"
It appears similar to the following:
<cc1:C1GridView ID="C1GridView1" runat="server"
AutoGenerateDeleteButton="true" AllowClientEditing="true" DataKeyNames="OrderID" HighlightCurrentCell="true" AllowKeyboardNavigation="true" AutogenerateColumns="false">
In Code
To write the code in Visual Basic:
| Visual Basic |
Copy Code
|
|---|---|
|
Private Sub C1GridView1_RowEditing(sender As Object, e As C1.Web.Wijmo.Controls.C1GridView.C1GridViewEditEventArgs) End Sub |
|
To write the code in C#:
| C# |
Copy Code
|
|---|---|
| void C1GridView1_RowEditing(object sender, C1.Web.Wijmo.Controls.C1GridView.C1GridViewEditEventArgs e) { C1GridView1.EditIndex = e.NewEditIndex; UpdateView(); } |
|
To write the code in Visual Basic:
| Visual Basic |
Copy Code
|
|---|---|
| Protected Sub Page_Init(sender As Object, e As EventArgs) AddHandler C1GridView1.RowEditing, AddressOf C1GridView1_RowEditing End Sub |
|
To write the code in C#:
| C# |
Copy Code
|
|---|---|
| protected void Page_Init(object sender, EventArgs e) { C1GridView1.RowEditing += C1GridView1_RowEditing; } |
|
To write the code in Visual Basic:
| Visual Basic |
Copy Code
|
|---|---|
|
Dim orders As DataTable = GetDataSet() Dim row As DataRow = orders.Rows.Find(C1GridView1.DataKeys(e.RowIndex).Value) |
|
To write the code in C#:
| C# |
Copy Code
|
|---|---|
| DataTable orders = GetDataSet(); DataRow row = orders.Rows.Find(C1GridView1.DataKeys[e.RowIndex].Value); if (row != null) { foreach (DictionaryEntry entry in e.NewValues) { row[(string)entry.Key] = entry.Value; } } else { throw new RowNotInTableException(); } |
|
To write the code in Visual Basic:
| Visual Basic |
Copy Code
|
|---|---|
| GetDataSet().AcceptChanges() UpdateView() |
|
To write the code in C#:
| C# |
Copy Code
|
|---|---|
| GetDataSet().AcceptChanges(); UpdateView(); |
|
To write the code in Visual Basic:
| Visual Basic |
Copy Code
|
|---|---|
|
Dim orders As DataTable = GetDataSet() Dim row As DataRow = orders.Rows.Find(C1GridView1.DataKeys(e.RowIndex).Value) If row IsNot Nothing Then |
|
To write the code in C#:
| C# |
Copy Code
|
|---|---|
|
DataTable orders = GetDataSet(); if (row != null) |
|
To write the code in Visual Basic:
| Visual Basic |
Copy Code
|
|---|---|
| AddHandler C1GridView1.RowDeleting, AddressOf C1GridView1_RowDeleting | |
To write the code in C#:
| C# |
Copy Code
|
|---|---|
| C1GridView1.RowDeleting += new C1.Web.Wijmo.Controls.C1GridView.C1GridViewDeleteEventHandler(C1GridView1_RowDeleting); | |
In Source View
Click the C1GridView control to select it and navigate to the properties window to handle C1GridView control events or set the following text to the <cc1:C1GridView> tag:
The tag appears similar to the following:
<cc1:C1GridView ID="C1GridView1" runat="server"
AutoGenerateDeleteButton="true" AllowClientEditing="true" DataKeyNames="OrderID" HighlightCurrentCell="true" OnRowUpdating="C1GridView1_RowUpdating" OnEndRowUpdated="C1GridView1_EndRowUpdated" OnRowDeleting="C1GridView1_RowDeleting" AllowKeyboardNavigation="true" AutogenerateColumns="false">
What You’ve Accomplished
Run the project and see that the edited data value is updated on the server. You can also delete a row and update the grid with the changes.
The following images illustrate the resultant grid interactions explained in this tutorial.

Fig (i) - Editing column value in the grid
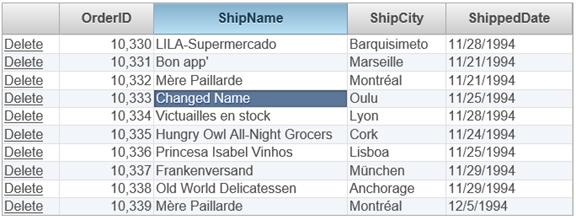
Fig (ii) - Changed value updated in the grid
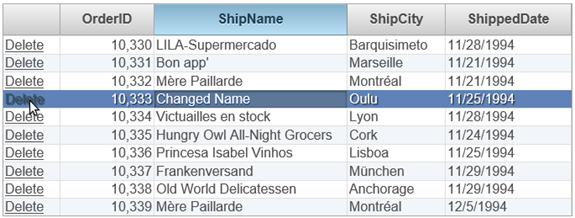
Fig (iii) - Deleting a row in the grid
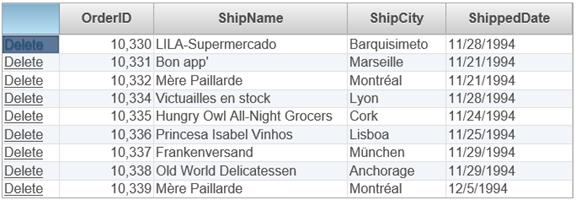
Fig (iv) - Updated grid after deletion