This quick start guides you through the steps of creating a simple List application. You begin by creating a Windows Forms App in Visual Studio, adding C1XLBook to the Form, adding content to it, formatting the data, and then saving it to an XLS file.
Follow the given steps to create a simple Excel application.
| C# |
Copy Code
|
|---|---|
c1XLBook1 = new C1XLBook();
|
|
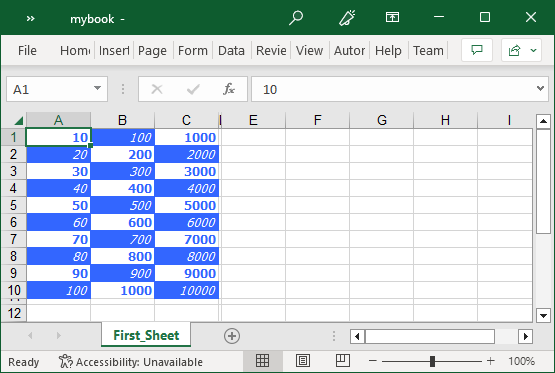
To add content to C1XLBook, you need to first add a sheet to it using the XLSheet class. Once you add the sheet, you can easily add content to its cells by using Value property of the XLCell class as demonstrated in the following code snippet. In this example, we populate the first ten rows in the first three columns of the sheet named First_Sheet with random numbers.
| C# |
Copy Code
|
|---|---|
// Add content to the sheet. int i; C1.C1Excel.XLSheet sheet = c1XLBook1.Sheets[0]; sheet.Name = "First_Sheet"; for (i = 0; i <= 9; i++) { sheet[i, 0].Value = (i + 1) * 10; sheet[i, 1].Value = (i + 1) * 100; sheet[i, 2].Value = (i + 1) * 1000; } |
|
To style the content of XLSheet, you can use the XLStyle class as demonstrated in the following steps:
| C# |
Copy Code
|
|---|---|
// Add style 1. XLStyle style1 = new XLStyle(c1XLBook1); style1.Font = new Font("Tahoma", 9, FontStyle.Bold); style1.ForeColor = Color.RoyalBlue; // Add style 2. XLStyle style2 = new XLStyle(c1XLBook1); style2.Font = new Font("Tahoma", 9, FontStyle.Italic); style2.BackColor = Color.RoyalBlue; style2.ForeColor = Color.White; |
|
| C# |
Copy Code
|
|---|---|
for (i = 0; i <= 9; i++) { // Apply styles to the content. if ((i + 1) % 2 == 0) { sheet[i, 0].Style = style2; sheet[i, 1].Style = style1; sheet[i, 2].Style = style2; } else { sheet[i, 0].Style = style1; sheet[i, 1].Style = style2; sheet[i, 2].Style = style1; } } |
|
Now, you can save the updates to an XLS file using Save method of the C1XLBook class as demonstrated in the following code. In this example, we save the content to "mybook.xls" file in the bin directory of the project folder.
| C# |
Copy Code
|
|---|---|
c1XLBook1.Save("mybook.xls"); System.Diagnostics.Process.Start("mybook.xls"); |
|