A worksheet is a matrix of cells where you can enter and display data, analyze information, write formulas, perform calculations, and review results. The following sections discuss the operations that can be performed on the worksheets.
A workbook may contain any number of worksheets. You can easily add one or more worksheets in your workbook using code. In Excel, sheets are represented by XLSheet class and are accessible through Sheets property of the C1XLBook class. Each sheet can have a name which can be set through the Name property and contains a collection of rows and columns.
To create a sheet in Excel, add the following code. In the following example, we create a sheet and set its name to First_Sheet.
| C# |
Copy Code
|
|---|---|
//create a sheet C1.C1Excel.XLSheet sheet = c1XLBook1.Sheets[0]; //set the name sheet.Name = "First_Sheet"; |
|
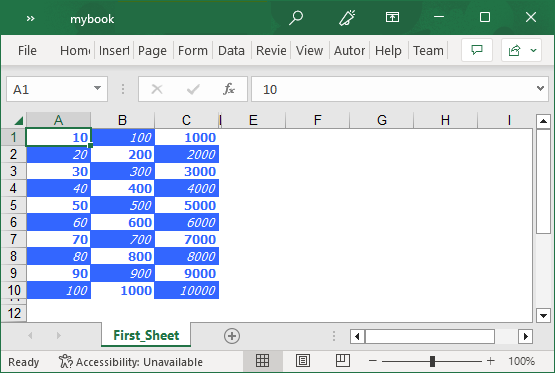
Each sheet in Excel comprises rows, columns, and cells. Data can be entered directly into these cells by using Value property of the XLCell class. To add content to worksheet in C1Excel, use the following code. In this example, we populate the first ten rows in the first three columns of the sheet created in the Create Worksheet section.
| C# |
Copy Code
|
|---|---|
// Add content to the sheet. int i; C1.C1Excel.XLSheet sheet = c1XLBook1.Sheets[0]; sheet.Name = "First_Sheet"; for (i = 0; i <= 9; i++) { sheet[i, 0].Value = (i + 1) * 10; sheet[i, 1].Value = (i + 1) * 100; sheet[i, 2].Value = (i + 1) * 1000; } |
|
By default, gridlines are displayed in the worksheets. However, there might be a scenario where you would want to hide the gridlines to categorize the data in a different way. To do so, you can set ShowGridLines property to false.
The following code shows how you can hide gridlines in worksheets in Excel.
| C# |
Copy Code
|
|---|---|
//create a sheet C1.C1Excel.XLSheet sheet = c1XLBook1.Sheets[0]; //hide the gridlines sheet.ShowGridLines = false; |
|
By default, all the sheets are visible in the workbook. However, there might be a scenario where you would want to hide a sheet with some sensitive details from the end-users. To achieve this, you can hide a sheet from the workbook by setting Visible property of the XLSheet class to false as demonstrated in the following code.
| C# |
Copy Code
|
|---|---|
//hide a sheet sheet.Visible = false; |
|
By default, the worksheets are displayed in a normal view but you can easily scale them to fit the page or shrink them to occupy a small space in the page. To do so, you can use Scale property of the XLSheet class. The Scale property sets the view scale of the worksheet using percentages.
To set the view scale of a worksheet in Excel, use the following code.
| C# |
Copy Code
|
|---|---|
//set scaling
sheet.Scale = 10;
|
|
Excel lets you apply formulas on cells by using Formula property of the XLCell. Using the Formula property, you can even apply complex formulas in the sheet and reduce the manual efforts of calculating numbers.
The following image showcases formula applied on an excel worksheet.

To apply formula on cells in an Excel sheet, use the following code. In this example, we apply a formula to calculate the percentage marks by using the Formula property and display the result in cell situated at index [10,10].
| C# |
Copy Code
|
|---|---|
c1XLBook1.Sheets[0][10, 10].Formula = "=((B8)/(C8))*100";
|
|