This section walks you through the process for achieving data binding in GanttView for .NET framework.
| C# |
Copy Code
|
|---|---|
//Add tasks and set the properties var task1 = c1GanttView1.Tasks[1]; task1.ConstraintDate = new System.DateTime(2012, 6, 22, 0, 0, 0, 0); task1.ConstraintType = C1.Win.GanttView.ConstraintType.StartNoEarlierThan; task1.Duration = 3; task1.ID = 656460240; task1.Mode = C1.Win.GanttView.TaskMode.Automatic; task1.Name = "Pursue a hare"; task1.Start = new System.DateTime(2015, 4, 1, 0, 0, 0, 0); var task2 = c1GanttView1.Tasks[2]; task2.ConstraintDate = new System.DateTime(2012, 6, 26, 0, 0, 0, 0); task2.ConstraintType = C1.Win.GanttView.ConstraintType.StartNoEarlierThan; task2.Duration = 12; task2.DurationUnits = C1.Win.GanttView.DurationUnits.Minutes; task2.ID = 132267904; task2.Mode = C1.Win.GanttView.TaskMode.Automatic; task2.Name = "Hit the hare"; task2.Start = new System.DateTime(2015, 4, 4, 0, 0, 0, 0); var task3 = c1GanttView1.Tasks[4]; task3.ConstraintDate = new System.DateTime(2012, 6, 28, 0, 0, 0, 0); task3.ConstraintType = C1.Win.GanttView.ConstraintType.StartNoEarlierThan; task3.Duration = 2; task3.ID = 1639616200; task3.Mode = C1.Win.GanttView.TaskMode.Automatic; task3.Name = "Skin that hare"; task3.Start = new System.DateTime(2015, 4, 6, 9, 12, 0, 0); var task4 = c1GanttView1.Tasks[6]; task4.ConstraintDate = new System.DateTime(2012, 6, 29, 0, 0, 0, 0); task4.ConstraintType = C1.Win.GanttView.ConstraintType.StartNoEarlierThan; task4.Duration = 3; task4.ID = 1784420689; task4.Mode = C1.Win.GanttView.TaskMode.Automatic; task4.Name = "Cook the hare"; task4.Start = new System.DateTime(2015, 4, 8, 9, 12, 0, 0); var task5 = c1GanttView1.Tasks[7]; task5.ConstraintDate = new System.DateTime(2012, 6, 30, 0, 0, 0, 0); task5.ConstraintType = C1.Win.GanttView.ConstraintType.StartNoEarlierThan; task5.Duration = 1; task5.ID = 1296539678; task5.Mode = C1.Win.GanttView.TaskMode.Automatic; task5.Name = "Eat the hare"; task5.Start = new System.DateTime(2015, 4, 13, 9, 12, 0, 0); |
|
| C# |
Copy Code
|
|---|---|
//Add Resources Resource resource1 = new C1.Win.GanttView.Resource(); Resource resource2 = new C1.Win.GanttView.Resource(); Resource resource3 = new C1.Win.GanttView.Resource(); Resource resource4 = new C1.Win.GanttView.Resource(); resource1.Cost = new decimal(new int[] { 20000, 0, 0, 131072}); resource1.ID = 457479171; resource1.Name = "Adam Miller"; resource2.Cost = new decimal(new int[] { 50000, 0, 0, 131072}); resource2.ID = 574928631; resource2.Name = "Ruth Radelet"; resource3.Cost = new decimal(new int[] { 25000, 0, 0, 131072}); resource3.ID = 1258408175; resource3.Name = "Johnny Jewel"; resource4.Cost = new decimal(new int[] { 40000, 0, 0, 131072}); resource4.ID = 187715318; resource4.Name = "Nat Walker"; this.c1GanttView1.Resources.Add(resource1); this.c1GanttView1.Resources.Add(resource2); this.c1GanttView1.Resources.Add(resource3); this.c1GanttView1.Resources.Add(resource4); |
|
| C# |
Copy Code
|
|---|---|
//Add Resource Reference ResourceRef resourceRef1 = new C1.Win.GanttView.ResourceRef(); ResourceRef resourceRef2 = new C1.Win.GanttView.ResourceRef(); ResourceRef resourceRef3 = new C1.Win.GanttView.ResourceRef(); ResourceRef resourceRef4 = new C1.Win.GanttView.ResourceRef(); ResourceRef resourceRef5 = new C1.Win.GanttView.ResourceRef(); ResourceRef resourceRef6 = new C1.Win.GanttView.ResourceRef(); ResourceRef resourceRef7 = new C1.Win.GanttView.ResourceRef(); resourceRef1.Amount = 1; resourceRef1.ResourceID = 457479171; resourceRef2.ResourceID = 1258408175; task1.ResourceRefs.Add(resourceRef1); task1.ResourceRefs.Add(resourceRef2); resourceRef3.Amount = 1; resourceRef3.ResourceID = 187715318; task2.ResourceRefs.Add(resourceRef3); resourceRef4.Amount = 1; resourceRef4.ResourceID = 187715318; resourceRef5.Amount = 1; resourceRef5.ResourceID = 1258408175; task3.ResourceRefs.Add(resourceRef4); task3.ResourceRefs.Add(resourceRef5); resourceRef6.Amount = 1; resourceRef6.ResourceID = 574928631; task4.ResourceRefs.Add(resourceRef6); resourceRef7.Amount = 1; resourceRef7.ResourceID = 457479171; task5.ResourceRefs.Add(resourceRef7); |
|
| C# |
Copy Code
|
|---|---|
//Add predecessors Predecessor predecessor1 = new C1.Win.GanttView.Predecessor(); Predecessor predecessor2 = new C1.Win.GanttView.Predecessor(); Predecessor predecessor3 = new C1.Win.GanttView.Predecessor(); Predecessor predecessor4 = new C1.Win.GanttView.Predecessor(); predecessor1.PredecessorTaskID = 656460240; task2.Predecessors.Add(predecessor1); predecessor2.PredecessorTaskID = 132267904; task3.Predecessors.Add(predecessor2); predecessor3.PredecessorTaskID = 1639616200; task4.Predecessors.Add(predecessor3); predecessor4.PredecessorTaskID = 1784420689; task5.Predecessors.Add(predecessor4); |
|
| C# |
Copy Code
|
|---|---|
gv.Dock = DockStyle.Fill; gv.BackColor = Color.LavenderBlush; gv.FixedFont = new Font("Microsoft Sans serif", 9, FontStyle.Bold); |
|
This section walks you through step-by-step instructions for achieving data binding in GanttView for .NET Framework.
GanttView, when bound to a data source, fetches the required data from the underlying data source. Data binding additionally lets multiple data consumers to be connected to a single data provider in a synchronized manner. GanttView supports data binding to most of the commonly used data sources such as BindingSource, ADO.NET objects such as DataSet, DataTable etc.
.gif)
| C# |
Copy Code
|
|---|---|
// TODO: This line of code loads data into the 'c1NWindDataSet1.Resources' table. You can move, or remove it, as needed. this.resourcesTableAdapter.Fill(this.c1NWindDataSet.Resources); // TODO: This line of code loads data into the 'c1NWindDataSet1.Properties' table. You can move, or remove it, as needed. this.propertiesTableAdapter.Fill(this.c1NWindDataSet.Properties); // TODO: This line of code loads data into the 'c1NWindDataSet1.Calendars' table. You can move, or remove it, as needed. this.calendarsTableAdapter.Fill(this.c1NWindDataSet.Calendars); // TODO: This line of code loads data into the 'c1NWindDataSet1.Tasks' table. You can move, or remove it, as needed. this.tasksTableAdapter.Fill(this.c1NWindDataSet.Tasks); |
|
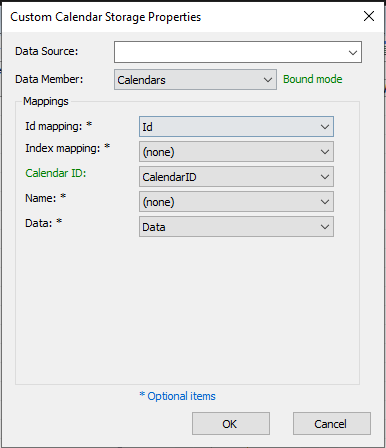
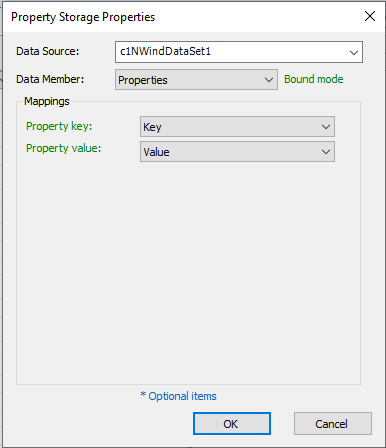
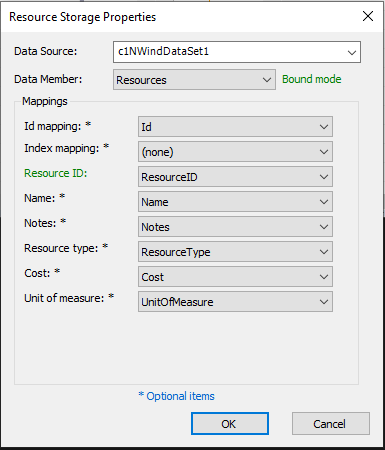
To bind the GanttView control to the data source at the design time, follow the given steps:
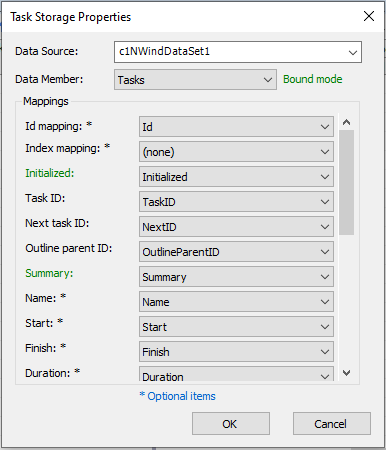
Refer to the following table to see all the mappings required for TasksStorage property.
| Id Mapping | Id |
| Initialized | Initialized |
| Task ID | TaskID |
| Next task ID | NextID |
| Outline parent ID | OutlineParentID |
| Summary | Summary |
| Name | Name |
| Start | Start |
| Finish | Finish |
| Duration | Duration |
| Mode | Mode |
| Calendar ID | CalendarID |
| Duration units | DurationUnits |
| Percent complete | PercentComplete |
| Deadline | Deadline |
| Constraint type | ConstraintType |
| Hide bar | HideBar |
| Predecessors | Predecessors |
| Resources | Resources |
| Custom fields | CustomFields |
| Notes | Notes |