DbNavigator is a data bound control which makes it easier to navigate over the records of a data source. A user can move to the first, last, previous, next record or perform common actions such as updating and refreshing the data source. The C1DbNavigator class provides various properties to set the Orientation, Location, Size and Styles for the control. It also includes several events for controlling its behavior when any of the buttons are clicked, for example, if the current row or fields have been changed in the record, an exception is thrown or if the visual property style has been changed.
| Create DbNavigator Control |
Copy Code
|
|---|---|
// initialize the control using the C1DbNavigator class c1dbNavigator1 = new C1.Win.Input.DbNavigator.C1DbNavigator(); // add control to the form Controls.Add(c1dbNavigator1); c1dbNavigator1.Location = new System.Drawing.Point(283, 199); c1dbNavigator1.Size = new System.Drawing.Size(300, 50); c1dbNavigator1.Dock = System.Windows.Forms.DockStyle.None; // added background color to highlight the DbNavigator control c1dbNavigator1.BackColor = Color.LightGray; |
|
DbNavigator comprises of below mentioned items:
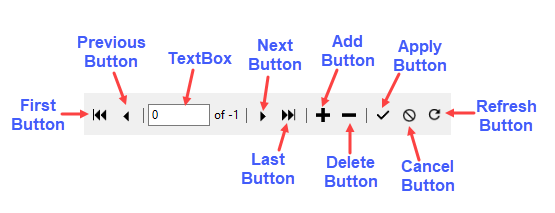
First button: This button moves to the first row in the record.
Previous button: This button moves to the previous row in the record.
TextBox: This is the area where the current row number of the record gets displayed.
Next button: This button moves to the next row in the record.
Last button: This button moves to the last row in the record.
Add button: This button adds a new row to the record.
Delete button: This button deletes a row in the record.
Apply button: This button applies the changes made in the record.
Cancel button: This button cancels the changes.
Refresh button: This button refreshes the record.
The DbNavigator control supports a smart tag icon at design time. Clicking the smart tag icon, opens the smart tag panel.

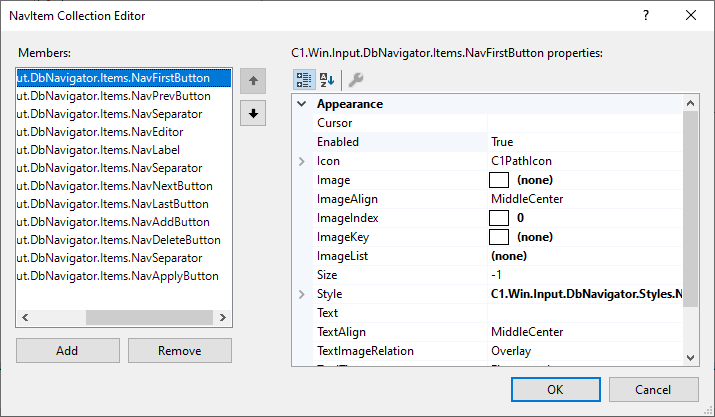
With the C1DBNavigator Tasks panel, you can choose a datasource for the control, and edit items using the NavItemCollection Editor.
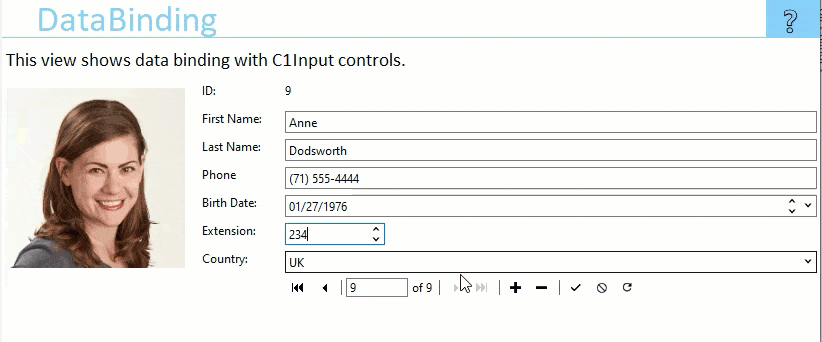
Binding a control with a data source gives you the ability to communicate and even update the underlying data through the control. DbNavigator can be bound to a data source using DataSource property of C1DbNavigator class. Here, a data source containing employee data is bound to DbNavigator control. It becomes very easy to quickly navigate between employee's data, add or delete any data entries and update the data source by using navigation buttons.
| Data Binding in DbNavigator |
Copy Code
|
|---|---|
// Databinding DbNavigator
c1dbNavigator1.DataSource = _data;
|
|
DbNavigator control consists of various items like first button, last button, apply button, label, editor, separator etc. These items can be added, edited or removed from the control by using the respective classes like NavFirstButton for first button, NavSeparator for separator, NavLabel for label etc.
| Add items to DbNavigator |
Copy Code
|
|---|---|
// initialize different items in DbNavigator NavFirstButton navFirstButton1 = new NavFirstButton(); NavPrevButton navPrevButton1 = new NavPrevButton(); NavSeparator navSeparator1 = new NavSeparator(); NavEditor navEditor1 = new NavEditor(); NavLabel navLabel1 = new NavLabel(); NavSeparator navSeparator2 = new NavSeparator(); NavNextButton navNextButton1 = new NavNextButton(); NavLastButton navLastButton1 = new NavLastButton(); NavSeparator navSeparator3 = new NavSeparator(); NavAddButton navAddButton1 = new NavAddButton(); NavDeleteButton navDeleteButton1 = new NavDeleteButton(); NavSeparator navSeparator4 = new NavSeparator(); NavApplyButton navApplyButton1 = new NavApplyButton(); NavCancelButton navCancelButton1 = new NavCancelButton(); NavRefreshButton navRefreshButton1 = new NavRefreshButton(); // add different items to DbNavigator control using Items property and Add method c1dbNavigator1.Items.Add(navFirstButton1); c1dbNavigator1.Items.Add(navPrevButton1); c1dbNavigator1.Items.Add(navSeparator1); c1dbNavigator1.Items.Add(navEditor1); c1dbNavigator1.Items.Add(navLabel1); c1dbNavigator1.Items.Add(navSeparator2); c1dbNavigator1.Items.Add(navNextButton1); c1dbNavigator1.Items.Add(navLastButton1); c1dbNavigator1.Items.Add(navSeparator3); c1dbNavigator1.Items.Add(navAddButton1); c1dbNavigator1.Items.Add(navDeleteButton1); c1dbNavigator1.Items.Add(navSeparator4); c1dbNavigator1.Items.Add(navApplyButton1); c1dbNavigator1.Items.Add(navCancelButton1); c1dbNavigator1.Items.Add(navRefreshButton1); |
|
You can also use the collection editor of DbNavigator control to add, remove or edit items in the collection at design-time. You can view the collection editor by clicking the Edit Items Button in the DbNavigator smart tag panel, or by selecting the ellipsis next to Items property in the Properties window.
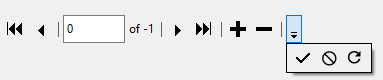
If the items in the DbNavigator exceed the control's size, a 'More Items' dropdown button appears which shows the remaining items, when clicked.
DbNavigator allows you to conveniently navigate through the data source by using the buttons to move to next, previous, first or last records. You can also add or delete data entries, apply the changes and refresh the data source.
You can set the orientation of DbNavigator to vertical or horizontal by using the Orientation property. The below image shows the vertical orientation of the control.

| Set Orientation |
Copy Code
|
|---|---|
c1dbNavigator1.Orientation = System.Windows.Forms.Orientation.Vertical;
c1dbNavigator1.Size = new System.Drawing.Size(37, 382);
|
|
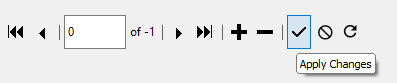
DbNavigator provides the flexibility to add custom tooltips in the navigator buttons by using ToolTip property. The below image adds custom tooltip for 'Apply' button as 'Apply Changes'.
| Set Tooltip |
Copy Code
|
|---|---|
navApplyButton1.ToolTip = "Apply Changes";
|
|
You can choose to show or hide any button in the DbNavigator by using Visible property. The below image shows the DbNavigator control when the Visible property of Delete button is set to False.

| Set Visibility |
Copy Code
|
|---|---|
navDeleteButton1.Visible = false;
|
|