This quick start will guide you through the steps of creating a simple travel registration form using the Input controls. Follow the steps below to get started.
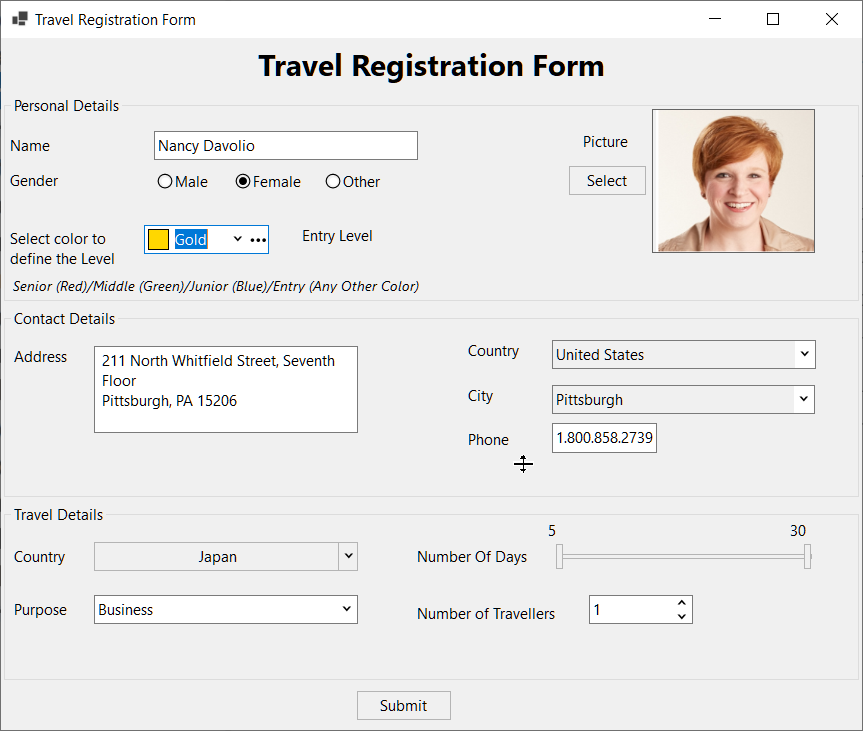
In this step, we are adding and configuring various Input controls to make you familiar with each one of them.
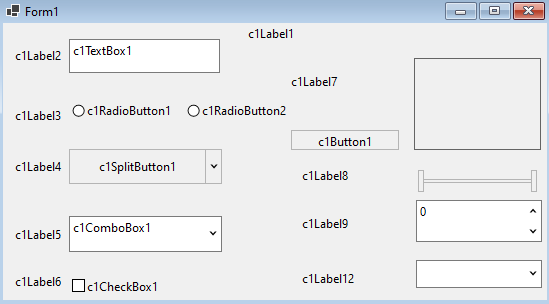
| Control | Name property | Text property |
|---|---|---|
| c1Label1 | lblTitle | Travel Registration Form |
| c1Label2 | lblName | Name |
| c1TextBox1 | txtName | |
| c1Label3 | lblGender | Gender |
| c1RadioButton1 | radioBtnMale | Male |
| c1RadioButton2 | radioBtnFemale | Female |
| c1Label4 | lblTravelTo | Country |
| c1SplitButton1 | splitBtnCountry | |
| c1Label5 |
lblPurpose |
Purpose |
| c1ComboBox1 | cmbPurpose | |
| c1Label6 | lblVisa | Visa Status |
| c1CheckBox1 | chkVisa | Stamped |
| c1Label7 | lblPic | Photo |
| c1Button1 |
btnSelectPic |
Browse |
| c1PictureBox1 | picBoxMain | |
| c1Label8 | lblNumofDays | Duration (in days) |
| c1RangeSlider1 |
rgSliderDays |
|
| c1Label9 | lblTravellers | Number of Travelers |
| c1NumericEdit1 | numEditTravellers | |
| c1Label10 | lblMin | rgSliderDays.Minimum.ToString(); |
| c1Label11 | lblMax | rgSliderDays.Maximum.ToString(); |
| c1Label12 | lblProf | Profession |
| c1DropDownControl1 | dropdownControl | dataGridView.CurrentCell.Value.ToString(); |
| DataGridView | dataGridView | |
| c1ColorPicker1 | colorPicker | |
| c1MaskedTextBox1 | MaskedTextBox |
| C# |
Copy Code
|
|---|---|
//configure range slider control rgSliderDays.LowerValue = 5D; rgSliderDays.Maximum = 30D; rgSliderDays.Minimum = 5D; rgSliderDays.LargeChange = 2D; rgSliderDays.ScrollBehavior = C1.Win.Input.RangeSliderScrollBehavior.ThumbStep; rgSliderDays.SmallChange = 1D; rgSliderDays.UpperValue = 30D; //assign value to rangslider's min and max label lblMin.Text = rgSliderDays.Minimum.ToString(); lblMax.Text = rgSliderDays.Maximum.ToString(); |
|
| C# |
Copy Code
|
|---|---|
//add items to purpose combobox cmbPurpose.ItemsDataSource = resource.GetString("Purposes").Split(","); cmbPurpose.PostValidation.AllowDbNull = false; |
|
| C# |
Copy Code
|
|---|---|
//Get the data to bind to country combobox Countries = Country.GetCountries(); imgList = new ImageList(); //create imagelist for (int i = 0; i < Countries.Count; i++) { Country c = Countries[i]; Image img = (Image)resource.GetObject(c.ISO2Name); if (img is null) continue; imgList.Images.Add(c.Name, img); } string[] offices = Resources.Offices.Split(','); foreach (string item in offices) { SplitButtonItem sbtn = new SplitButtonItem(); sbtn.Text = item; sbtn.Click += Sbtn_Click; splitBtnCountry.Items.Add(sbtn); splitBtnCountry.TextAlign = ContentAlignment.MiddleLeft; } |
|
| C# |
Copy Code
|
|---|---|
private void btnSelectPic_Click(object sender, EventArgs e) { OpenFileDialog fileDialog = new OpenFileDialog(); fileDialog.Filter = "Image files (*.jpg, *.jpeg, *.jpe, *.jfif, *.png) | *.jpg; *.jpeg; *.jpe; *.jfif; *.png"; if (fileDialog.ShowDialog() == DialogResult.OK) { picBoxMain.Image = Image.FromFile(fileDialog.FileName); } } |
|
| C# |
Copy Code
|
|---|---|
dataGridView.ColumnHeadersVisible = false; dataGridView.RowHeadersVisible = false; dataGridView.DataSource = _profession; |
|
| C# |
Copy Code
|
|---|---|
dropdownControl.Control = dataGridView;
dropdownControl.DroppedDown = false;
|
|
| C# |
Copy Code
|
|---|---|
private void dataGridView_SelectionChanged(object sender, EventArgs e) { dropdownControl.Text = dataGridView.CurrentCell.Value.ToString(); } |
|