InputPanel for WinForms | ComponentOne
In This Topic
    Quick Start
    In This Topic

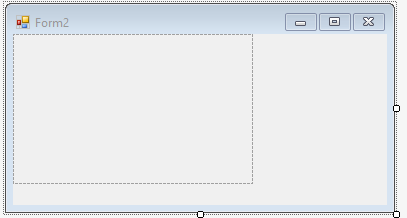
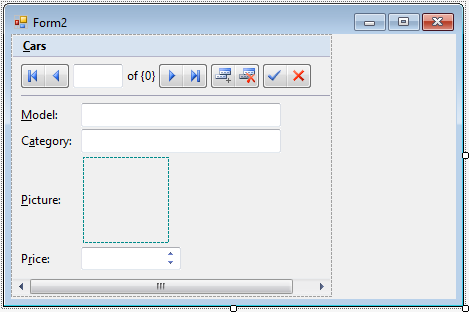
    This quick start guides you through the steps of creating a simple form to display the car details using the InputPanel control.

    A simple form to display the car details using InputPanel

    Follow the steps below to get started:

    Set up the application

    1. Create a new Windows Forms app.
    2. Drag and drop the InputPanel control from the toolbox onto the form.
      Observe: A blank InputPanel control gets added to the form.

    Design-time view of form with empty InputPanel control.

    Bind the control to a data source

    1. In the design view, select the C1InputPanel control and click smart tag to open the C1InputPanel Tasks menu.
    2. Click the Choose Data Source drop down button and select Add Project Data Source... option to open the Data Source Configuration Wizard.
    3. On Choose a Data Source Type page, select Database and click Next.
    4. On Choose a Database Model page, select Dataset and click Next.
    5. On Choose Your Data Connection page, click New Connection to open the Add Connection dialog.
    6. Against the DataSource field, click Change... button to open the Change Data Source dialog.
    7. Select Microsoft Access Database File and click OK to return to the Add Connection dialog.
    8. Against the Database file name field, click Browse and navigate to the database file. Provide the User name and Password, if required to connect to the database file. This example uses C1NWind.mdb file located at the following location by default:
      \Documents\ComponentOne Samples\Common
    9. Click Test Connection to make sure that you have successfully connected to the database or server and click OK.
    10. Click OK again to close the Add Connection dialog box.
    11. Click Next to continue. A dialog box will appear asking if you would like to add the data file to your project and modify the connection string. Choose the appropriate option as per your requirement.
    12. Save the connection string in the application configuration file by checking the Yes, save the connection as box and entering a name.
    13. Click Next to switch to the Choose Your Database Objects page.
    14. Choose a table, say Cars from the Tables node and click Finish. In this example, we have selected just few fields, Model, Category, Picture and Price.
    15. The above steps add a dataset and connection string to your project. Also, Visual Studio automatically creates the following code to fill the dataset:
      C#
      Copy Code
      // TODO: This line of code loads data into the c1NWindDataSet1.Cars table. You can move, or remove it, as needed.
      this.carsTableAdapter.Fill(this.c1NWindDataSet1.Cars);
      
      VB
      Copy Code
      ' TODO: This line of code loads data into the c1NWindDataSet1.Cars table. You can move, or remove it, as needed.
      Me.carsTableAdapter.Fill(Me.c1NWindDataSet1.Cars)
      

    Quick Start Step 2

    Configure the InputPanel control

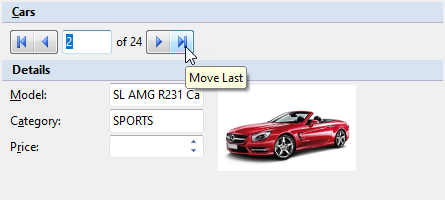
    Once the control is bound to a data source, you can also add your own components either to add more fields or to change the layout of the form. For instance, here, we are changing the layout to categorize the data by adding and moving input components.

    1. Select the InputPanel control and click smart tag to open the C1InputPanel Tasks menu.
    2. Click the Edit Items option to open the C1InputPanel Item Collection Editor.
    3. Under the Select item... combo box, select the InputGroupHeader (default).
    4. Click the Add button to add a group header.The group header is added to the end of the already added list of components.
    5. Select inputGroupHeader1 and set its Text property to "Details".
    6. Select the header and move it up to place it after the component navCars by using the Move Up arrow.
      Observe: In design view, input navigator component displays under Cars group and other fields get displayed under Details group.
      Note: You can also drag and drop controls in design view to place them at the desired position. 
    7. Select the navCars component and go to NavigatorItems property dropdown. Select or de-select the buttons as required. In this example, we have checked off the AddNew, Delete, Apply and Cancel buttons.  
    8. Select the sepLine and lblPicture component and press the Remove button.
    9. Select the imgPicture and move it to the end using the MoveDown arrow.
    10. Select all the components under Details group except imgPicture to set their Width property to "95".
    11. Select the numPrice component and set its Break property to Column to shift the imgPicture to next column.
    12. Set the Height and Width property of the imgPicture component.
    13. Click OK to close the C1InputPanel Item Collection Editor.
    14. Press F5 key to build and run your application.
      Observe: An InputPanel form displaying the car details with image in a presentable layout.

    To create a simple WinForms application in .NET using the InputPanel control, complete the following steps:

    Set Up the Application

    1. Create a new Windows Forms .NET Core application.
    2. In the Solution Explorer, right click Dependencies and choose Manage NuGet Packages and add .NET packages of C1.Win.InputPanel.
    3. Initialize the InputPanel control and its components.
      C#
      Copy Code
      // Create an instance of InputPanel control
      c1InputPanel1 = new C1.Win.InputPanel.C1InputPanel();
                  
      // Create an instance of Binding Source
      carsBindingSource = new System.Windows.Forms.BindingSource(this.components);
                  
      // Create instances of each component to be placed on InputPanel 
      hdrCars = new C1.Win.InputPanel.InputGroupHeader();
      hdrDetails = new C1.Win.InputPanel.InputGroupHeader();
      navCars = new C1.Win.InputPanel.InputDataNavigator();
      lblBrand = new C1.Win.InputPanel.InputLabel();
      txtBrand = new C1.Win.InputPanel.InputTextBox();
      lblModel = new C1.Win.InputPanel.InputLabel();
      txtModel = new C1.Win.InputPanel.InputTextBox();
      lblCategory = new C1.Win.InputPanel.InputLabel();
      txtCategory = new C1.Win.InputPanel.InputTextBox();
      imgPicture = new C1.Win.InputPanel.InputImage();
      lblPrice = new C1.Win.InputPanel.InputLabel();
      numPrice = new C1.Win.InputPanel.InputTextBox();
      
    4. Add the InputPanel control to the form and the components to the InputPanel control.
      C#
      Copy Code
      // Add InputPanel control to the form.
      Controls.Add(c1InputPanel1);
      
      // Add components to the InputPanel control
      c1InputPanel1.Items.Add(hdrCars);
      c1InputPanel1.Items.Add(navCars);
      c1InputPanel1.Items.Add(hdrDetails);
      c1InputPanel1.Items.Add(lblCategory);
      c1InputPanel1.Items.Add(txtCategory);
      c1InputPanel1.Items.Add(lblModel);
      c1InputPanel1.Items.Add(txtModel);
      c1InputPanel1.Items.Add(lblPrice);
      c1InputPanel1.Items.Add(numPrice);
      c1InputPanel1.Items.Add(imgPicture);
      System.ComponentModel.ComponentResourceManager resources = new System.ComponentModel.ComponentResourceManager(typeof(Form1));
      

    Bind to the Data Source

    1. Create a dataset to bind the InputPanel control.
      C#
      Copy Code
      private void InitData() {
          dataSet = new DataSet();
          string conn = "Select * from Cars";
          OleDbDataAdapter da = new OleDbDataAdapter(conn, GetConnectionString());
          da.Fill(dataSet, "Cars");
          carsBindingSource.DataMember = "Cars";
          carsBindingSource.DataSource = dataSet;
      }
      private string GetConnectionString() {
          string path = Environment.GetFolderPath(Environment.SpecialFolder.Personal) + @"\ComponentOne Samples\Common";
          string conn = "provider = microsoft.jet.oledb.4.0; data source = " + path + @"\C1Nwind.mdb";
          return conn;
      }
      
    2. Set the DataSource property to bind InputPanel control to the dataset.
    3. Set the DataBinding property of components added to InputPanel control to bind them to the data source.
      C#
      Copy Code
      // Bind the InputPanel control to the data source
      c1InputPanel1.DataSource = carsBindingSource;
      
      // Bind the InputNavigator component to the data source
      navCars.DataSource = carsBindingSource;
      
      // Bind components of InputPanel to fields in the data source
      txtBrand.DataBindings.Add(new System.Windows.Forms.Binding("BoundValue", carsBindingSource, "Brand", true));
      txtModel.DataBindings.Add(new System.Windows.Forms.Binding("BoundValue", carsBindingSource, "Model", true));
      txtCategory.DataBindings.Add(new System.Windows.Forms.Binding("BoundValue", carsBindingSource, "Category", true));
      numPrice.DataBindings.Add(new System.Windows.Forms.Binding("BoundValue", carsBindingSource, "Price", true));
      imgPicture.DataBindings.Add(new System.Windows.Forms.Binding("BoundValue", carsBindingSource, "Picture", true));
      InitData();
      

    Configure the Control

    1. Configure the InputPanel control to get the required appearance and positioning.
      C#
      Copy Code
      // Configure the InputPanel control
      c1InputPanel1.DesignScaleFactor = 1.282051F;
      c1InputPanel1.Dock = System.Windows.Forms.DockStyle.Fill;
      
    2. Set image and tooltip for buttons of the InputDataNavigator component.
      C#
      Copy Code
      // Configure the InputNavigator component
      navCars.MoveFirstImage = ((System.Drawing.Image)(resources.GetObject("navCars.MoveFirstImage")));
      navCars.MoveFirstToolTip = "Move First";
      navCars.MoveLastImage = ((System.Drawing.Image)(resources.GetObject("navCars.MoveLastImage")));
      navCars.MoveLastToolTip = "Move Last";
      navCars.MoveNextImage = ((System.Drawing.Image)(resources.GetObject("navCars.MoveNextImage")));
      navCars.MoveNextToolTip = "Move Next";
      navCars.MovePreviousImage = ((System.Drawing.Image)(resources.GetObject("navCars.MovePreviousImage")));
      navCars.MovePreviousToolTip = "Move Previous";
      
    3. Set Text property of components placed on the InputPanel control.
      C#
      Copy Code
      // Configure other controls 
      // Set the text to be displayed in components
      hdrCars.Text = "&Cars";
      hdrDetails.Text = "Details";
      lblBrand.Text = "&Brand:";
      lblModel.Text = "&Model:";
      lblCategory.Text = "Cat&egory:";
      lblPrice.Text = "&Price:";
      
    4. Set dimensions of the components to create a uniform layout.
      C#
      Copy Code
      // Set the dimensions of the components
      lblBrand.Width = 95;
      lblModel.Width = 95;
      lblCategory.Width = 95;
      txtCategory.Width = 95;
      imgPicture.Height = 90;
      imgPicture.Width = 150;
      lblPrice.Width = 95;
      
    5. Set the Break property of InputNumber control to Column to place next component in another column.
      C#
      Copy Code
      //Set the break type to shift the next component to a new column
      numPrice.Break = C1.Win.InputPanel.BreakType.Column;
      
    6. Press F5 key to build and run your application.
      Observe: An InputPanel form displaying the car details with its image.
    Note: WinForms .NET Edition does not include rich design-time support yet. We will enhance it in future releases.
    See Also