You can use background pictures to customize static list elements such as caption bars, column headers, and column footers. For example, the following code applies a colored gradient bitmap to the BackgroundImage member of the Style object returned by the list's CaptionStyle property:
To write code in Visual Basic
| Visual Basic |
Copy Code
|
|---|---|
Dim myfont As Font
Me.C1List1.CaptionStyle.BackgroundImage = System.Drawing.Image.FromFile("c:\bubbles.bmp")
Me.C1List1.CaptionStyle.BackgroundPictureDrawMode = C1.Win.C1List.BackgroundPictureDrawModeEnum.Tile
Me.C1List1.CaptionStyle.ForeColor = System.Drawing.Color.White
myfont = New Font(Me.C1List1.CaptionStyle.Font, FontStyle.Bold)
Me.C1List1.CaptionStyle.Font = myfont
|
|
To write code in C#
| C# |
Copy Code
|
|---|---|
Font myfont; this.c1List1.CaptionStyle.BackgroundImage = System.Drawing.Image.FromFile(@"c:\bubbles.bmp"); this.c1List1.CaptionStyle.BackgroundPictureDrawMode = C1.Win.C1List.BackgroundPictureDrawModeEnum.Tile; this.c1List1.CaptionStyle.ForeColor = System.Drawing.Color.White; myfont = new Font(this.c1List1.CaptionStyle.Font, FontStyle.Bold); this.c1List1.CaptionStyle.Font = myfont; |
|
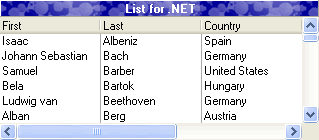
This code also adjusts the color of the caption text and makes it bold, producing the following display:
You can achieve the same effect at design time by editing either the built-in Caption style on the Style Collection Editor, or the members of the C1ListBase.CaptionStyle property in the Properties window.
By default, background pictures are centered within the associated list element. Depending upon the height of the background bitmap, you may need to adjust the value of the BackgroundPictureDrawMode property to ensure that the entire area is filled. This property determines whether the picture is centered, tiled, or stretched to fit the entire area, as shown in the following figure:
| Center | Tile | Stretch |
|---|---|---|
 |
 |
 |
You can also use background pictures within data cells to produce interesting visual effects. For example, the following patterns were designed to be replicated in adjacent rows.
By eliminating the dividing lines between data rows and the column header dividers, these patterns can be used to produce the following display.

The trick is to insert an empty unbound column on the left to display the binder rings. Add a column using the C1List Designer (see Using the C1List Designer). The following code demonstrates how to display the list:
To write code in Visual Basic
| Visual Basic |
Copy Code
|
|---|---|
' Give the list a flat appearance and remove row dividers, and scroll bars. Assume that the ScaleMode of the containing form is in pixels.
Me.C1List1.Splits(0).HeadingStyle.ForeColor = System.Drawing.Color.White
Me.C1List1.RowDivider.Style = C1.Win.C1List.LineStyleEnum.None
Me.C1List1.HeadingStyle.Borders.BorderType = C1.Win.C1List.BorderTypeEnum.None
Me.C1List1.ItemHeight = 16
Me.C1List1.HScrollBar.Style = C1.Win.C1List.ScrollBarStyleEnum.Always
Me.C1List1.VScrollBar.Style = C1.Win.C1List.ScrollBarStyleEnum.Always

' Set the background pattern to be used by data cells in the default split (so as not to disturb the Normal style).
Me.C1List1.Splits(0).Style.BackgroundImage = System.Drawing.Image.FromFile("binderpaper.bmp")
Me.C1List1.Splits(0).Style.BackgroundPictureDrawMode = C1.Win.C1List.BackgroundPictureDrawModeEnum.Tile

' Create an empty unbound column on the left to hold the binder rings. Remove its dividing lines and set the BackroundBitmap property of its Style object.
Dim C As C1.Win.C1List.C1DisplayColumn
C = C1List1.Splits(0).DisplayColumns(0)

C.Width = 48
C.Visible = True
C.Style.BackgroundImage = System.Drawing.Image.FromFile("binderrings.bmp")
C.HeaderDivider = False
C.ColumnDivider.Style = C1.Win.C1List.LineStyleEnum.None

' Scroll the unbound column into view.
Me.C1List1.Col = 0

' Use a small corner of the binder ring bitmap as the background of the column headers, and adjust the font and text color accordingly.
Dim myfont As Font
Dim S As New C1.Win.C1List.Style()

Me.C1List1.HeadingStyle.BackgroundImage = System.Drawing.Image.FromFile("bindercorner.bmp")
Me.C1List1.HeadingStyle.BackgroundPictureDrawMode = C1.Win.C1List.BackgroundPictureDrawModeEnum.Tile
myfont = New Font(S.Font, FontStyle.Bold)
Me.C1List1.HeadingStyle.Font = myfont
Me.C1List1.HeadingStyle.ForeColor = System.Drawing.Color.White
|
|
To write code in C#
| C# |
Copy Code
|
|---|---|
// Give the list a flat appearance and remove row dividers, and scroll bars. Assume that the ScaleMode of the containing form is in pixels.
this.c1List1.Splits[0].HeadingStyle.ForeColor = System.Drawing.Color.White;
this.c1List1.RowDivider.Style = C1.Win.C1List.LineStyleEnum.None;
this.c1List1.HeadingStyle.Borders.BorderType = C1.Win.C1List.BorderTypeEnum.None;
this.c1List1.ItemHeight = 16;
this.c1List1.HScrollBar.Style = C1.Win.C1List.ScrollBarStyleEnum.Always;
this.c1List1.VScrollBar.Style = C1.Win.C1List.ScrollBarStyleEnum.Always;

// Set the background pattern to be used by data cells in the default split (so as not to disturb the Normal style).
this.c1List1.Splits[0].Style.BackgroundImage = System.Drawing.Image.FromFile("binderpaper.bmp");
this.c1List1.Splits[0].Style.BackgroundPictureDrawMode = C1.Win.C1List.BackgroundPictureDrawModeEnum.Tile;

// Create an empty unbound column on the left to hold the binder rings. Remove its dividing lines and set the BackroundBitmap property of its Style object.
C1.Win.C1List.C1DisplayColumn C;
C = this.c1List1.Splits[0].DisplayColumns[0];

C.Width = 48;
C.Visible = true;
C.Style.BackgroundImage = System.Drawing.Image.FromFile("binderrings.bmp");
C.HeaderDivider = false;
C.ColumnDivider.Style = C1.Win.C1List.LineStyleEnum.None;

// Scroll the unbound column into view.

this.c1List1.Col = 0;

// Use a small corner of the binder ring bitmap as the background of the column headers, and adjust the font and text color accordingly.
Font myfont;
C1.Win.C1List.Style S = new C1.Win.C1List.Style();

this.c1List1.HeadingStyle.BackgroundImage = System.Drawing.Image.FromFile("bindercorner.bmp");
this.c1List1.HeadingStyle.BackgroundPictureDrawMode = C1.Win.C1List.BackgroundPictureDrawModeEnum.Tile;
myfont = new Font(S.Font, FontStyle.Bold);
this.c1List1.HeadingStyle.Font = myfont;
this.c1List1.HeadingStyle.ForeColor = System.Drawing.Color.White;
|
|