RadialMenu Tutorial Step 3 of 3: Adding the Remaining RadialMenuItems
In This Topic
In this step, you will add submenu items to the existing Products menu.
- In the C1RadialMenu properties window click on the ellipsis button next to the Items property. The RadialMenuBaseItem Collection Editor appears.
- Select radialMenuItem3 from the Members list and set its Image property to bullet_ball_glass_red, Text property to ON, Checked property to True, Name property to rmiCheck, and UserData property to Check.
- Select radialMenuItem4 from the Members list and set its Image property to Help, Text property to Help, ToolTip property to Get help, and Name property to rmiHelp.
- Click on ellipsis button next to the Items property. The RadialMenuBaseItem Collection Editor appears.
- Click on the Add dropdown button and select RadialMenuItem. Repeat this so there are 4 RadialMenuItems.
- Select radialMenuItem2 from the Members list and set its Text property to Documents and Name property to rmiDocs.
- Select radialMenuItem3 from the Members list and set its Text property to Samples and Name to rmiSamples.
- Select radialMenuItem4 from the Members list and set its Text property to Demo and its Name property to rmiDemos.
- Select radialMenuItem5 from the Members list and set its Text property to Demos and its Name property to rmiDemos.
- Select radialMenuItem6 from the Members list and set its Text property to Videos and Name property to rmiVideos.
- Click OK to save and close the RadialMenuItemBase Collection Editor.
- In the RadialMenuItemBase Collection Editor select radialMenuItem5 from the Members list and set its Image property to shoppingcart_full1, Text property to Shop, ToolTip property Shop C1, Enabled property to False, and Name property to rmiStore.
- Select radialMenuItem6 from the Members list and set its Image property to bullet_ball_glass_grey, Text property to Disabled, ToolTip property to Disabled Item, and Enabled property to False.
- Click OK to save and close the RadialMenuItemBase Collection Editor.
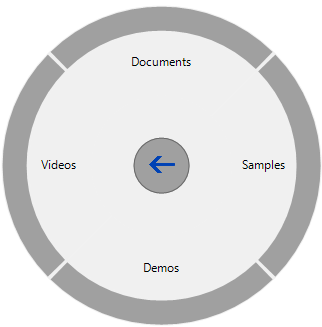
- Run your project and observe the following:

The disabled menus appear with a grey border. The checked menu, ON, appears with a thin blue border around the inner edge of grey border. Clicking the Help button opens a new Radial menu with submenu items for the Help menu.
See Also