In this topic, you will learn how to customize the title area of a C1OutBar control’s pages. You will create a C1OutBar with three C1OutPages, set a few properties, and then add code to the project that will paint custom colors to each title.
Complete the following steps:
To write code in Visual Basic
| Visual Basic |
Copy Code
|
|---|---|
Imports C1.Win.C1Command |
|
To write code in C#
| C# |
Copy Code
|
|---|---|
using C1.Win.C1Command; |
|
To write code in Visual Basic
| Visual Basic |
Copy Code
|
|---|---|
'e.page parameter determines the page
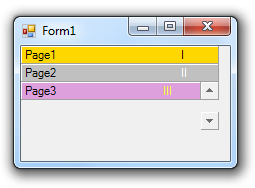
If e.Page Is c1OutPage1 Then
e.Graphics.FillRectangle(Brushes.Gold, e.Bounds)
e.Graphics.DrawString("I", c1OutBar1.Font, Brushes.Black, New PointF(e.Bounds.Right - 40, e.Bounds.Top + 2))
ElseIf e.Page Is c1OutPage2 Then
e.Graphics.FillRectangle(Brushes.Silver, e.Bounds)
e.Graphics.DrawString("II", c1OutBar1.Font, Brushes.White, New PointF(e.Bounds.Right - 40, e.Bounds.Top + 2))
ElseIf e.Page Is c1OutPage3 Then
e.Graphics.FillRectangle(Brushes.Plum, e.Bounds)
e.Graphics.DrawString("III", c1OutBar1.Font, Brushes.Yellow, New PointF(e.Bounds.Right - 40, e.Bounds.Top + 2))
End If
|
|
To write code in C#
| C# |
Copy Code
|
|---|---|
\\e.page determines the page
If (e.Page == c1OutPage1)
{
    e.Graphics.FillRectangle(Brushes.Gold, e.Bounds);
    e.Graphics.DrawString("I", c1OutBar1.Font, Brushes.Black, new PointF(e.Bounds.Right - 40, e.Bounds.Top + 2));
}
else if (e.Page == c1OutPage2)
{
    e.Graphics.FillRectangle(Brushes.Silver, e.Bounds);
    e.Graphics.DrawString("II", c1OutBar1.Font, Brushes.White, new PointF(e.Bounds.Right -40, e.Bounds.Top + 2));
}
else if (e.Page == c1OutPage3)
{
    e.Graphics.FillRectangle(Brushes.Plum, e.Bounds);
    e.Graphics.DrawString("III", c1OutBar1.Font, Brushes.Yellow, new PointF(e.Bounds.Right - 40, e.Bounds.Top + 2));
}
|
|